How to Draw an Easy AND Realistic Car | Step-by-Step Tutorial

In this tutorial, I'm going to explain and show you in detail how to draw a car that is simple and realistic so you can hopefully draw realistic cars yourself.
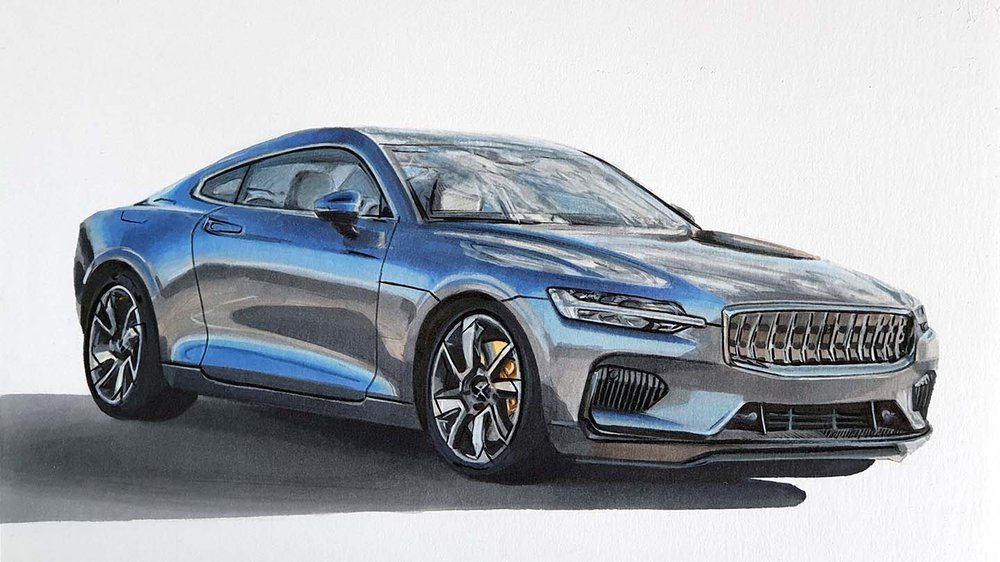
The car we're going to draw in this tutorial is this beautiful Polestar 1 I saw a while back.
So if you'd like to know how to draw cars, follow along with me!
Disclaimer: In the name of full transparency, please be aware that this blog post
contains affiliate links and any purchases made through such links will result in a
small commission for me (at no extra cost for you).
The Tools I Used in this Tutorial
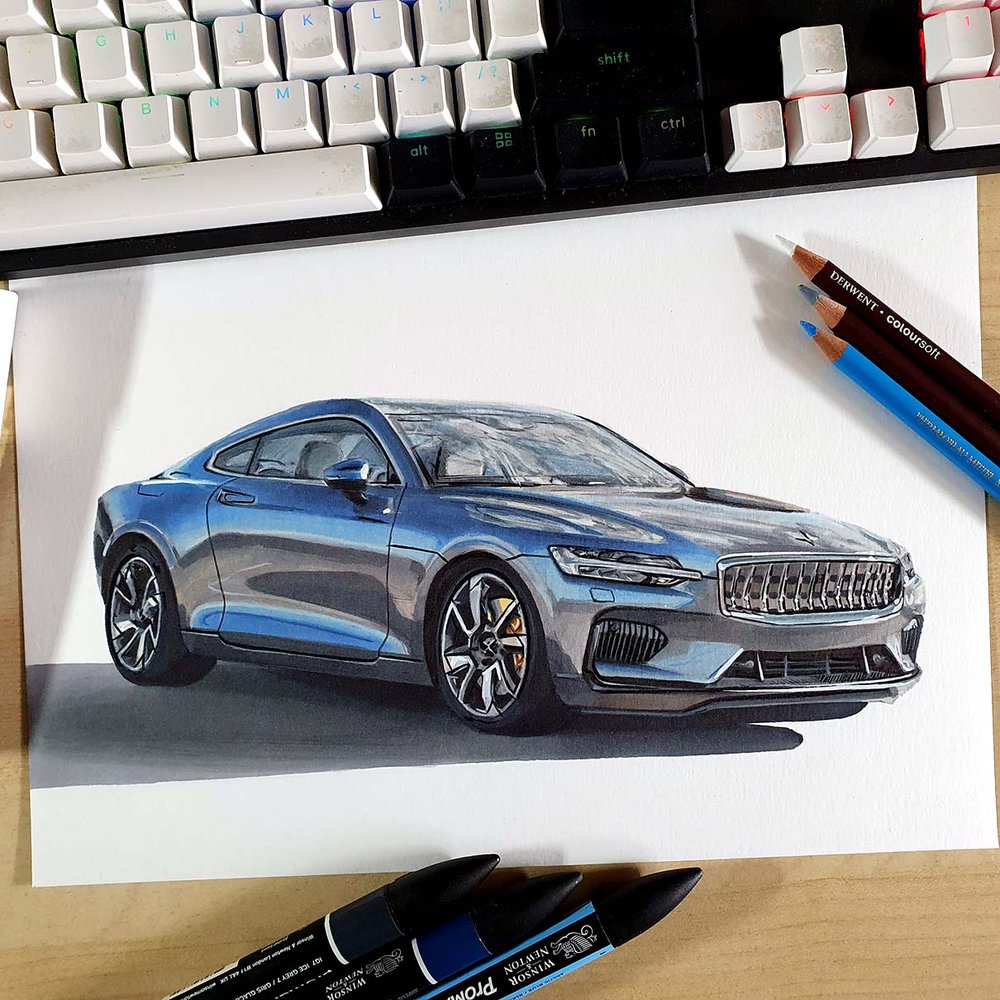
To make this drawing, I used the following art supplies:
A regular graphite pencil, a kneaded eraser, and a normal eraser;
Canson Illustration Manga paper (which is by far the best paper for alcohol markers);
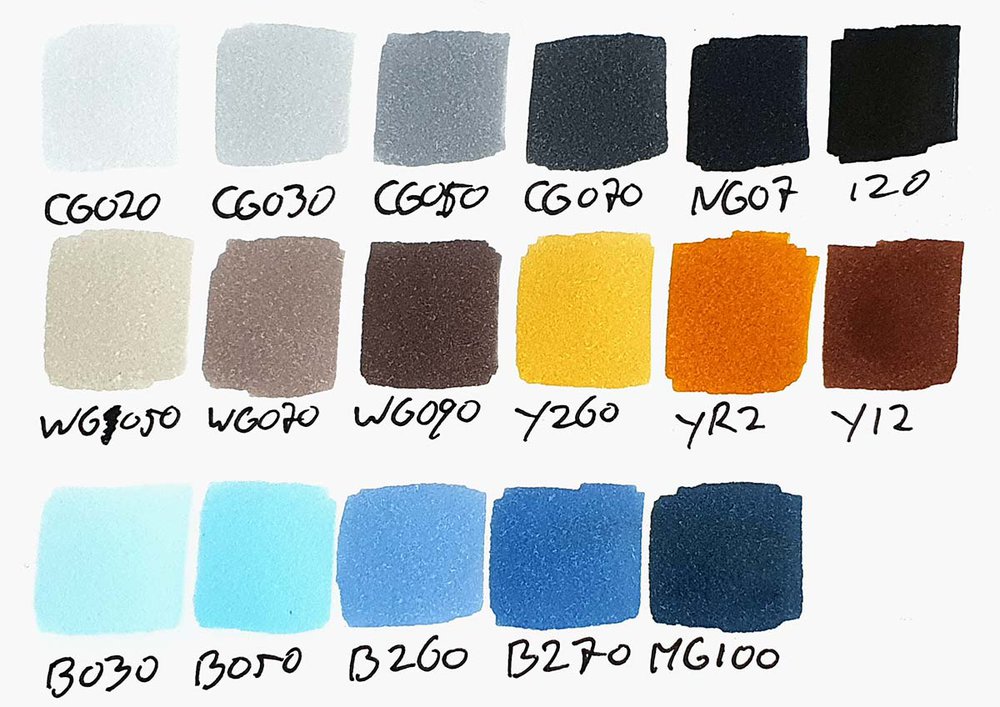
Ohuhu Honolulu markers in the colors Neutral Grey 02 (CG020), Neutral Grey 03 (CG030), Neutral Grey 05 (CG050), Neutral Grey 07 (CG070), Neutral Grey 7 (NG07), Black (120), Warm Grey 05 (WG050), Warm Grey 07 (WG070), Warm Grey 09 (WG090), Yellow Dahlia (Y260), Marigold (YR2), Mahogany (Y12), Frost Blue (B030), Robin's Egg Blue (B050), Smoky Blue (B260), Vivid Blue (B270), and Blue Grey 09 (MG100);
Derwent Coloursoft colored pencils in the colors White, Dove Grey, and Black;
And a white Posca PC-3M for the finishing touches.
The Reference Photo I Used for this Tutorial
For this tutorial, I used a reference photo that I took myself a while back of a Polestar 1 when we went to the beach in Wassenaar, the Netherlands.
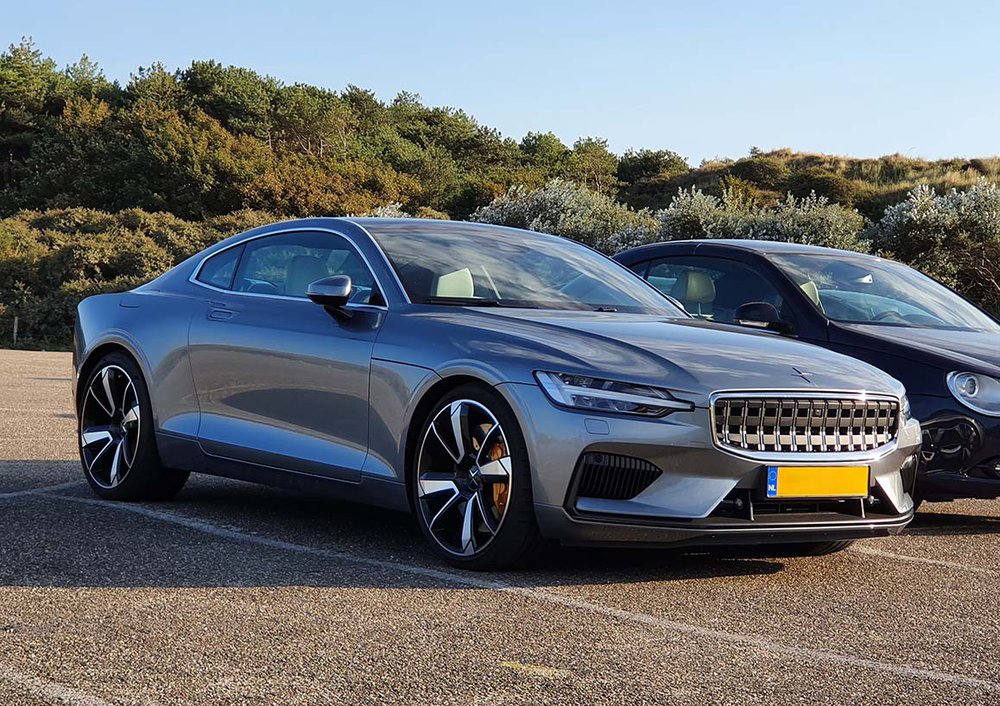
Ever since I made that photo I had the intention to draw it sometime. And what better time to draw it than for this tutorial?!
So that's what I did.
I hope you like the car. If not, you can find more step-by-step tutorials on other cars here.
How Do You Draw A Car?
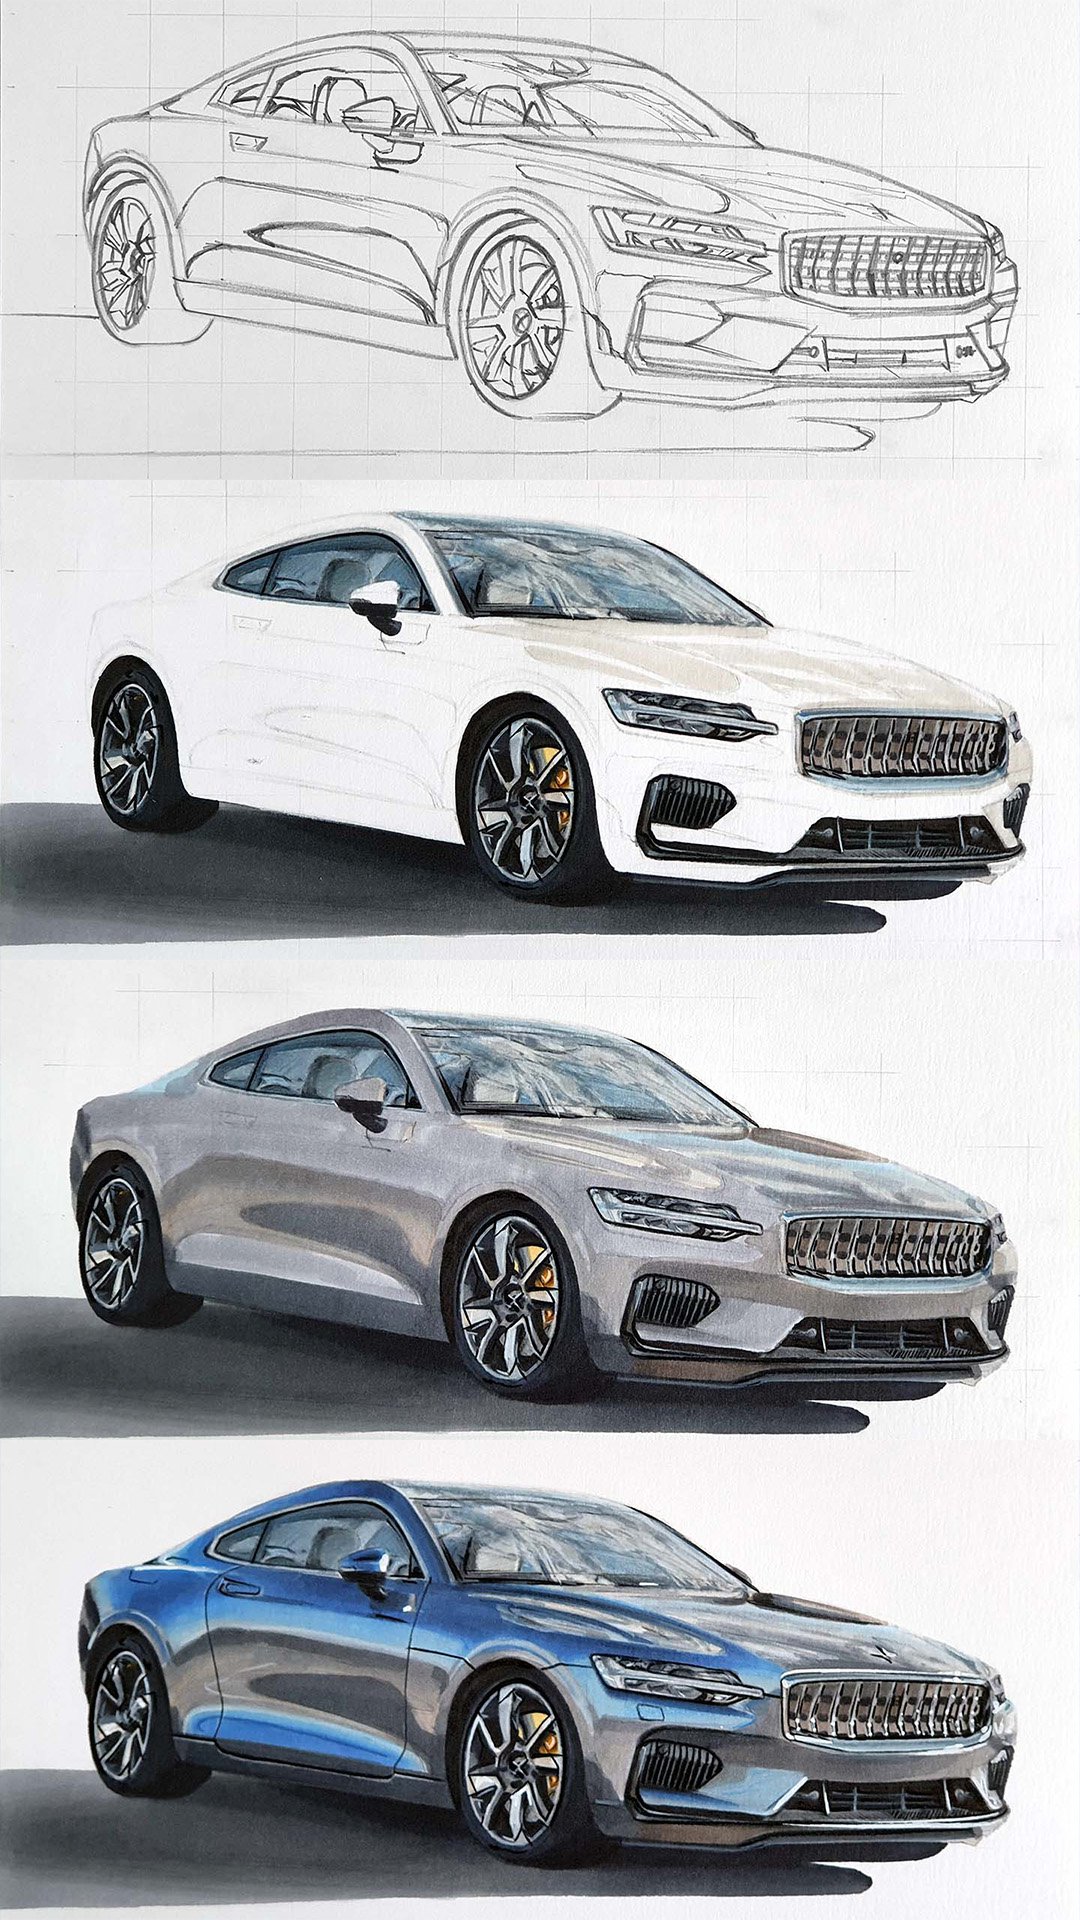
To draw a car you start by sketching the outline, the wheel, the interior, the grill, etc. For this, you can use techniques like the grid method to make it a lot easier. After that, it's time to color the car with alcohol markers and add details with colored pencils. Finally, it's time to add some bright white highlights with a Posca Marker.
1. Sketch the Outline of the Car
The first step to drawing a car is sketching the outline.
It can be very tricky to get the proportions right. That's why I'm using the grid technique to make the car easier to sketch. You can find out more about this technique here.
You can use any technique you want, like these methods, or you can freehand the sketch. But I personally really enjoy using the grid method.
I first added a grid on top of the reference photo in Photoshop. I wanted the squares to be 2 by 2 cm and my paper is 21 by ~30 cm, resulting in 15 by 10.5 squares.
You can also use my grid overlay tool to add a grid overlay on your reference photo.
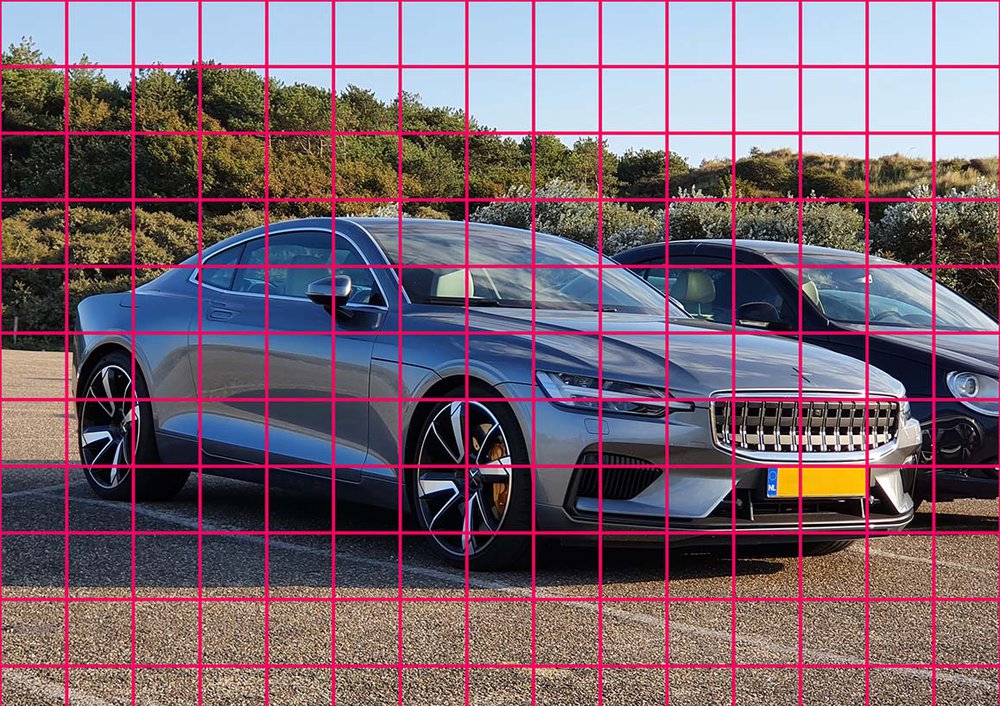
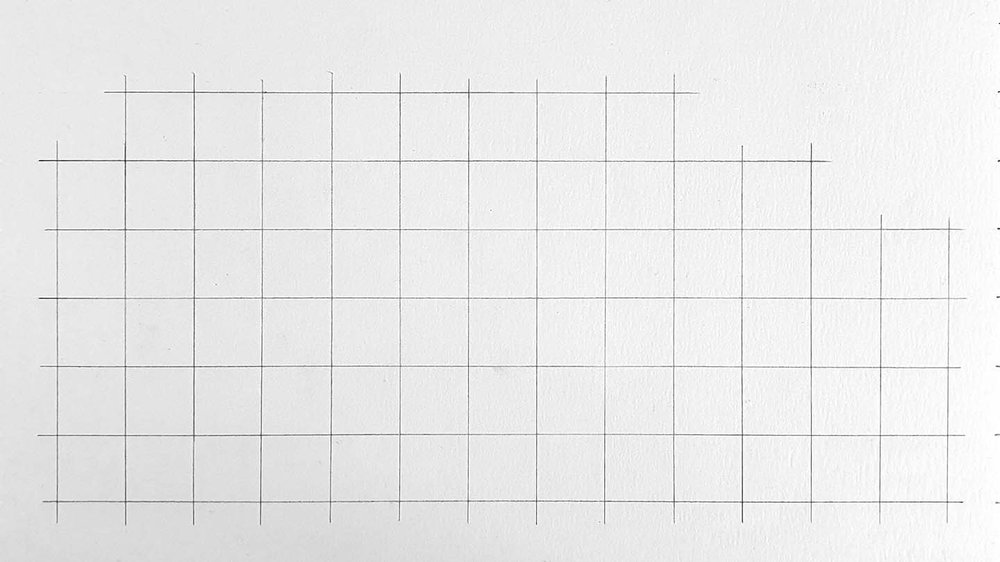
After that, I recreated that grid on my paper, though I only sketched in the necessary squares.
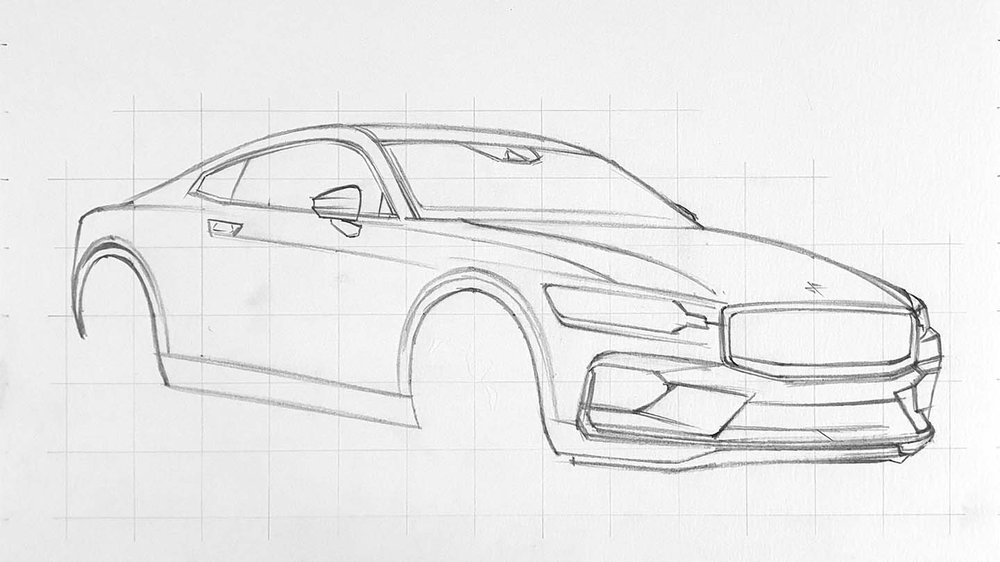
Now it's time to start the sketch.
I sketched the main body of the car without the wheels, shadow, grill details, headlights details, interior, and reflections.
Just take your time. It's essential for the final outcome that you make your sketch as precise as possible.
2. Sketch the Wheels of the Car
Next up to be sketched are the wheels - the second most vital parts of your sketch.
Wheels are in my opinion one of the most difficult parts to sketch of a car, but they are also one of the most important parts to get right, otherwise your whole drawing will look off.
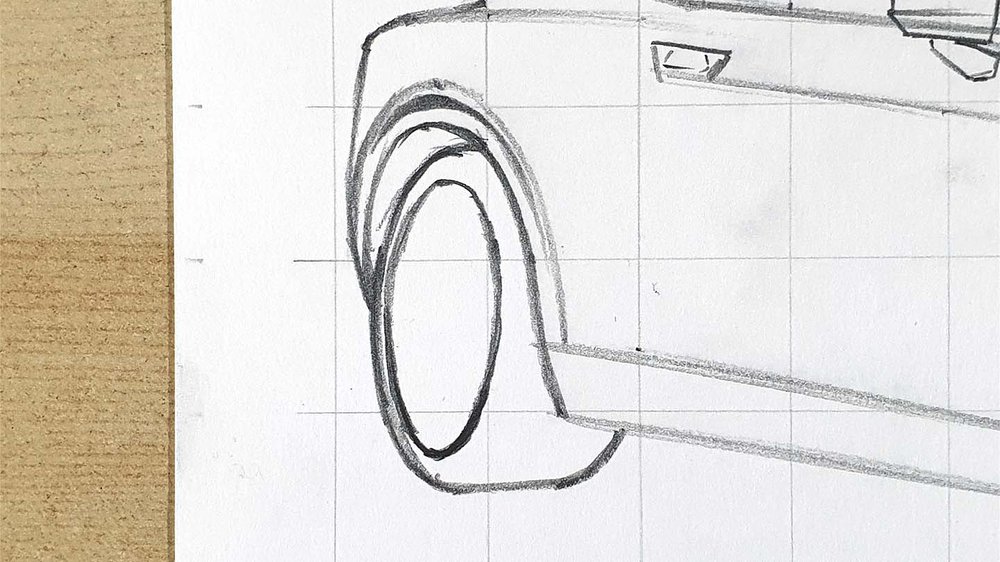
I first sketched the outline of the wheel and when that looked okay I sketched the rim.
Before moving on, make sure that the rim is as perfectly ellipse-shaped as possible. It's really easy to accidentally make them more of an egg shape than an ellipse and it can be quite difficult to tell what's off about it.
But there are some tricks you can use to tell a bit easier what needs to be adjusted. For example, holding your sketch in front of a mirror makes it easier for you to spot inconsistencies, or you can overlay your sketch over the reference photo in Photoshop and see if the shape matches.
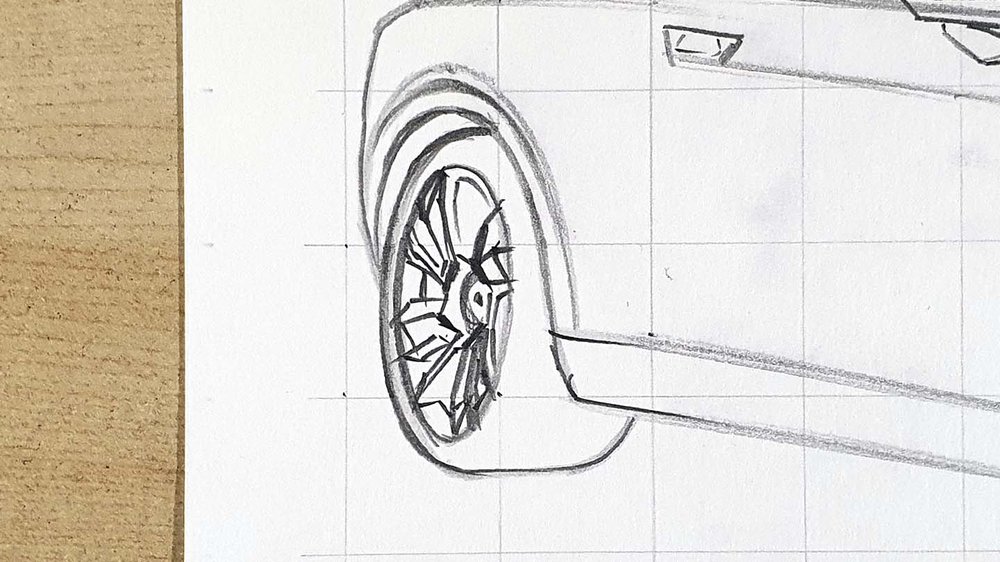
When you've made sure the rim is the right shape it's time to sketch the spokes.
I first marked where the center is which is more toward the left than you might expect as the center where all spokes originate from is a bit inset in the wheel. (Also make sure that it's not too far to the top or the bottom.)
After that I sketched the spokes one by one, making sure they're evenly spaced and in the correct place in the grid.
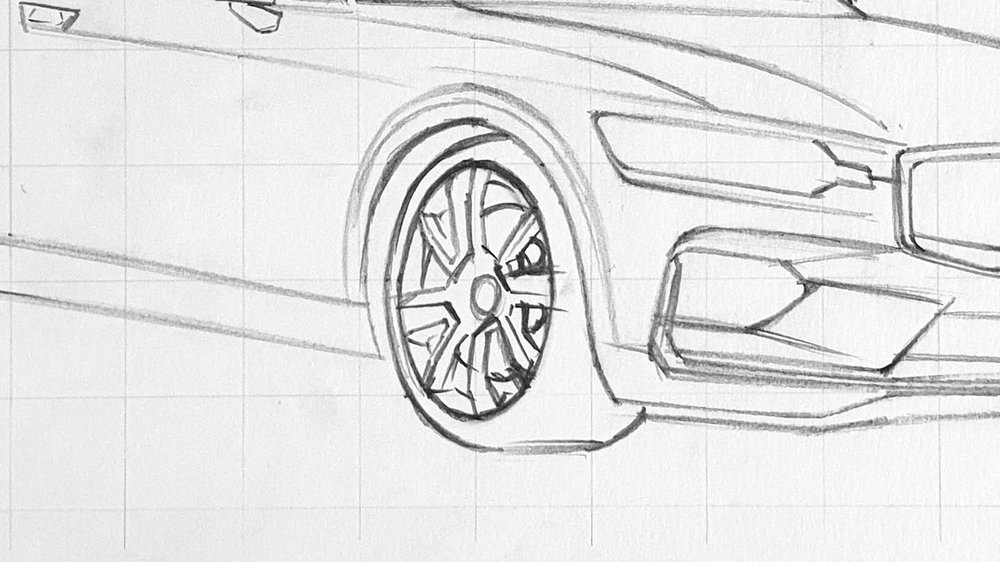
After the rear wheel, I used the same steps to sketch the front wheel and I sketched the brake disc and caliper too.
Check out this article for a more in-depth tutorial on how to draw car wheels.
3. Sketch the Headlights of the Car
The headlights are next on the list to sketch and contrary to the wheels, you can just about get away with anything when sketching the headlights on this car as long as the sideways hammer shape (the sideways elongated T-shape) is correct.
So that's what I did. I started by sketching the left headlight and I made sure the hammer shape looked good. Then I added more details and lines that I saw in the reference photo.
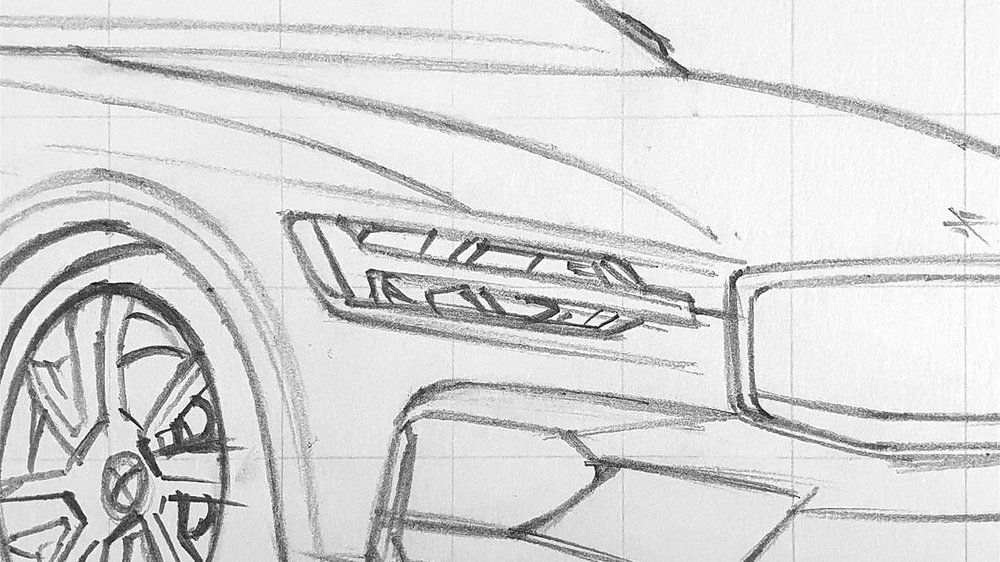
The right headlight is barely visible, so I only added two lines that indicate the start of the hammer shape, and that's it.
Here is a more in-depth guide for drawing car headlights if you'd like to check that out.
4. Sketch the Grill of the Car
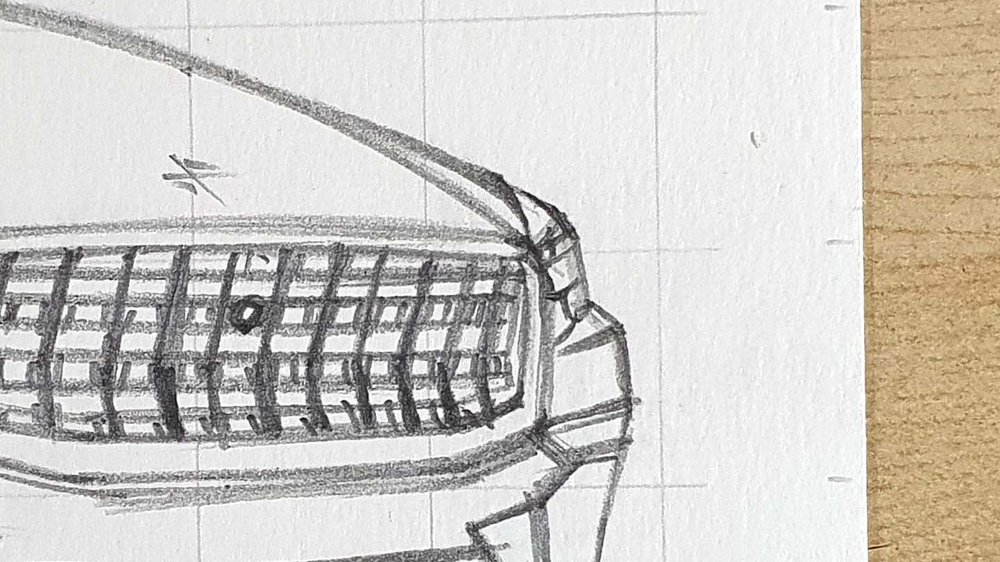
I started sketching the main grill piece first. Sketching it was actually easier than it might look.
I first sketched all the horizontal lines of the grill.
When they were in place, I sketched in the hockey-stick-shaped vertical lines.
After that, I added one line on either side of the hockey stick shape in between the rectangular plates on the grill, except for the middle top one. That's where there's a camera, so I sketched a circle in that spot.
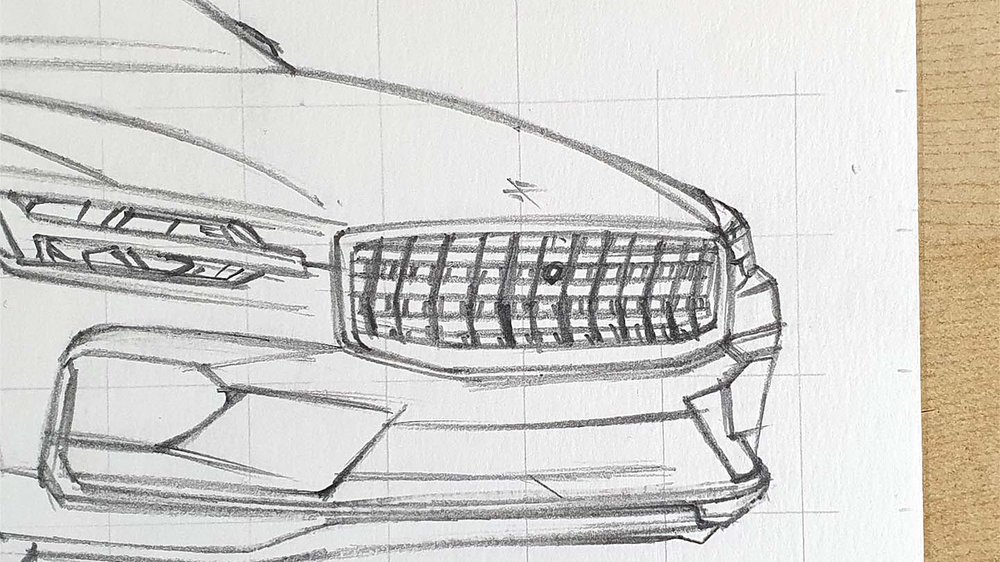
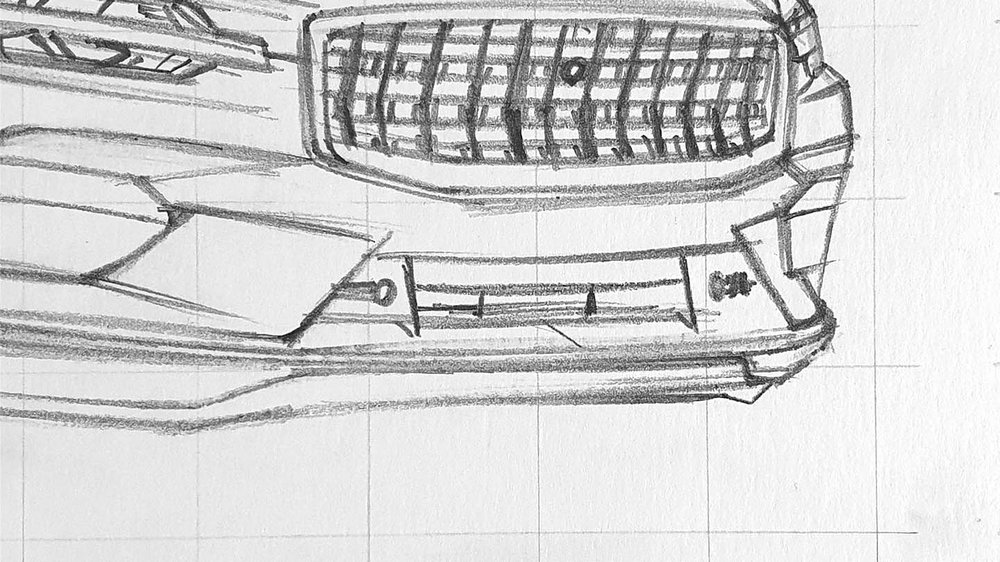
After the main grill was complete, I sketched the lower grill parts. I added a few horizontal and vertical lines and I sketched the 2 parking sensors.
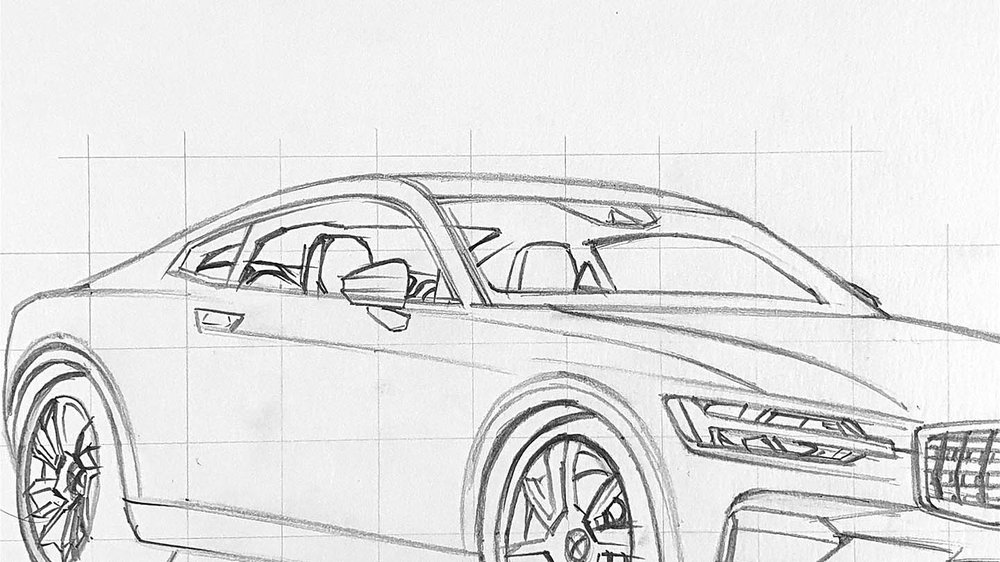
5. Sketch the Interior and the Windows of the Car
Sometimes when drawing a car the interior is barely visible through the windows of the car. In this photo, however, most of the interior is visible (which I really like).
Sketching the interior of this car is actually quite easy. There are not many details or things you can get very wrong while using the grid method as a guide.
I first sketched the shape of the side window you can see through the windshield and then I started sketching the rest of the interior.
One thing you need to make sure of is that the top of the rear window lines up correctly as the rear window is broken up into two pieces by the A-pillar.
6. Sketch the Shadow of the Car
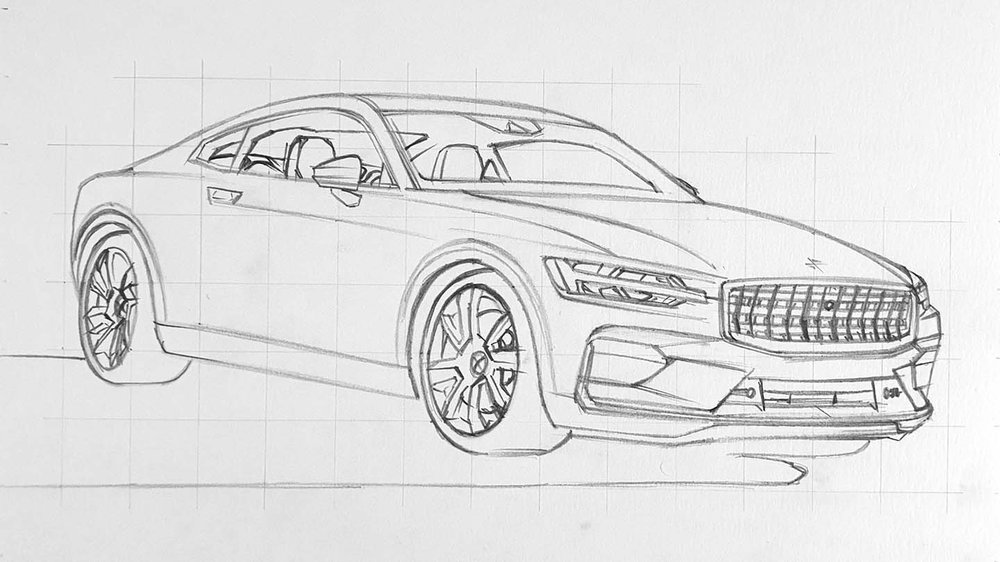
To stop the car from floating in space we're going to sketch the shadow of the car.
It's a very sharp shadow as the car is in direct sunshine and the shadow is also quite long.
I sketched a horizontal line between the rear wheel and the edge of the paper to mark where the top of the shadow is.
Then I sketch the bottom part of the shadow starting and the front right wheel that is barely visible, just a round edge. From there I sketched a short horizontal line which indicates the shadow of the right front wheel.
After that, I made a sharp angle toward to right wheel again, but curving it down and to the left, and then I sketched a horizontal line from there all the way to the left edge of the paper.
7. Sketch the Reflections on the Car
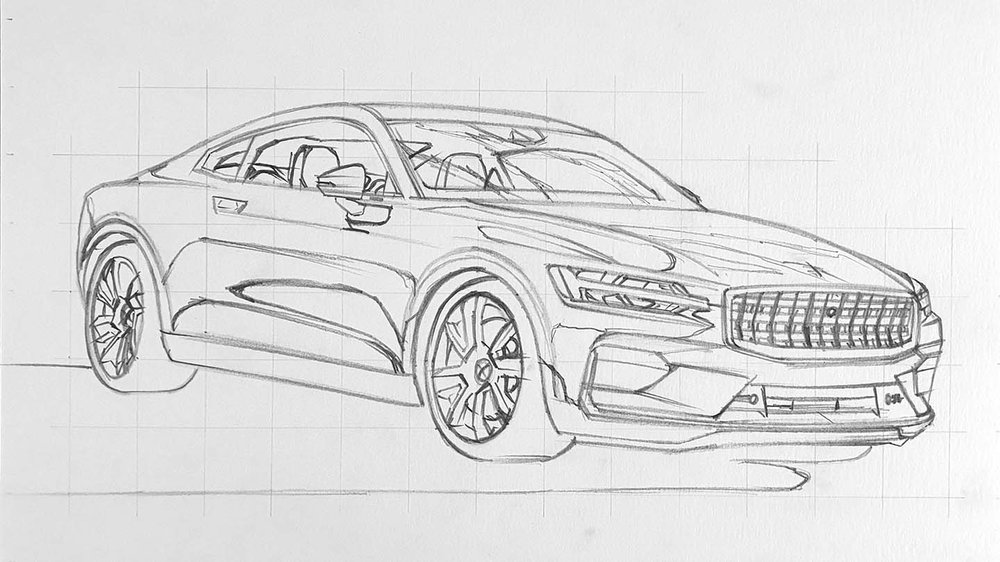
The car is now fully sketched, but there is one thing missing: the reflections (my favorite part).
This car has quite a lot of reflections, but luckily they are not that difficult to sketch.
I started on the hood and sketched in the sections of cloud shapes. On the hood is actually also a reflection close to the windshield of the windshield itself, and to the right of that is a reflection of the car standing next to it.
I also sketched the reflections just to the right of the front wheel.
Next, I marked where the cloud reflections will be on the windshield.
And lastly, I sketched the reflections on the side of the car.
If you'd like to know more about reflections on cars, make sure to check out this article.
8. Color the Wheels of the Car
Now that the sketch is fully done, it's time to start coloring. I always like to start with the black parts of the car and work my way from the bottom to the top.
First up are the wheels.
I started coloring the front wheel, and the first thing I did was color all pure black parts with the Black (120) Ohuhu marker. This makes the wheel look a lot less overwhelming and complicated.

After that, I colored in the spokes. The top spokes are more cool-toned, while the left and right spokes look more warm-toned.
I first colored the spokes with Neutral Grey 02 (CG020) for the top and bottom spokes and Warm Grey 05 (WG050) for the left and right spokes.
Then I darkened the part closest to the tire on the bottom and left spokes, and the part closest to the middle of the wheel for the right and top spokes. For the cool-toned spokes, I used Neutral Grey 03 (CG030) to darken those parts, and for the warm-toned spokes, I used Warm Grey 07 (WG070).

After I had done that, I colored the parts that were a mid-tone grey with Neutral Grey 05 (CG050).

Next, I colored the darkest parts with Neutral Grey 07 (CG070) and Neutral Grey 7 (NG07), and I colored the brake disc with Yellow Dahlia (Y260) and the brake caliper with Yellow Dahlia (Y260) for the light parts, Marigold (YR2) for the mid-toned parts, and Mahogany (Y12) for the darkest parts and details.
I also colored the tire with Neutral Grey 7 (NG07), and I used Black to darken the bottom left.

The front wheel is now fully colored, but it lacks details and smooth edges. To fix that, I used the Black, White, and Dove Grey Coloursoft colored pencils.
I first made sure to refine the outside rim with White and Dove Grey. After that, I added the black details and interruption in the rim. Lastly, I refined the shape of the spokes and added some highlights.

After I finished the front wheel, I colored the rear wheel using the same steps.

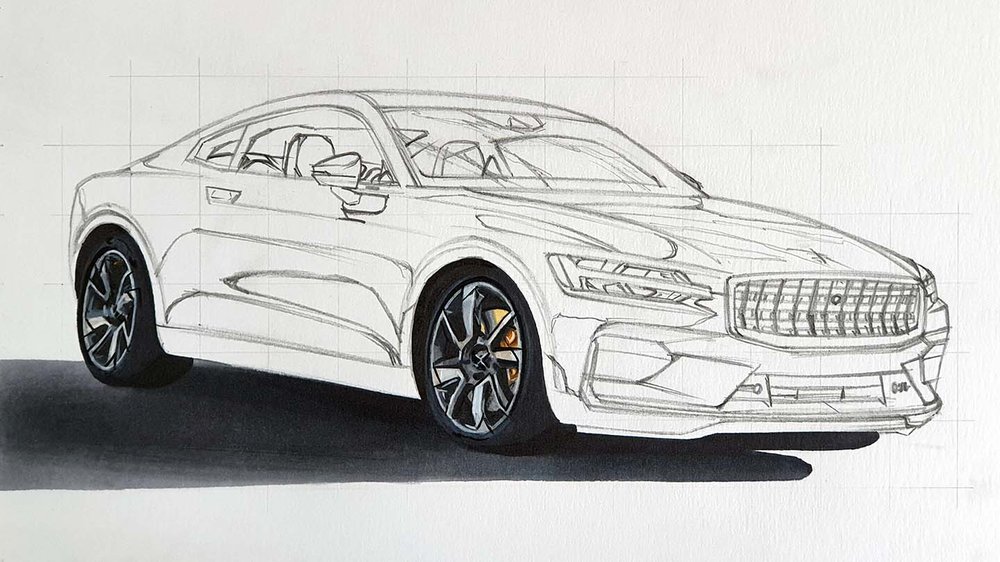
9. Color the Shadow of the Car
Next up is the shadow.
I started by coloring the darkest part of the shadow with Neutral Grey 7 (NG07). This includes the right front wheel and a bit of the shadow to the left and the right of the left front wheel.

After that, I used Neutral Grey 07 (CG070) to color the remainder of the shadow underneath the car and a bit around the front wheel. I blended the dark grey into the black by going over the edges of the black a bit.

Then I colored most of the rest of the shadow with Neutral Grey 05 (CG050), but I left the top left and the bottom left uncolored for now.

Lastly, I used Neutral Grey 03 (CG030) to color the bits I left uncolored before and blended them into the darker grey.
10. Color the Front Grills and Other Black Parts of the Car
Now it's time to color the grill.
I started by coloring the lower grill parts first with black.

Next, I used Neutral Grey 05 (CG050) to color the bottom of the middle bottom grill. I also colored the vertical and horizontal lines, and the parking sensors with it.
I also used Neutral Grey 05 (CG050) to color the top of the bottom left grill and a small part on the right grill.
After that, I used Neutral Grey 07 (CG070) to color the darkest grey parts, which include the bottom of both parking sensors, the right of the right lower grill, and the bottom of the left lower grill.

Lastly, I used Neutral Grey 03 (CG030) to color the remaining light grey parts of the lower grills.

After I had finished the lower grill parts, I started coloring the main grill.
I first colored all the black rectangles between the rectangular plates with Black.

After that, I colored the hockey-stick-shaped metal bits. I colored the top with Neutral Grey 03 (CG030) and the bottom with Neutral Grey 02 (CG020).

Next, I colored the rectangular plates. I colored the bottom row with Warm Grey 05 (WG050) on the right half and Warm Grey 07 (WG070) on the left half.
I also used Warm Grey 07 (WG070) for the right half of the middle row and the bottom half of the right half of the top row.
For the left half of the middle row, I used Warm Grey 09 (WG090). And for the top half of the right of the top row, I used Warm Grey 09 (WG090) too.
And lastly, for the left half of the top row, I layered Neutral Grey 07 (CG070) over Warm Grey 09 (WG090).

After I had done that, I started coloring the chrome strip around the grill.
I used Frost Blue (B030) for the blue parts, and I used various Neutral Greys tones to shade the chrome strip, except for the left side. I used Warm Grey 07 (WG070) to color that part.

Now that the main grill is fully colored, it's time to add the details.
Again, I used the White, Dove Grey, and Black Coloursoft colored pencils for this.
I first refined the metal plates in the grill. I started by drawing a black line to the left of every metal plate.
Then I drew a black line in the middle of the hockey stick shapes.
I also used these colored pencils to add more details and highlights to the grill.
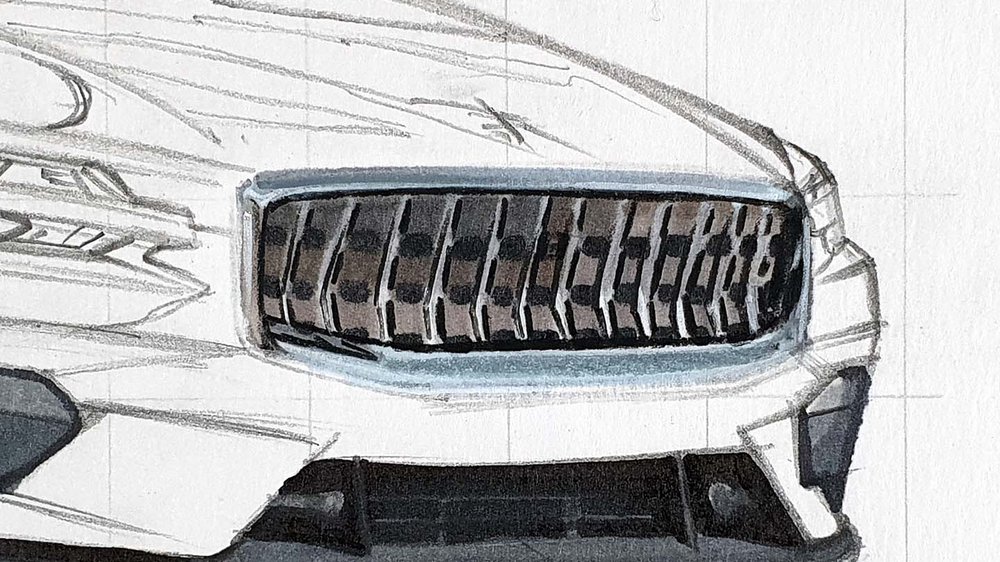
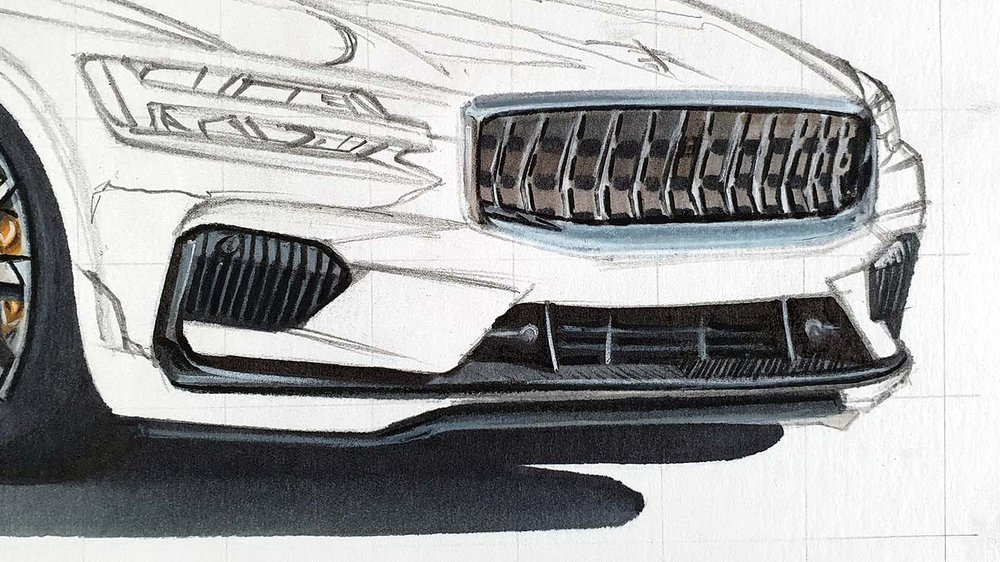
After that, I also added the details on the lower grill parts.
I added the black lines in the lower left grill, I emphasized the lines in the middle lower grill part, and I added the carbon fiber lines on the bottom of that, and I added a few lines and details to the right lower grill.
Btw, I made an article showcasing 3 ways you can draw carbon fiber. You can check it out here.
My go-to alcohol markers for blending, rich color payoff, and amazing value. The brush tips feel super natural to draw with — a must-have for smooth gradients and realistic shading!
- Brush + chisel tips
- Great for beginners & advanced artists
- Budget-friendly alternative to Copics
11. Color the Headlights of the Car
Next, I colored the headlights.
I started by coloring the hammer shape with Neutral Grey 02 (CG020) and Neutral Grey 03 (CG030).

Then I colored some of the mid-toned grey parts in the headlights, and for that I used Neutral Grey 05 (CG050) and Warm Grey 07 (WG070).

After that, I colored the remainder with Neutral Grey 07 (CG070) and refined some of the shapes with it.

Lastly, I used the White, Dove Grey, and Black colored pencils to add the details.
Honestly, no idea what I did. I just looked at the reference and added details where I thought they would look good.
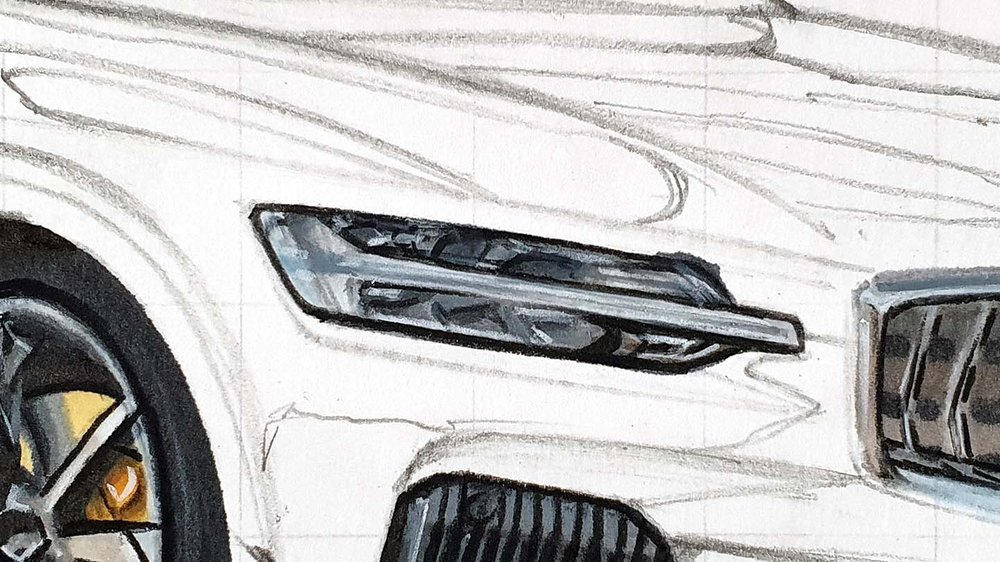
Next, I colored the right headlight.
I first colored it fully with Neutral Grey 02 (CG020) and shaded the right of it with Neutral Grey 03 (CG030).
Then I shaded the bottom with Neutral Grey 05 (CG050).
And lastly, I added some details with a White and Black colored pencil.

12. Color the Windshield and the Roof of the Car
Next up are the windshield and the roof of the car. They look quite complex, but I'll try my best to break them up into easy steps.
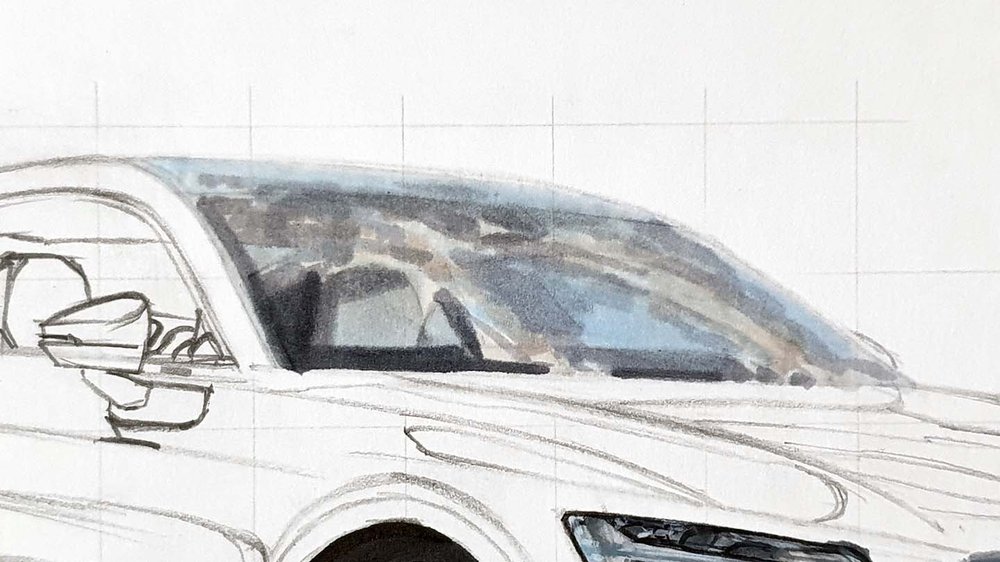
I first started coloring the cloud reflections in the windshield, and for that, I used Warm Grey 05 (WG050).

Next, I used Neutral Grey 02 (CG020) to color most of the rest of the windshield and the roof light grey.
I also darkened the bottom edge of the windshield where there are no reflections with Neutral Grey 03 (CG030). And I darkened the top middle of the windshield and a bit of the roof with some organic-looking cloud-shaped reflections.

Next, I used Neutral Grey 05 (CG050) to darken the bottom and left of the windshield, and I used Neutral Grey 07 (CG070) to darken the bottom left even more.
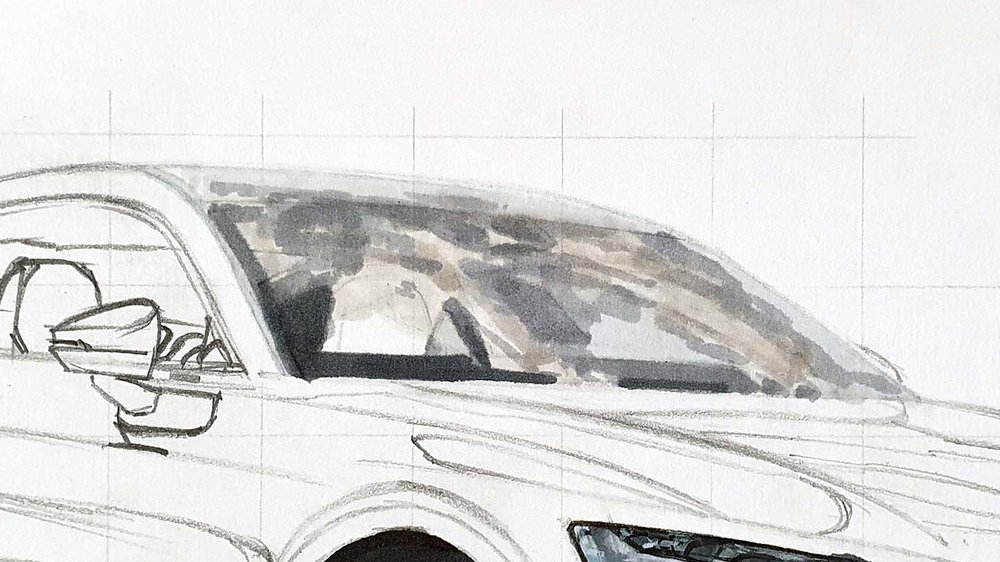
After that, I colored the headrest of the seat. I colored the light part Warm Grey 05 (WG050) and layered Neutral Grey 02 (CG020) over it. And for the shadow parts, I used Neutral Grey 05 (CG050).

The windshield is now fully colored, but in the reference, it has a blue tone to it, so that's what we're going to do next.
To add the blue tone, I used Frost Blue (B030) and layered it over the parts where it looked blue in the reference, almost everywhere except on the bright cloud reflections.
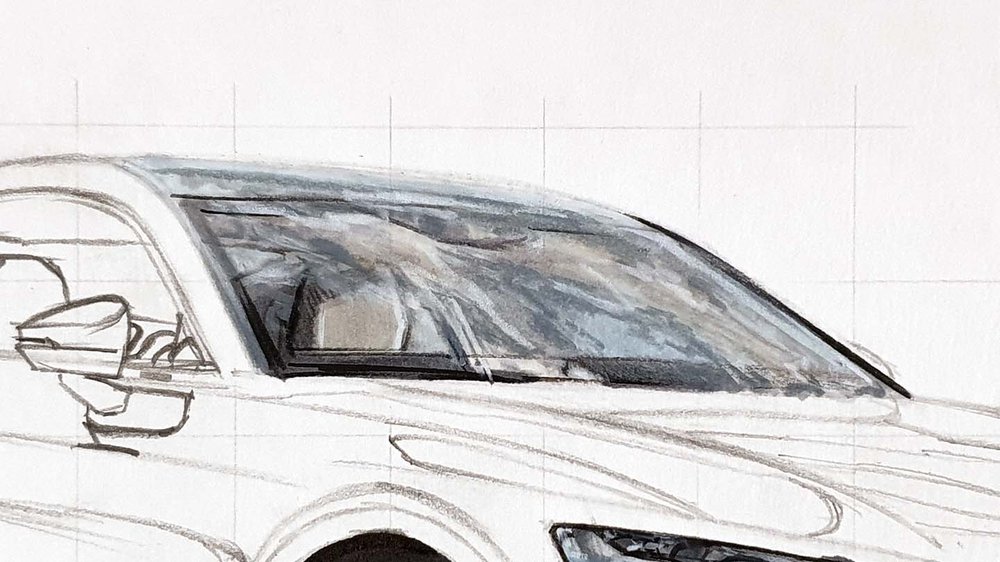
And finally, it's time to add the details and refine the reflections.
I started by refining the cloud reflections by layering white over them with the White colored pencil.
I tried to avoid using harsh straight lines as clouds are often quite soft and round-ish. I mostly just scribbled around a bit until I thought it looked cloud-like.
I also did the same with Dove Grey, but on the edges of the clouds.
And I used Black to add some lines and details all around the windshield.
13. Color the Side Windows and the Interior of the Car
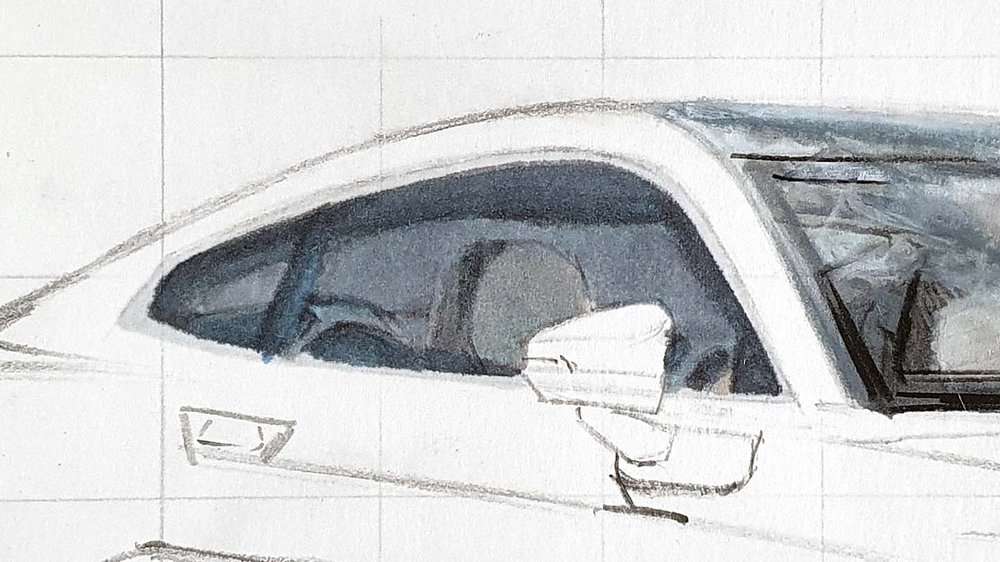
Now that the windshield is done, it's time to color the side windows (and the interior).
These are a lot less complicated than the windshield as they don't really have any detailed reflections.
To color the side windows, I started by coloring the rear window with Neutral Grey 02 (CG020) and the window sills with Neutral Grey 03 (CG030).

Next, I colored the roof and window lining and a few bits of the rear "seats" with Neutral Grey 05 (CG050).
I also added some darker details to the windows and the rear seats with Neutral Grey 07 (CG070).
And I finished the rest of the rear seats with Neutral Grey 03 (CG030).

After that, I colored the headrest of the front seat, first with Warm Grey 05 (WG050) and then with Neutral Grey 03 (CG030).

Now it's time to also tint the side windows with a blue tone. I layered Frost Blue (B030) on the lighter parts of the side windows and Robin's Egg Blue (B050) on the darker parts.
Just one quick layer, otherwise the grey tones will look faded.
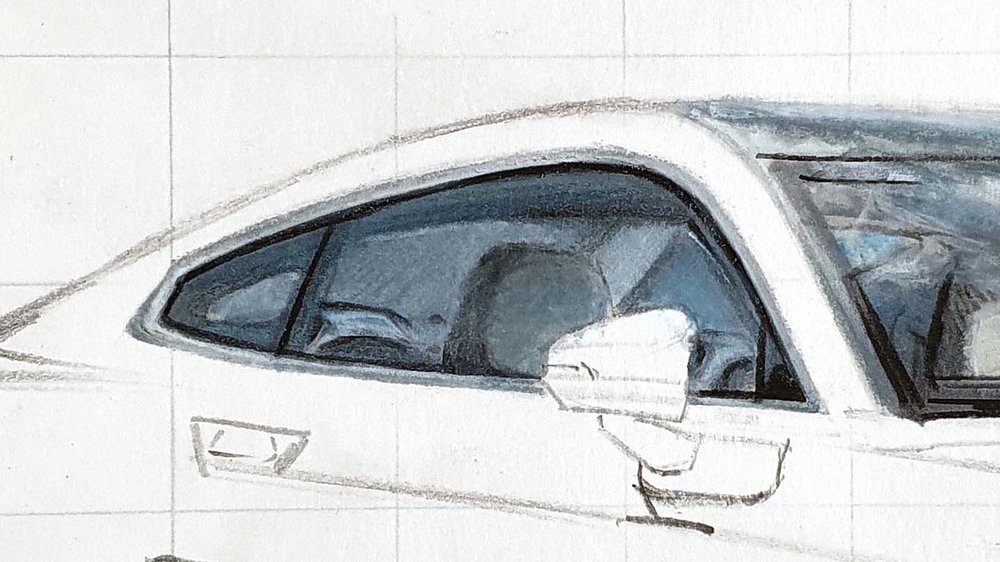
Lastly, it's time to add some details and smooth out some things a little bit. And for that, we're going to use the colored pencils again.
I added a Black line on the inside of the window sills, used White to add some highlights on these sills, and used Dove Grey to smooth the headrest a bit.
14. Color the Door Mirror of the Car
It's almost time to start coloring the main body of the car, but before we do that, we need to color one last small thing: the bottom half of the door mirror.
I started by coloring the door mirror arm with Neutral Grey 07 (CG070), and I colored the indicator just above that with Neutral Grey 05 (CG050).

And after that, I used Black to darken most of the arm.

15. Color the Main Body of the Car and Reflections
After all of this work, the car is now half done!
Just the other half left: the main body (the fun part).
I started by erasing the sketch lines almost completely so that they wouldn't show through the markers later on.
I also colored the lightest cloud reflections on the hood with Warm Grey 05 (WG050) and on some bits to the right of the front grill.

After that, I colored the remainder of the hood with Frost Blue (B030) after I added the reflection of the car next to it with Warm Grey 07 (WG070) and Warm Grey 09 (WG090).
I also colored the part just behind the side windows with Frost Blue (B030).
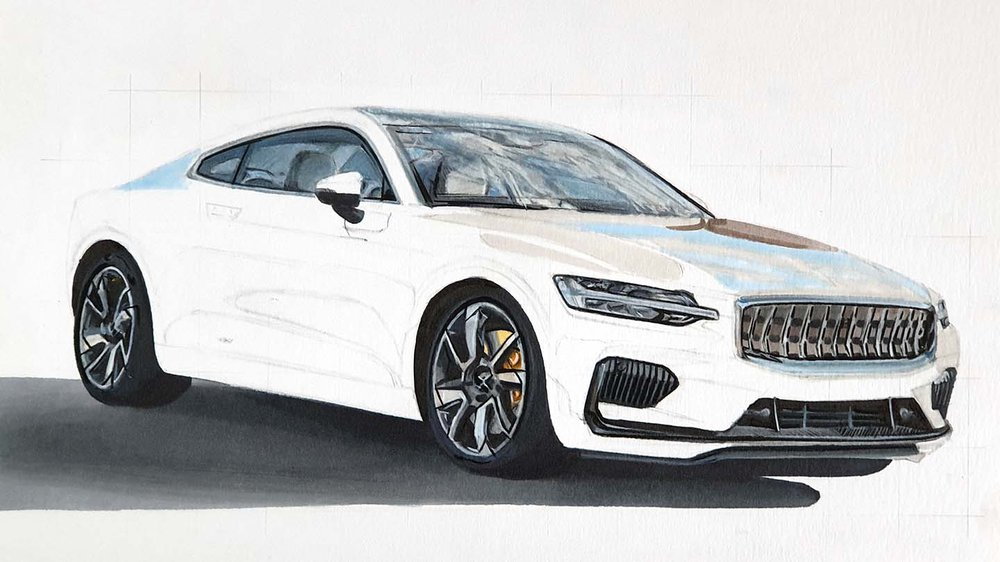
Next, I darkened the front of the hood where there were no cloud reflections with Neutral Grey 03 (CG030) as well as some parts on the front bumper and the side of the car.
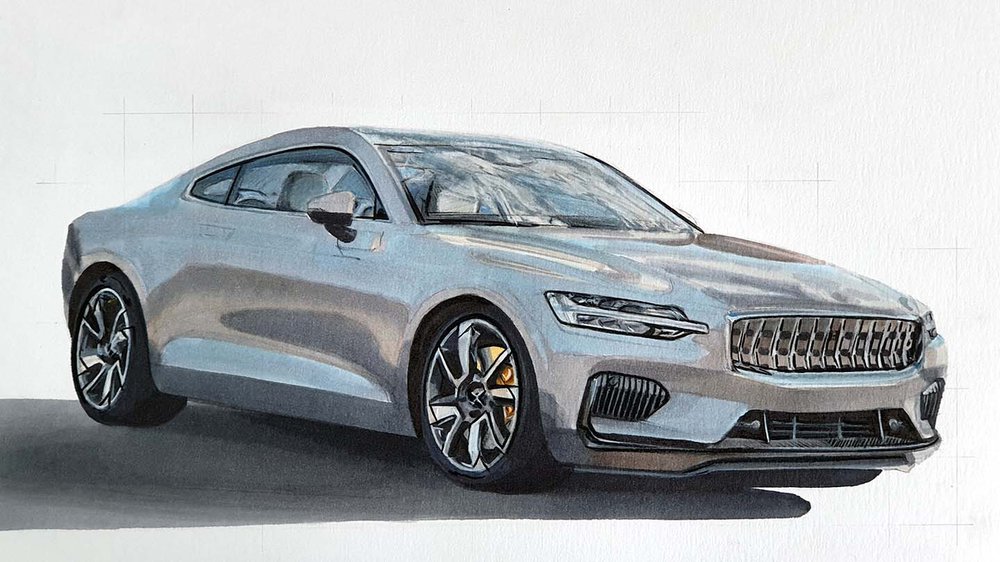
I also added some darker reflections with Neutral Grey 07 (CG070) on the rear, the side, and the lower front.

Then I colored in the big reflection on the side of the car, first with Warm Grey 07 (WG070) and then with Neutral Grey 03 (CG030), and I darkened the top of the reflection with Neutral Grey 05 (CG050).
I also toned the front a bit with Neutral Grey 03 (CG030).

Now that all reflections are colored, we can focus on the rest of the main body.
I first colored the rest with Neutral Grey 02 (CG020), and then I layered Robin's Egg Blue (B050) over it.
It will look a lot better in just a minute...

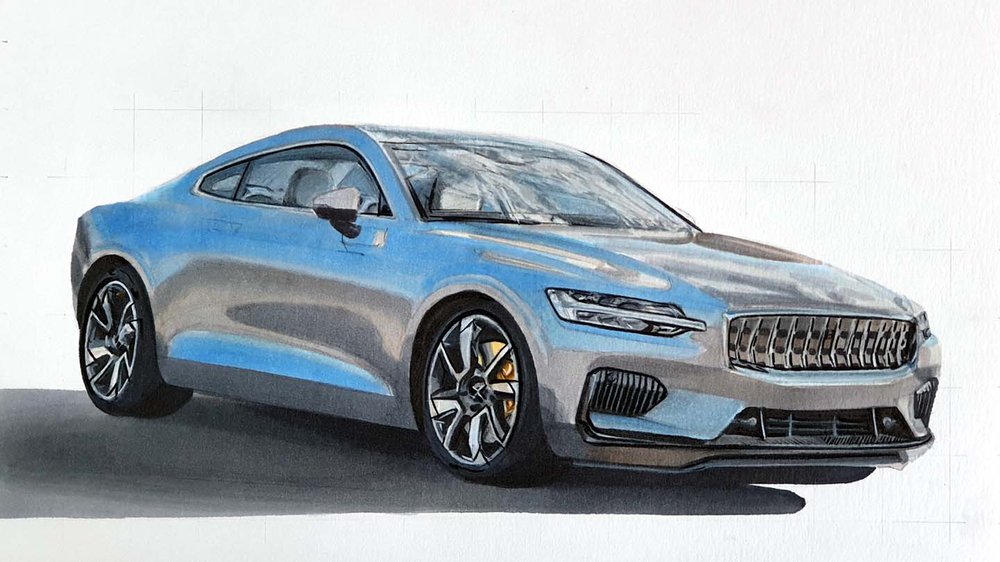
Next, I used Smoky Blue (B260) to make most of the blue-ish part more blue.
After that, I used Vivid Blue (B270) to darken the top half of the car and the bottom of the lower blue reflection.
And when I was done with that, I thought it could do with some more depth and dark tones, so I added some Blue Grey 09 (MG100) around the door mirror and just above the rear wheel.
I also colored the door mirror itself as I forgot to do that earlier...
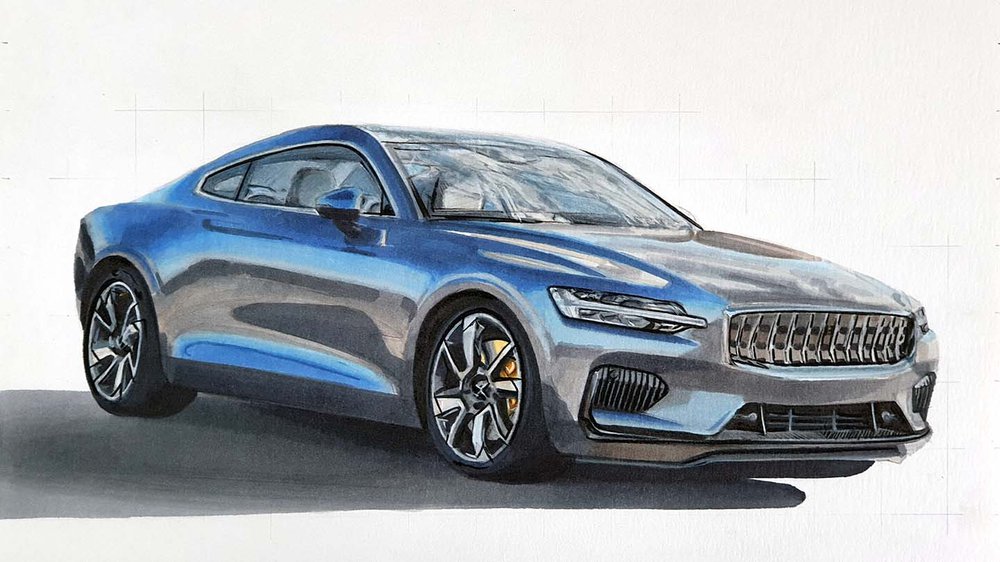
Now that the full car is colored, the second-to-last thing to do is add some more details to it, specifically the panel gaps and the logo.
For that, I used the Black and white Coloursoft pencils.
16. Add a Few Pure White Highlights on the Car
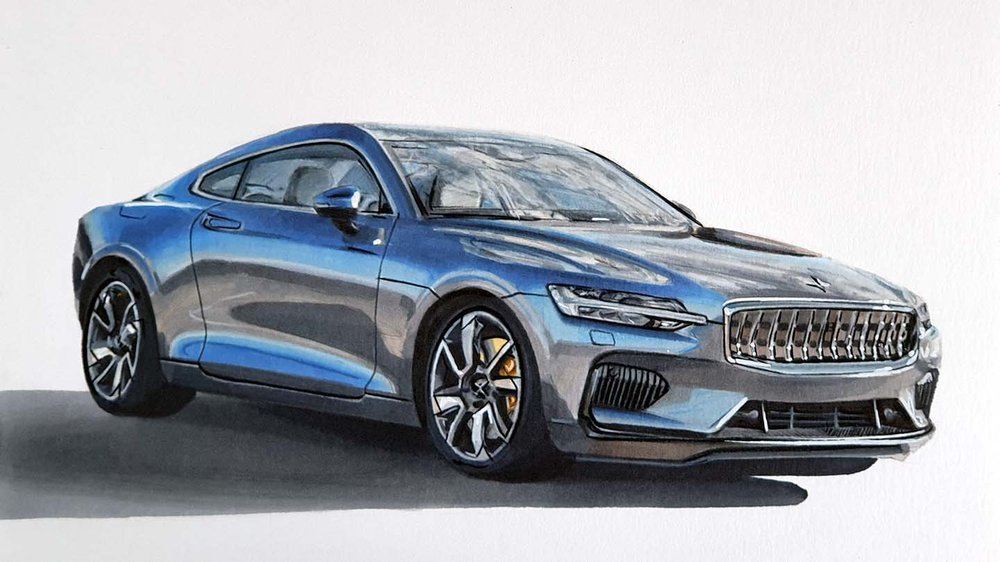
The car is fully colored now, but there is one last thing to do to make it look finished: adding white highlights with the Posca marker.
I added a few highlights on the rear wheel and the front wheel, on the door mirror and the reflection of the door mirror on the door, on the chrome part around the front grill, and on the lower front bumper.
Learn tricks, techniques, and full in-depth step-by-step car guides — join the club now!
And That's How You Draw a Car
At least, that's how I do it.
I know it's a lot, especially when all the steps are written out like this.
In reality, it's too difficult, and drawing it only took me a couple of hours.
How did your car drawing of the Polestar 1 turn out?
I love to see it, so if you decide to share it on Instagram, please tag me (@luukminkman).


.jpg__500x500_q85_crop_subsampling-2.jpg)



Add a comment
Comments
Wow wonderful!! Neatly done. One shld hv God level Patience to draw such a realistic object. I wish one day I can do that...