How to Draw a Ferrari F50 - Easy Step-by-Step Tutorial
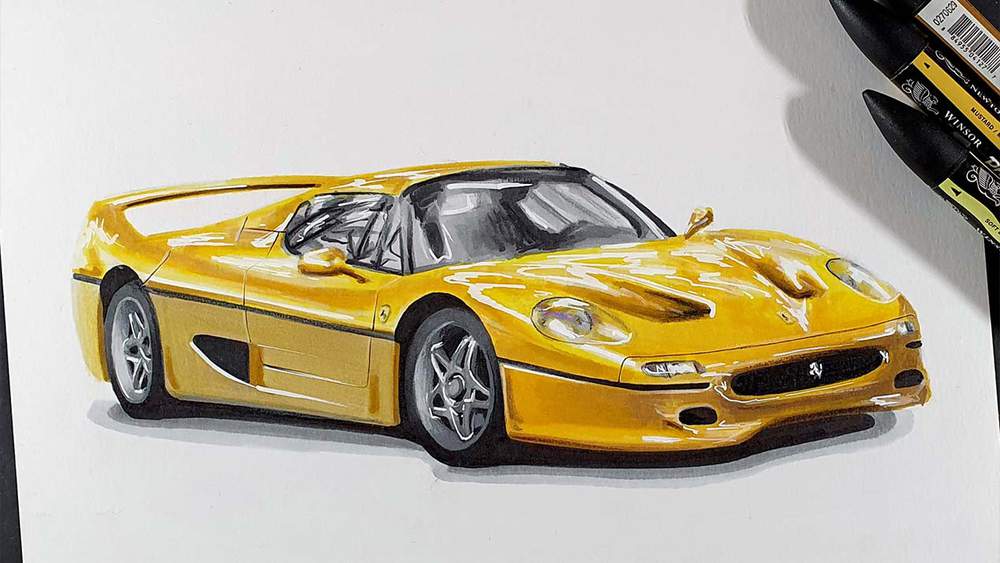
In this tutorial, I'm going to show you how you can pretty easily draw your own realistic Ferrari F50.
The idea to make this tutorial came from a video I saw a while back from Shmee150. I never really liked the F50 before, but watching this video made me really want to draw one. And of course, I had to draw it in Shmee's dream spec.
I hope you like it!
Disclaimer: In the name of full transparency, please be aware that this blog post contains affiliate links and any purchases made through such links will result in a small commission for me (at no extra cost for you).
Drawing Supplies I Used in this Tutorial
To make this drawing I used the following art supplies:
- A4-sized Canson Illustration Manga paper (my favorite marker paper);
- A graphite pencil, a ruler, a kneaded eraser, and a regular eraser;
- Winsor & Newton Promarkers in the colors Ice Grey 1 (IG1), Ice Grey 2 (IG2), Ice Grey 4 (IG4), Ice Grey 5 (IG5), Black (XB), Soft Lime (Y828), Yellow (Y657), Mustard (O948), Sandstone (O928), Caramel (O727), Umber (O615), Buttercup (Y417), Mango (O248), Cloud Blue (B318), and Purple (V546);
- Derwent Coloursoft pencils in the colors White, Dove Grey, and Black;
- And a white Posca PC-3M.
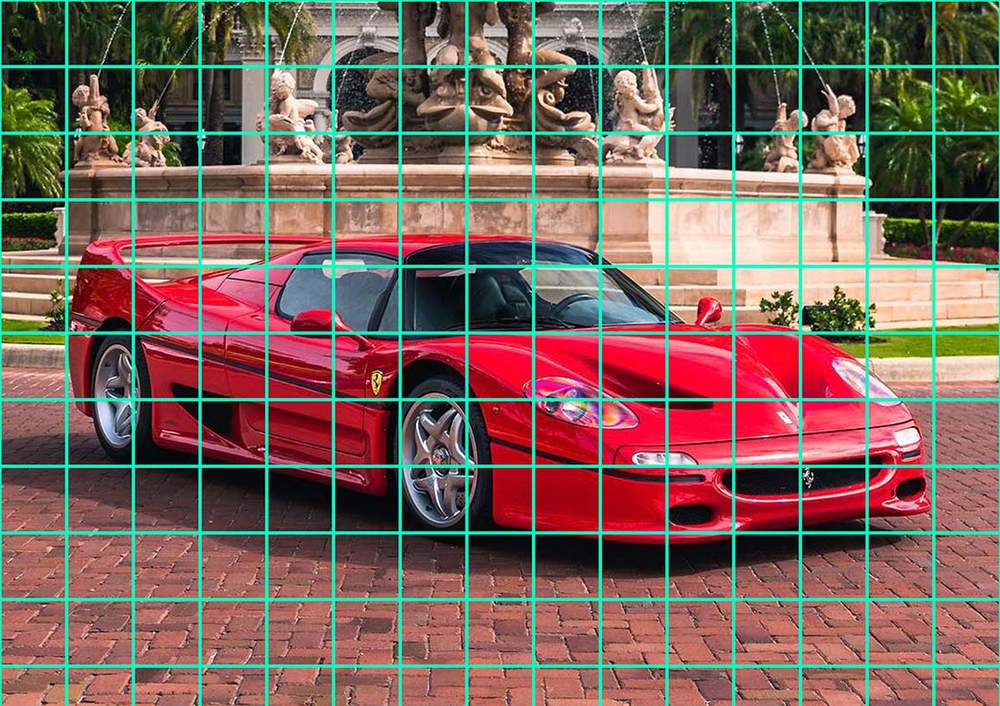
Reference Photos I Used to Create this Drawing
To make this drawing I used 3 reference photos. 1 for the proportions and perspective, 1 for the reflections, and 1 for the color.
I used the photo below (5th slide) as a reference for the proportions.
This is the reference photo (slide 5) I used for the reflections.
And the photo below is the reference for the color.
How Do You Draw a Ferrari F50?
To draw a realistic-looking Ferrari F50 I first gathered a few reference photos. Next, I sketched the outline of the car using the grid method. After that. I started coloring the car with alcohol markers. I first colored the black and grey parts before moving on to the main body. And finally, I added some details with colored pencils and a white Posca paint marker.
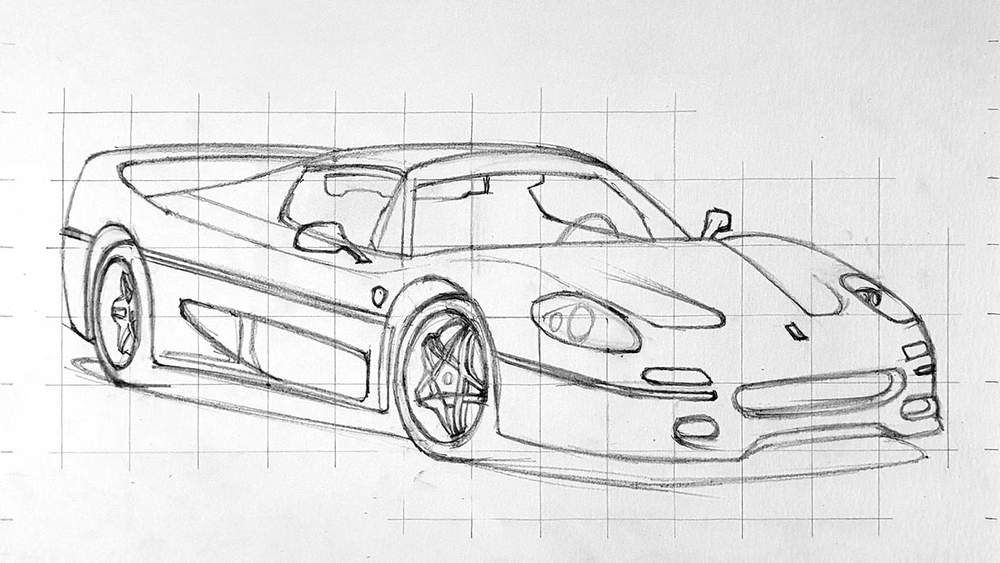
Step 1: Sketch the Outline of the Ferrari F50
Sketching the outline of a car with accurate proportions can be very tricky. That's why I always use the grid method to make it a bit easier. But there are more sketching techniques you can use.
To use the grid method, I start by overlaying a grid of 15 by 10.5 squares over the reference photo which I resized to be A4-size (the same size as my paper). This means that each square is 2 by 2cm.
After that, I draw the same grid on my piece of paper. And I start sketching.
I started by sketching the basic shape of the car first and made sure that it was all correct before I moved on to the details like the headlights and the spokes of the wheels.
Just take your time. This is the most important step of your whole drawing, so make sure your sketch looks as good as possible before moving on to the next step.
Step 2: Color All Pure Black Parts
To start off with coloring, we're going to color all the pure black parts first. By doing this the drawing looks less complicated and overwhelming. At least it does for me.
But before you start coloring it's important that you erase the sketch until you can only lightly see it. This prevents the sketch lines from showing through the ink of the markers.

Step 3: Color the Wheels of the Ferrari F50
After that, it's time to get the most difficult parts done: the wheels.
But honestly, coloring the wheels is not that difficult on this car.
I first colored the lightest parts of the wheels with Ice Grey 1.
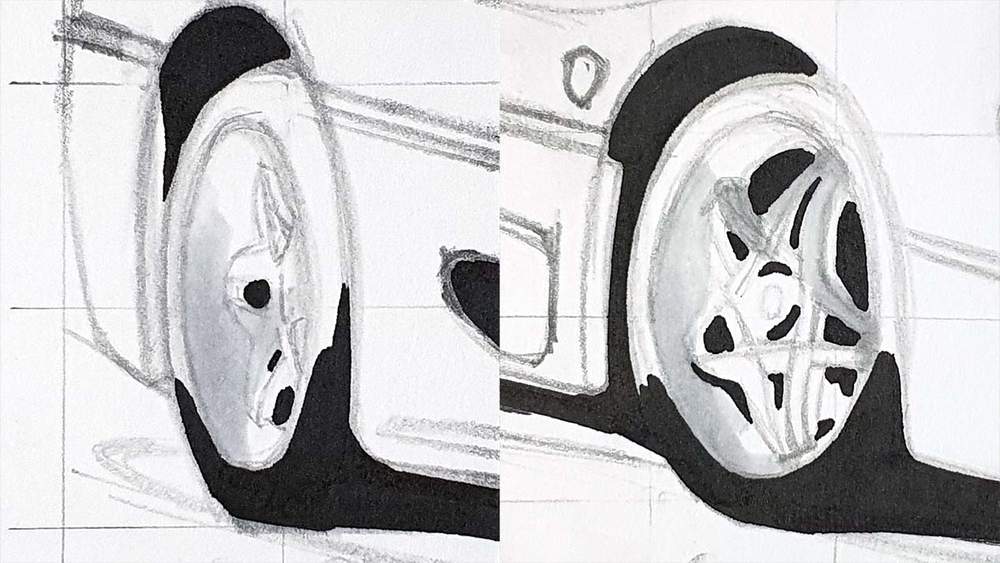
Next, I colored the rest of the wheels with Ice Grey 2.

After that, I darkened some parts with of the rim and the spokes with Ice Grey 4 and 5, and I colored the tires with Ice Grey 5 and blended that into the black.

Step 4: Color the Bumper Lights
Next, it's time to color the bumper lights.
I first colored the lights with Buttercup and Ice Grey 1.
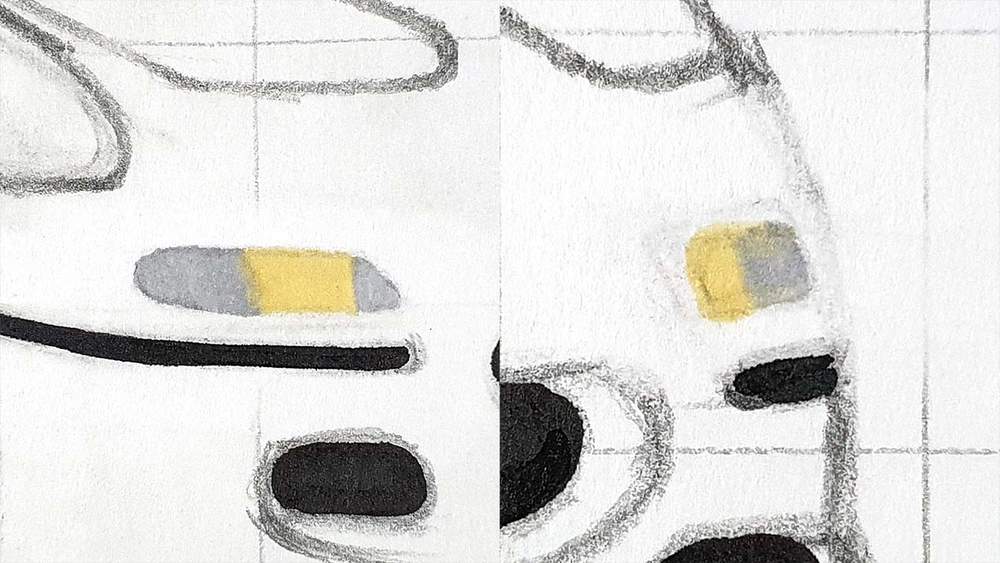
Then, I added some details and reflections with Ice Grey 2 and 4.
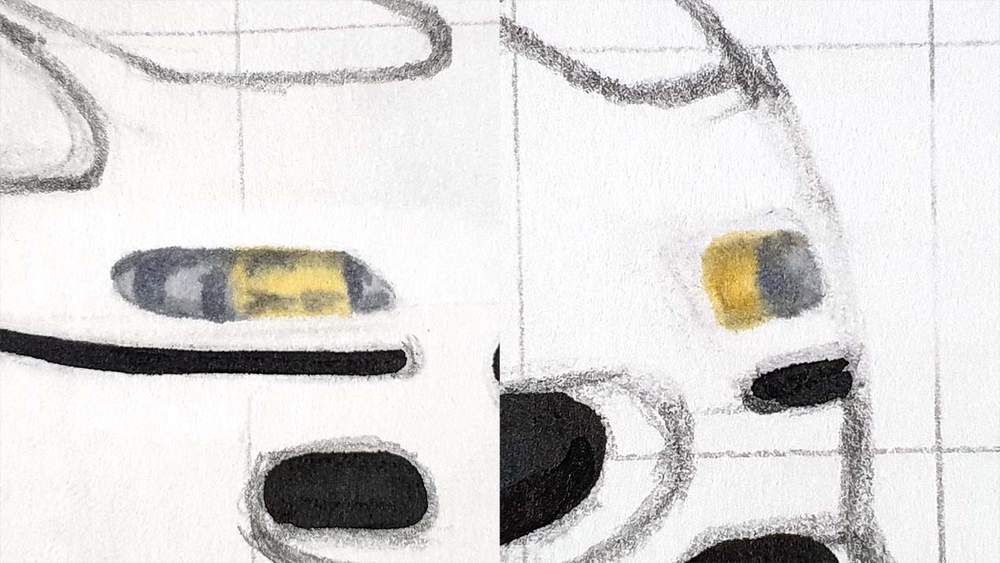
Lastly, I added some orange tints in the left bumper light with Mango.

Step 5: Color the Headlights of the F50
Now it's time for the headlights.
I started by coloring the lightest parts first with Buttercup and Ice Grey 1.
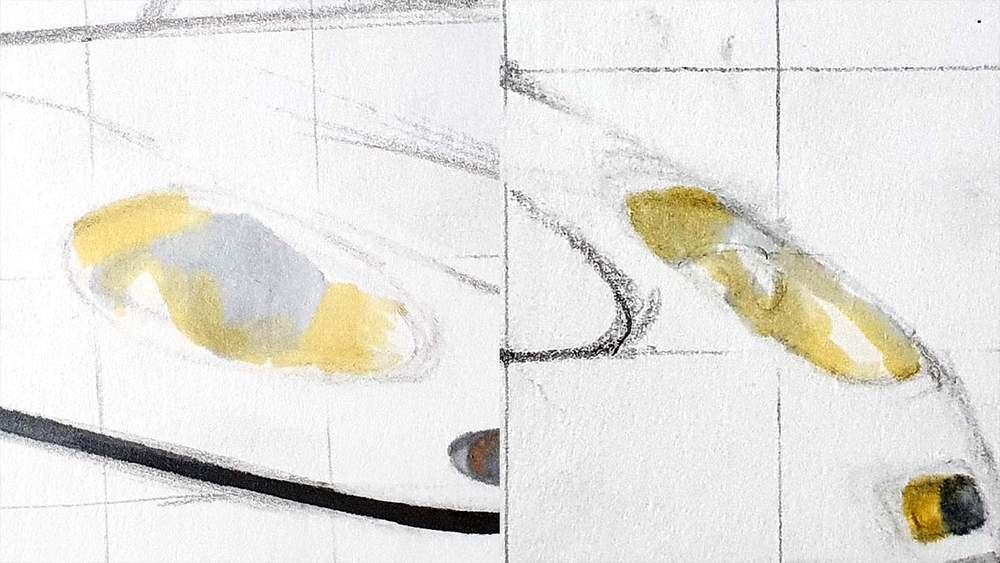
After that, I added the darker yellows with Yellow (only on the left side) and Mustard and some darker grey details with Ice Grey 2 and 4.
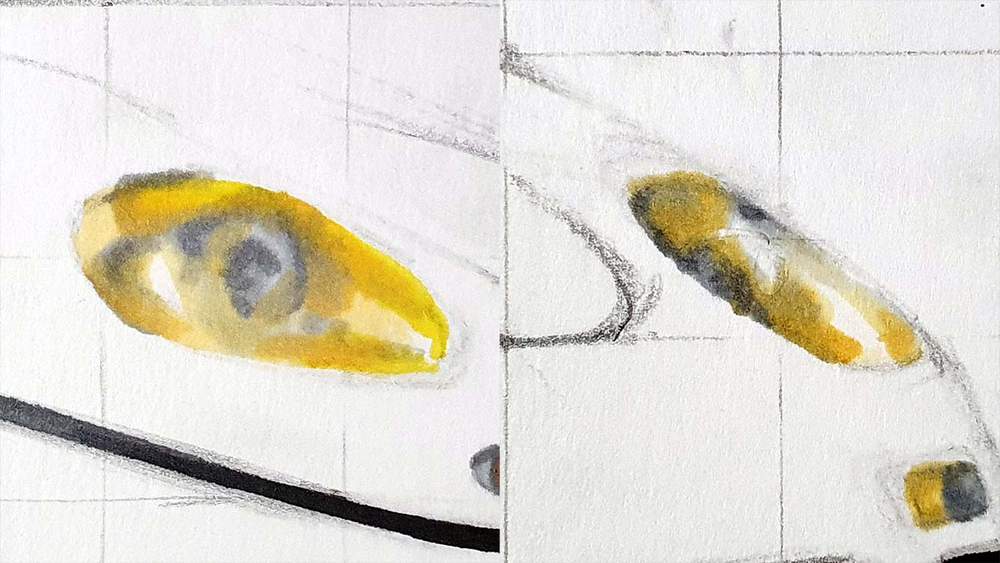
Lastly, I added some colored reflections on the left headlight with Cloud Blue and Purple.

Step 6: Color the Side Window
Next on the list are the side windows.
I first colored the lightest parts with Ice Grey 1 and left the rear window uncolored.
I also used Ice Grey 2 for the bits that are a bit darker.
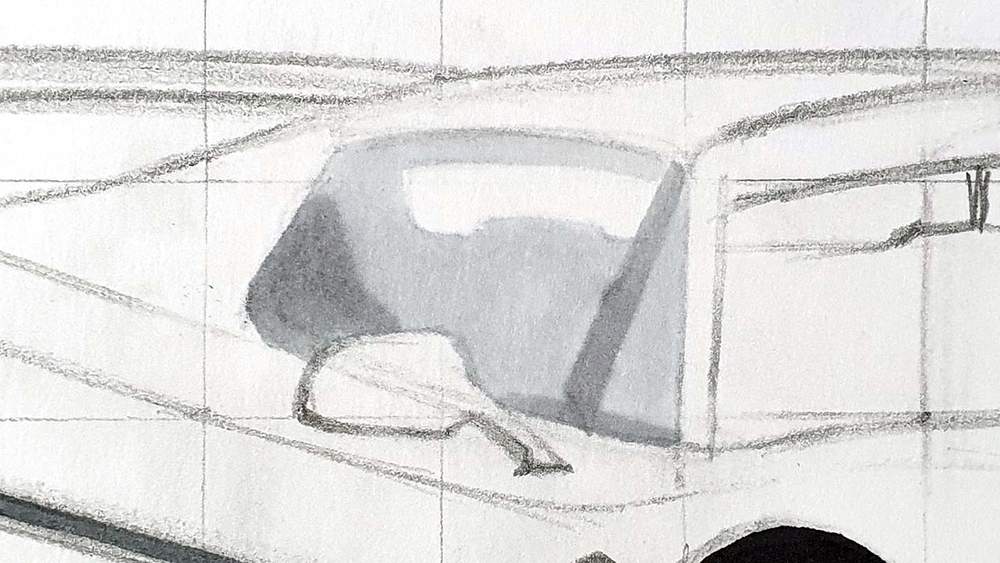
After that, I added the tree reflections with Ice Grey 5 and Black. I started by drawing the base of each tree and then added the branches. I tried to make them look organic and distorted by the curvature of the window.

Step 7: Color the Windshield of the Ferrari
To color the windshield I again started by coloring the lightest parts which are the left side of the windshield and the right A-pillar and the view through the right side window.
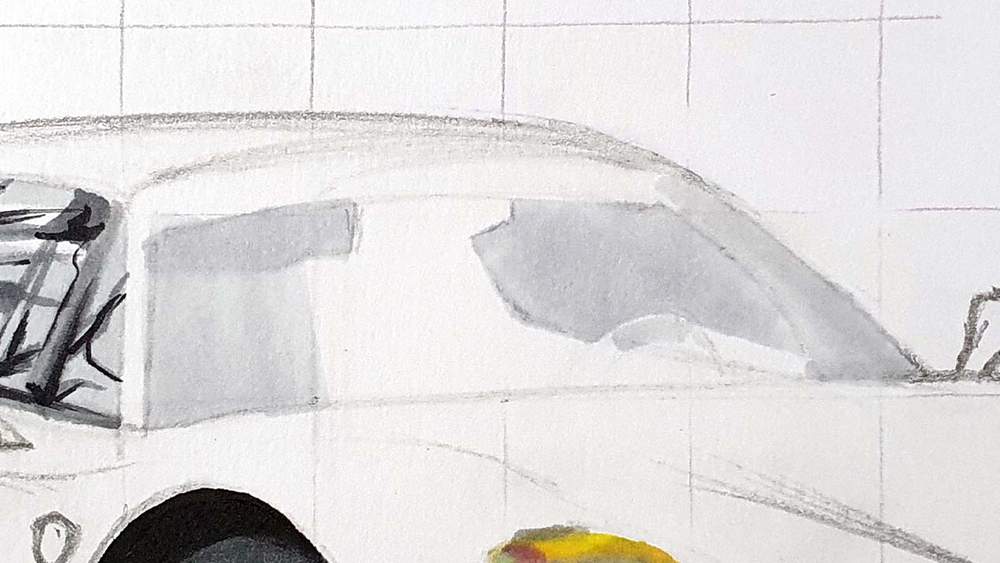
Next, I colored the remainder with Ice Grey 2.
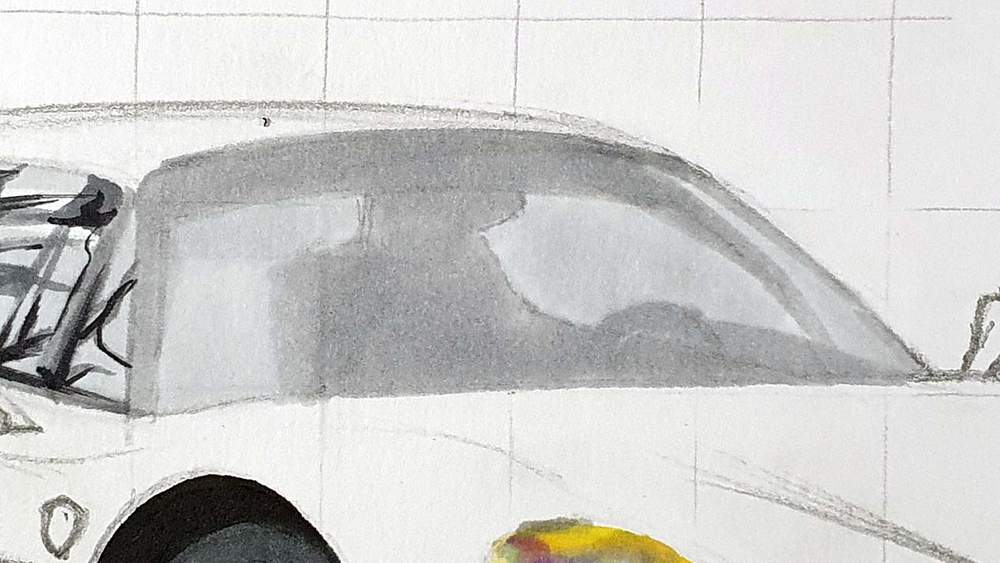
And lastly, I added some darker reflections on the windshield with Ice Grey 5 and Black. For the reflections on the right side window, I used Ice Grey 2.

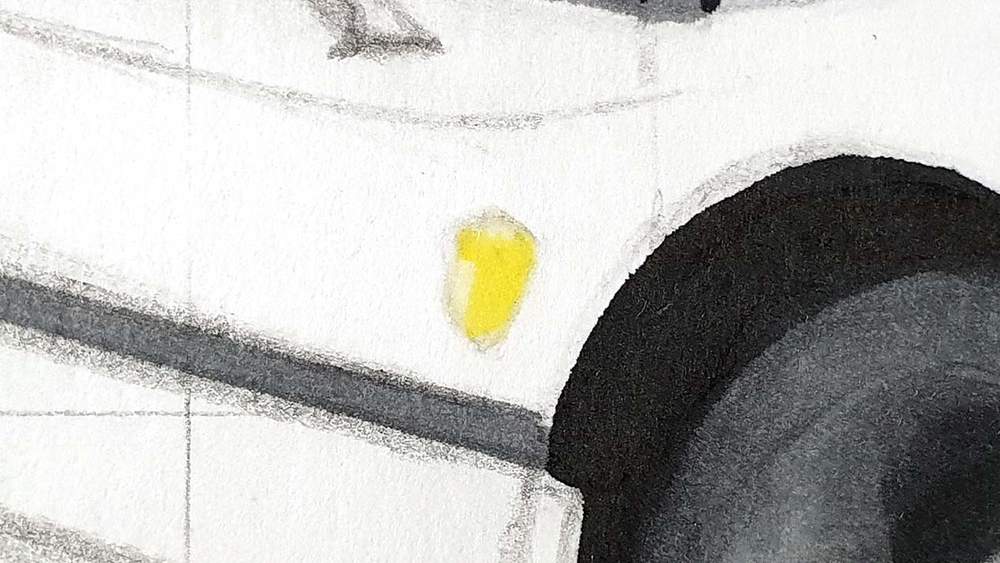
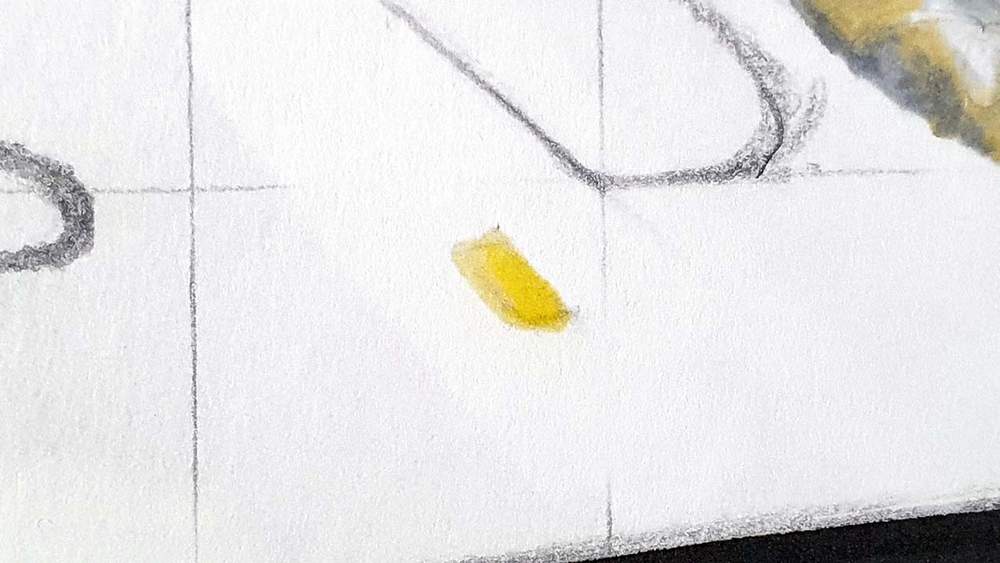
Step 8: Color the Ferrari Logo and the Shield
After that, I colored the Scuderia shield on the side of the car with Soft Lime and Yellow as well as the logo on the front of the car.
Step 9: Color the Shadow Underneath the Ferrari F50
The last thing to color before moving on to the main body is the shadow of the car.
I kept it very simple this time.
I first colored the shadow with Ice Grey 1 as usual.

Then, I added Ice Grey 4 in between the light grey and the black.
I didn't blend it this time as I kind of like the unblinded look of the shadow.
But if you want it to look smoother, you can blend the IG4 into the IG1 by going ver the edge with IG2 and you can blend the IG4 into the Black with IG5.

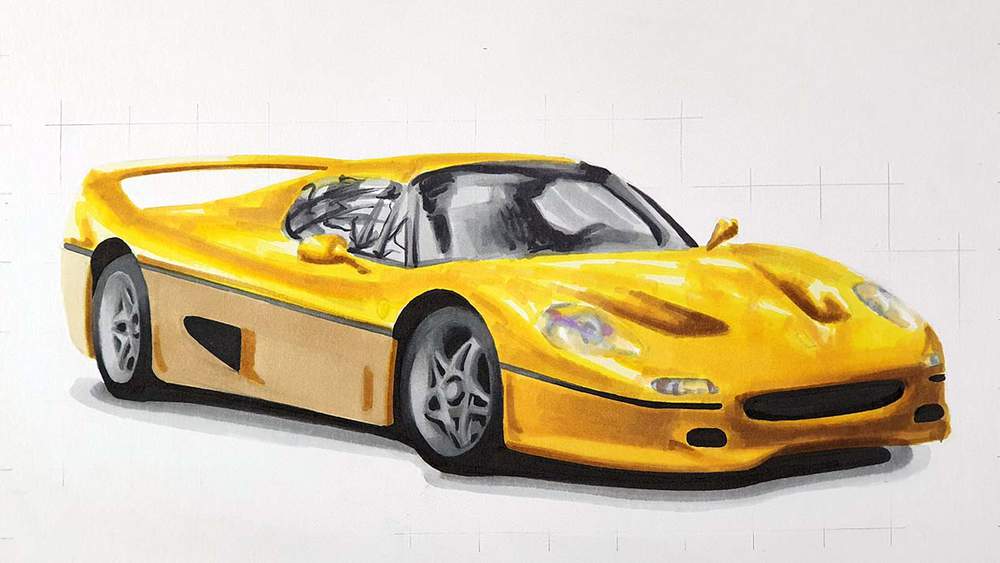
Step 10: Color the Main Body and Reflections of the Ferrari F50
Now that all non-body colored parts are done, it's time to color the main body of the F50.
I started by coloring the whole main body with Soft Lime.
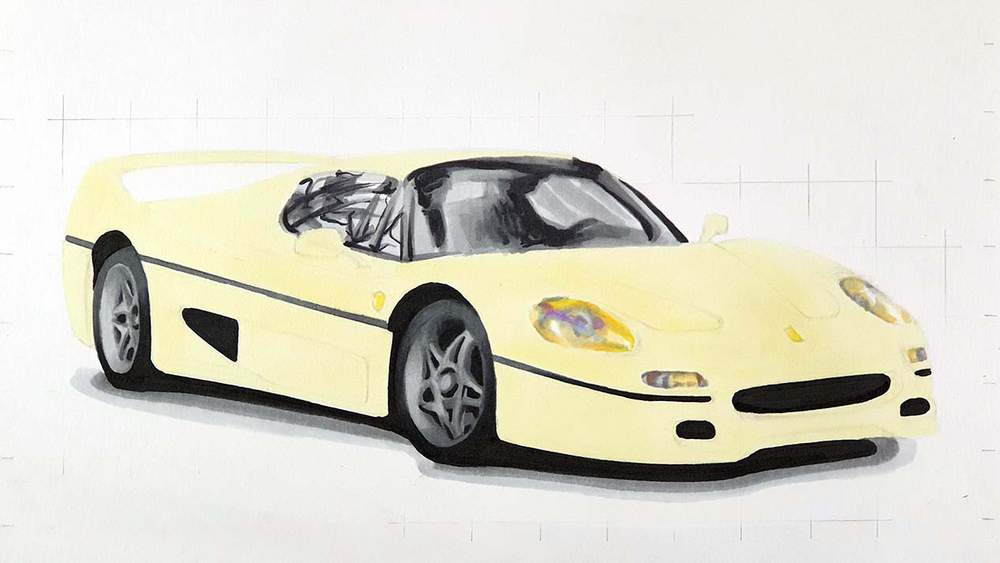
Next, I used Yellow to color all the reflections and darker parts. Later on, I also colored the side of the car with Yellow as it started to look too desaturated, but I'll mention that again when I did it.
After that, I darkened some reflections and parts of the body a bit more with Mustard this time.
Lastly, I used Sandstone to darken the side of the car and I used Caramel and Umber to darken some parts of the rest of the body. Mainly around the front and the nostrils on the hood.
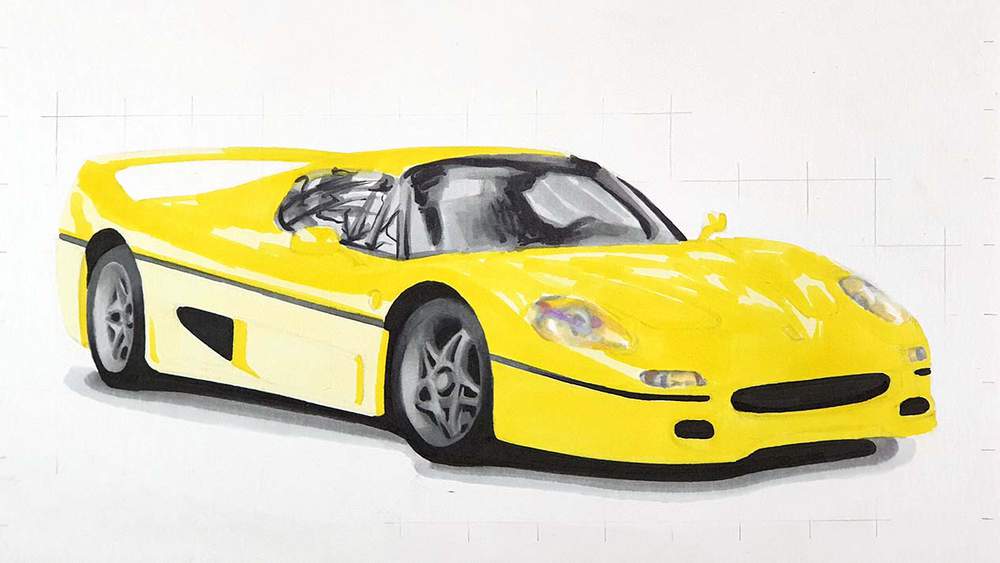
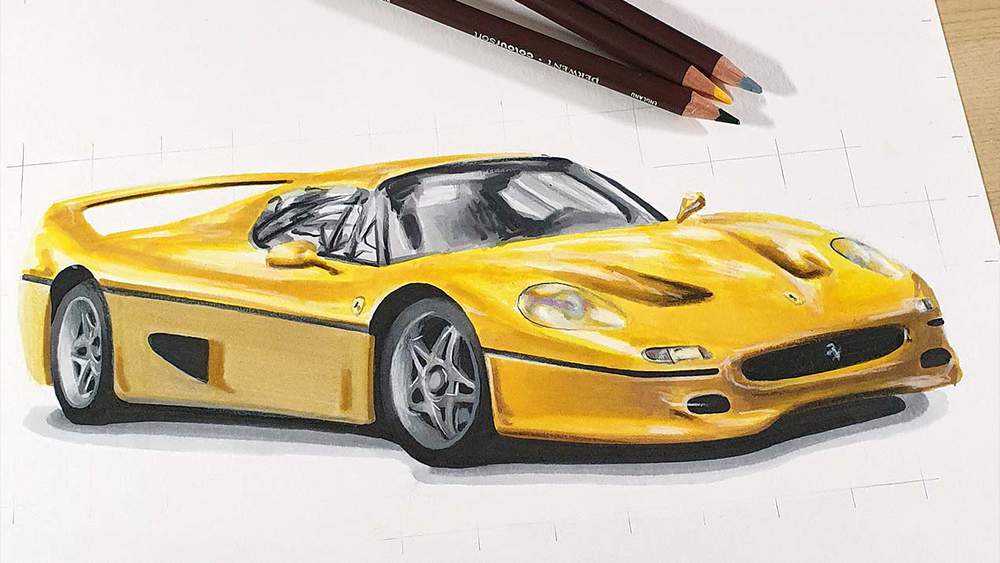
Step 11: Add Details with Black, Grey, and White colored pencils
Next up, I added some details with Black, Dove Grey, and White colored pencils.
I added some highlights and shadows on the wheels, I added a black around the top of the headlights and some highlights in the headlights, and I added tons of white reflections from the light shining through the trees that are reflected on the body of the car.
I also added some more details here and there.
This is also when I used Yellow to resaturate the side of the car a bit.


I forgot to take a good photo of this stage, so this'll have to do...
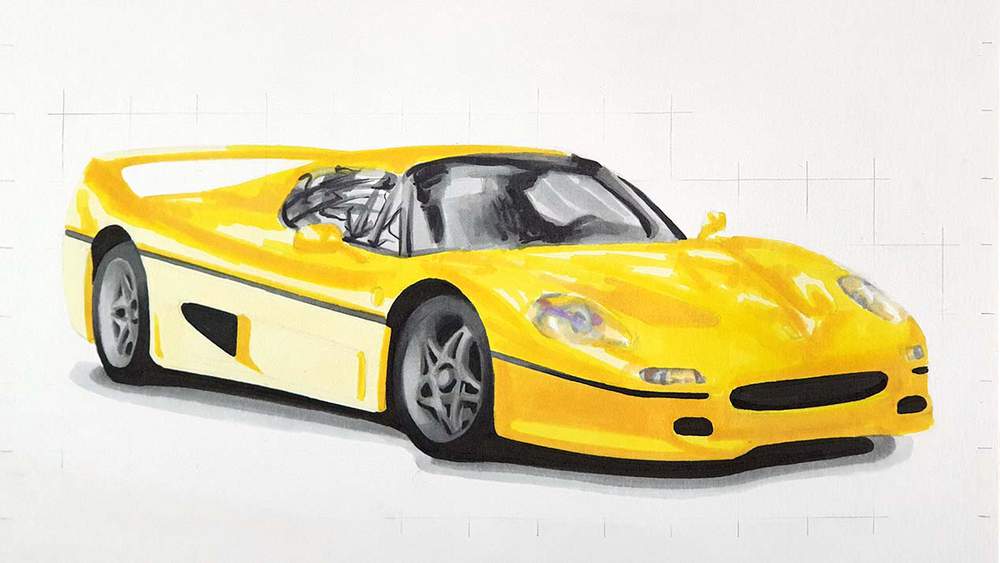
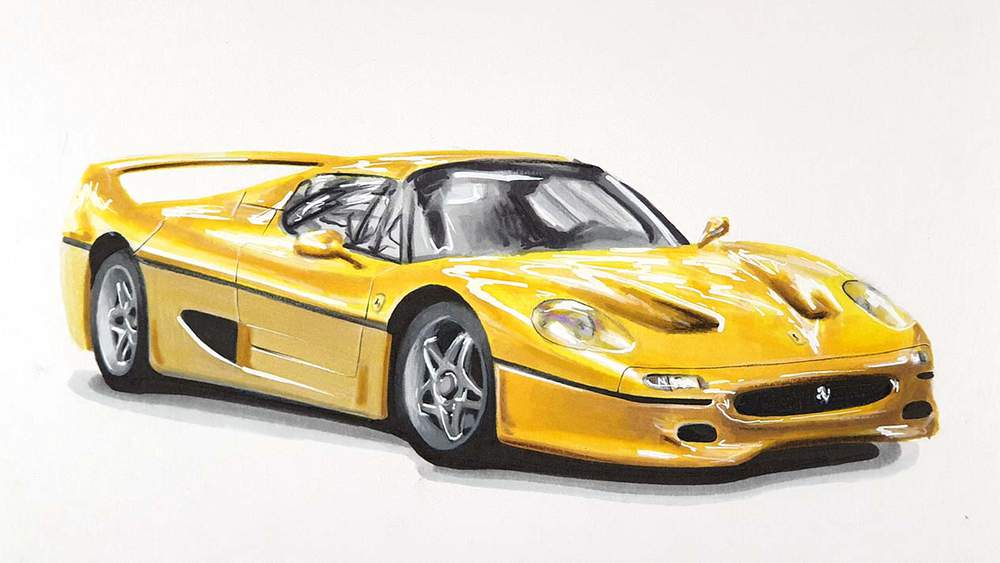
Step 12: Add Pure White Highlights with a Posca Paint Marker
Next up, I added a ton of pure white reflections on the car with a Posca PC-3M paint marker.
I added some highlights on the wheels, on some edges of the car, and a lot on the tree reflections on the main body.

Step 13: Add the Panel Gaps
Lastly, it's time to add something I usually add when I draw the details with colored pencils but I forgot: the panel gaps.
I used the Black and White pencils with very sharp points to lightly add in the lines of the panel gaps and door gaps.
And That's How You Draw a Ferrari F50
There are multiple ways of drawing cars, but this is a workflow that works well for me and is in my opinion a great balance between realism and time spent on a drawing.
I hope you found this helpful! If so, I would really appreciate it if you could share this with someone that might also like this. It would help me out a lot.
And if you've followed along with me and decide to share it on Instagram, please tag me (@luukminkman). I'd love to see your drawing!

Articles You Might Also Like


I love bringing cars to life with alcohol markers and colored pencils.
Whether you're just starting out or looking to improve your skills, I'm here to help!
Click here to learn more about me.


Be the first to comment!
Comments
There are no comments yet.