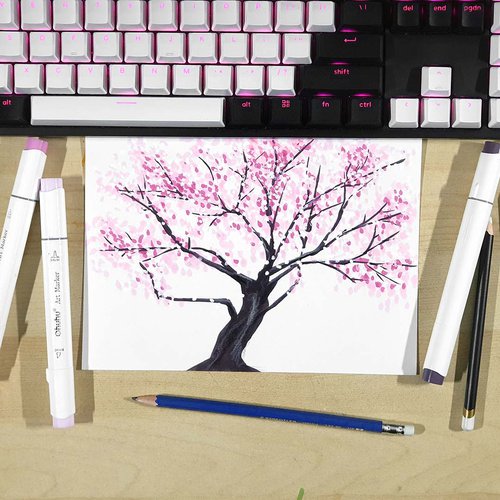
How to Draw a Magical Tree with Markers - Enchanted Purple Tree Drawing Step by Step
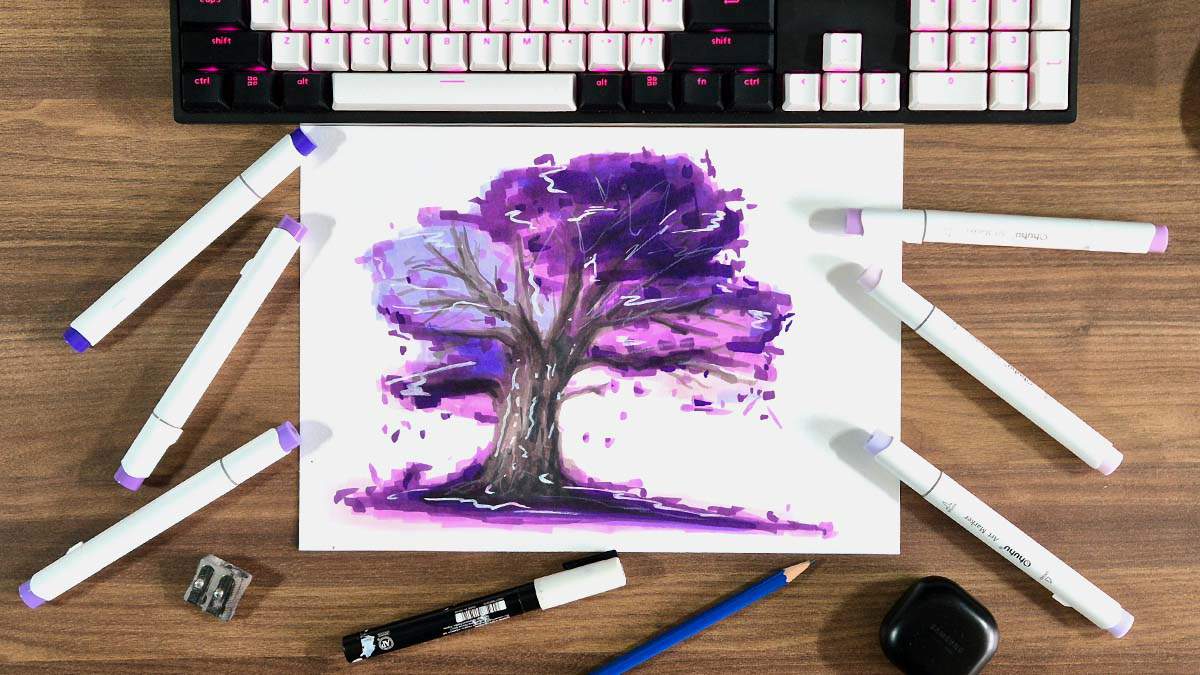
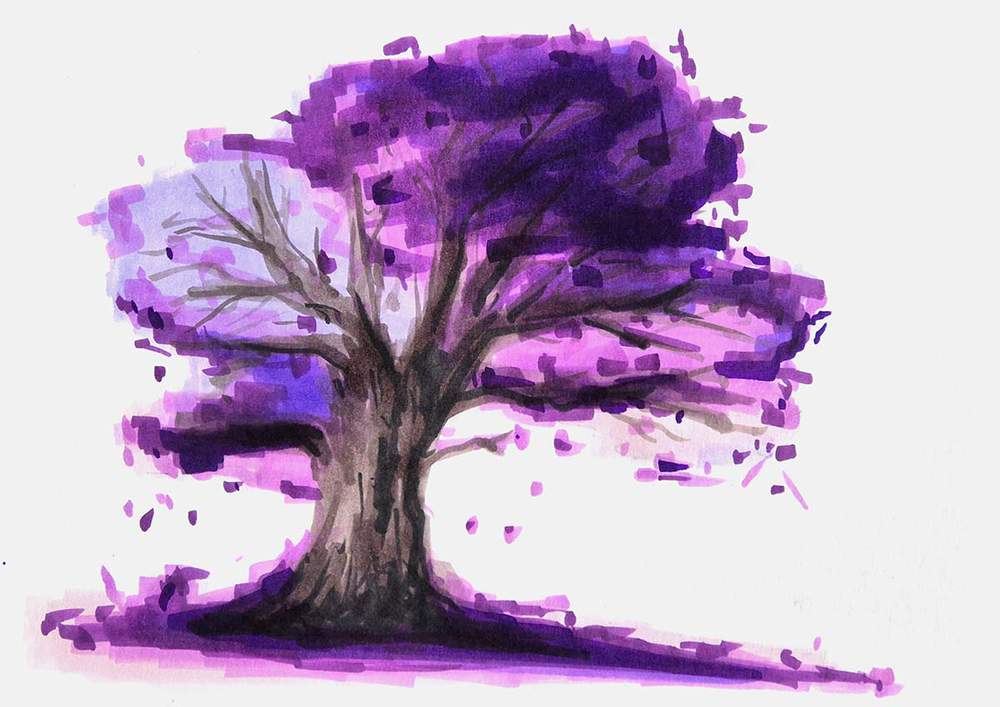
When scrolling through Pinterest, I saw this image of a purple tree. When I saw that drawing, I knew I had to give it a try.
In this tutorial, I'll show you exactly how I drew it and what drawing supplies I used so you can draw this magical purple tree too.
It's easy to follow and perfect for beginners or anyone looking for some drawing inspiration.
Let's get started!
Disclaimer: In the name of full transparency, please be aware that this blog post contains affiliate links and any purchases made through such links will result in a small commission for me (at no extra cost for you).
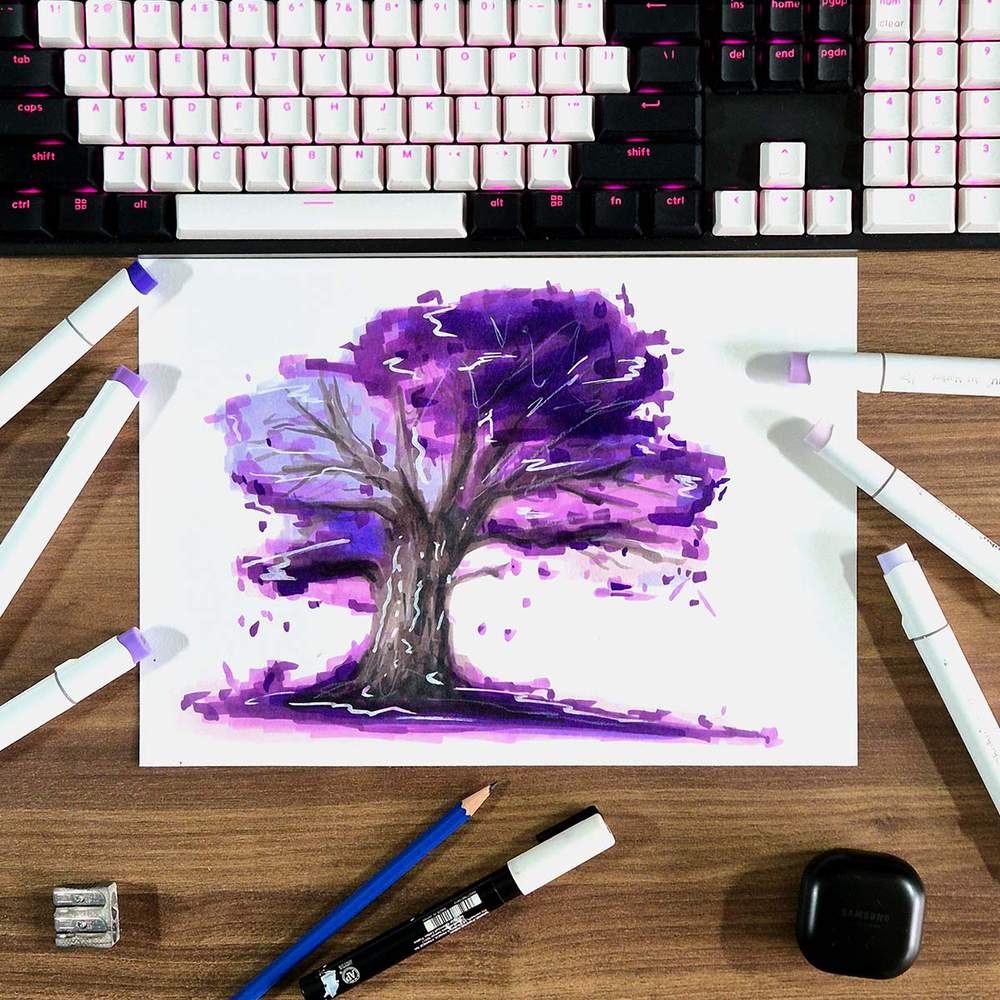
Drawing Materials I Used
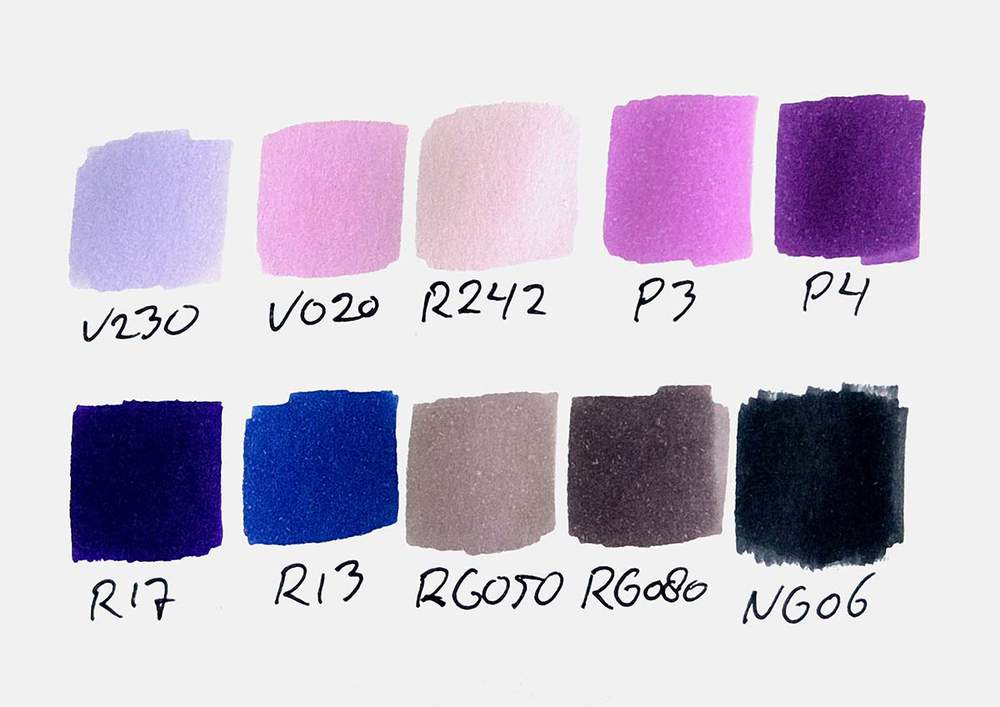
To make this magical tree drawing, I used Ohuhu Honolulu markers in the colors Viola (V230), Pale Lilac (V020), Grayish Cherry (R242), Pastel Violet (P3), Lavender (P4), Pansy (R17), Clematis (R13), Red Grey 05 (RG050), Red Grey 08 (RG080), and Neutral Grey 6 (NG06).
You can also buy these colors individually on their website.
I used a white Posca PC-3M paint pen to add white highlights.
And I used the white Derwent Chromaflow colored pencil.
I also used an eraser and a regular HB pencil.
And I made this drawing on Canson Illustration Manga Paper.
How Do You Draw a Magical Tree?
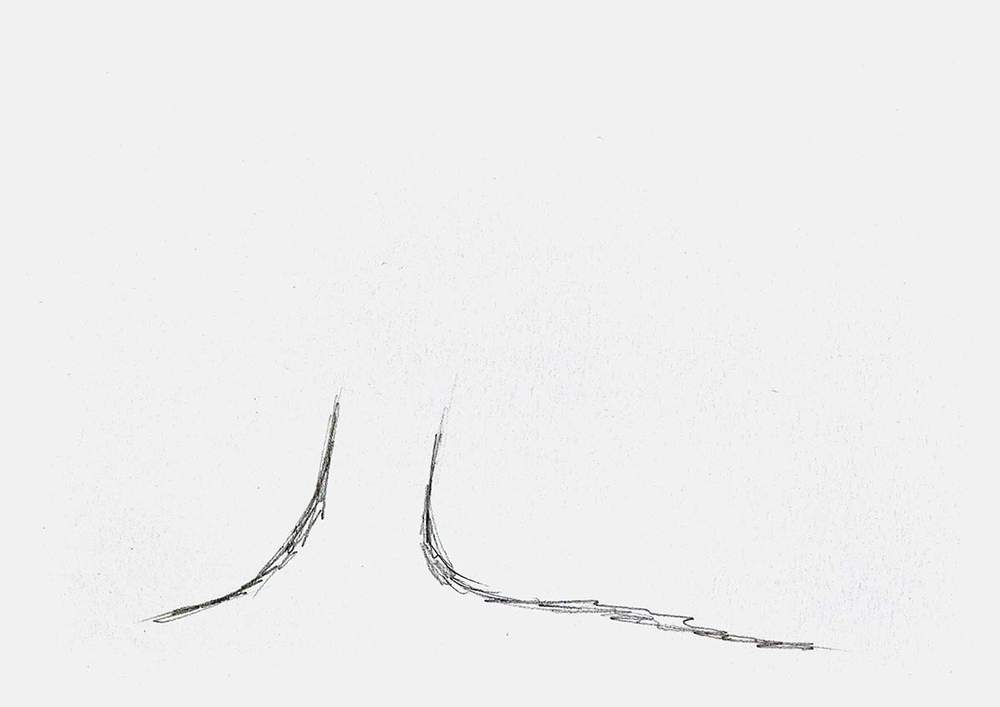
Step 1: Sketch the Trunk Base of the Magical Tree
A tree isn't magical if it's not super old. And to make this tree look old, I made the tree trunk nice and thick.
I sketched two lines that curved upwards towards each other. These two lines form the basis of the trunk.
I made the trunk slightly tilted towards the right because I thought it would look good and less static.
I also placed it off-center for the same reason.
Step 2: Add Some Big Branches
With the old tree trunk in place, we can start adding the branches.
Just like the trunk, I made the branches thick.
I first added the branches on the left of the tree. Kinda just wherever it felt right.
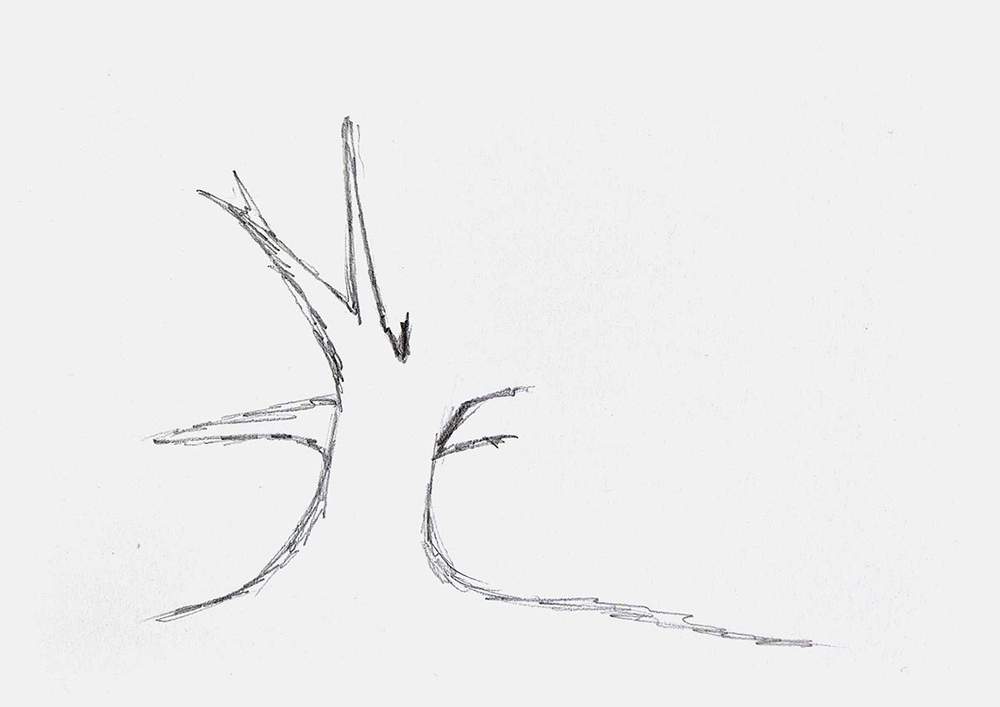
And then, I added the branches on the right side of the tree.
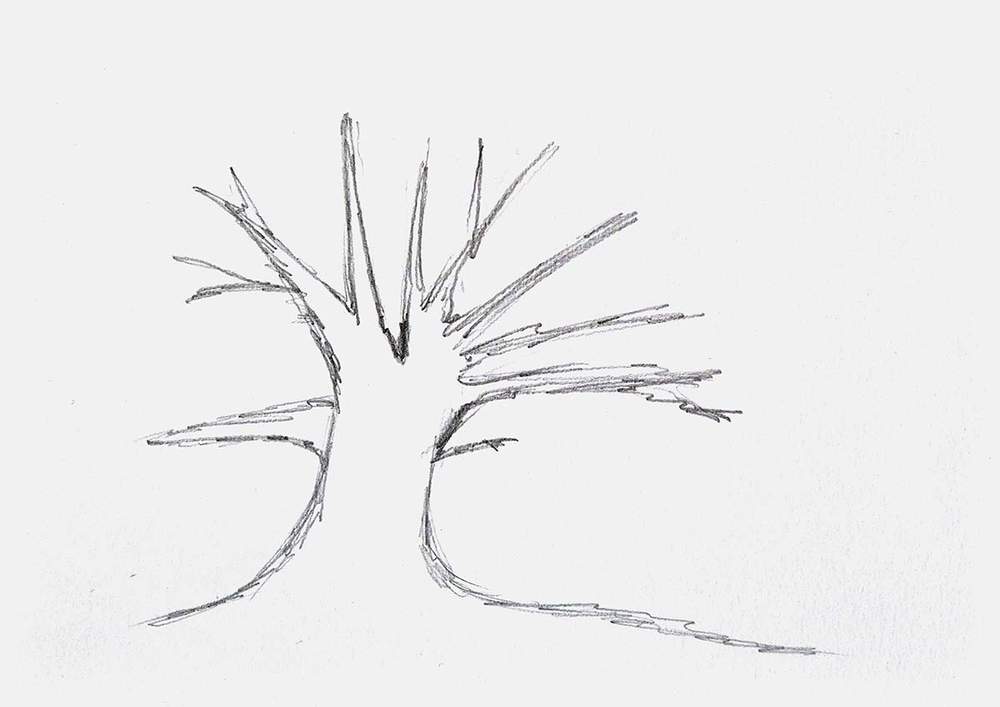
You can't really mess up the branches, as long as you don't make them all the same length and spread them super evenly.
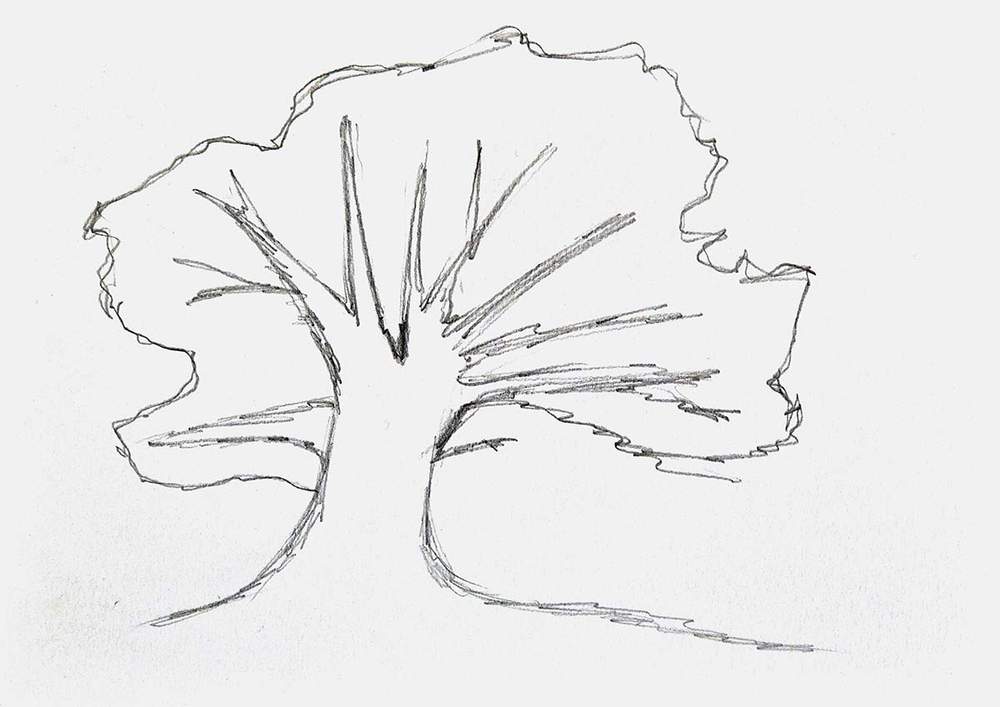
Step 3: Mark Out the Shape of the Leafs
After sketching the branches, I added the outline for the leaves.
I roughly followed the branches with some extra padding. And I made the line scribbly to make it look more like leaves, instead of super smooth.
I also decided to not add any leaves to the one small branch on the bottom right.
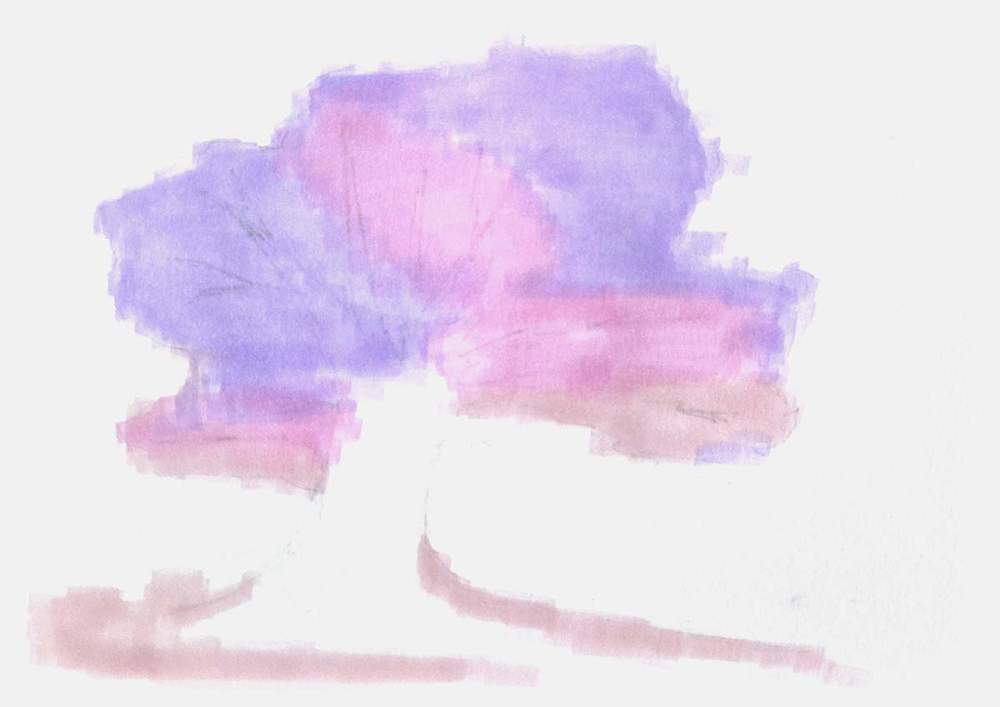
Step 4: Color the Leafs with a Base of Purple-ish Pastel Colors
With the sketch now done, it's time to color it with markers!
But first, I highlighted the sketch with an eraser to make sure it doesn't shine through the marker ink.
Next, I used the 3 pink and purple pastel colors to color the leaves and parts of the ground.
I used Viola (V230) for the purple bits of the leaves on the top right and the left of the tree.
I used Pale Lilac (V020) for the more pinkish purple parts in the middle, bottom right, and bottom left.
And I sued Grayish Cherry (R242) for the pale pink on the bottom left, bottom right, and the ground.
Step 5: Add Dimension to the Leafs by Layering Darker Purples
To add more 3D to the leaves, I layered more purples on the first base layer of markers.
I used Pastel Violet (P3) to color more of the ground, and to darken the top, the right, and the bottom left of the leaves.
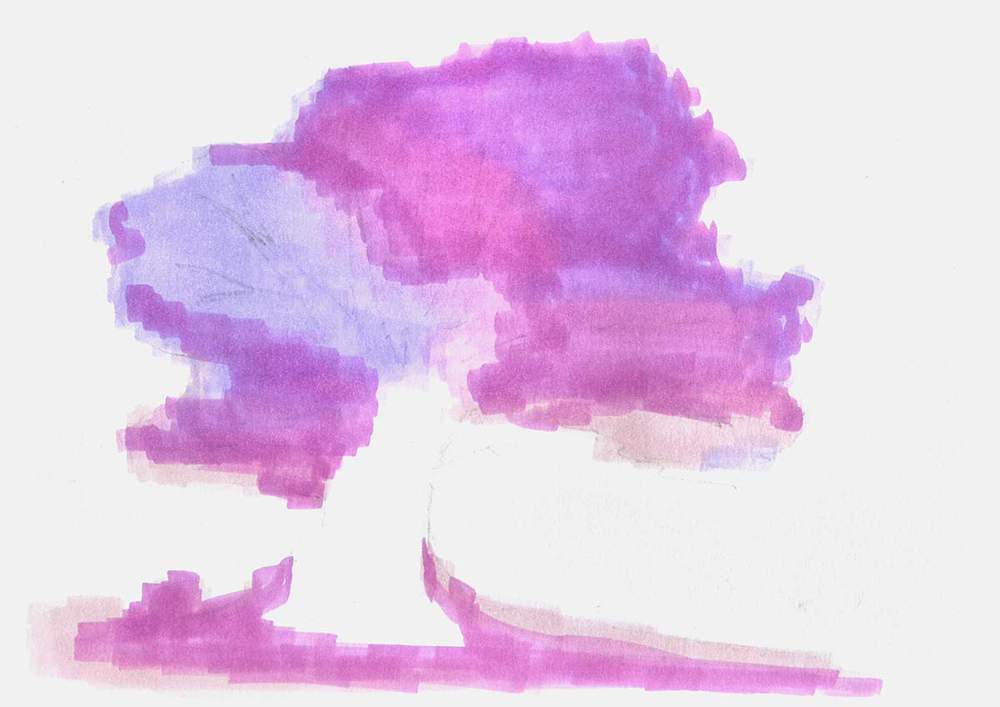
Then, I used Lavender (P4) to add more shading to the top right of the tree, and a little bit on the bottom right and bottom left. I made these markings more scribbly to give the tree some texture.
I also colored more of the ground.
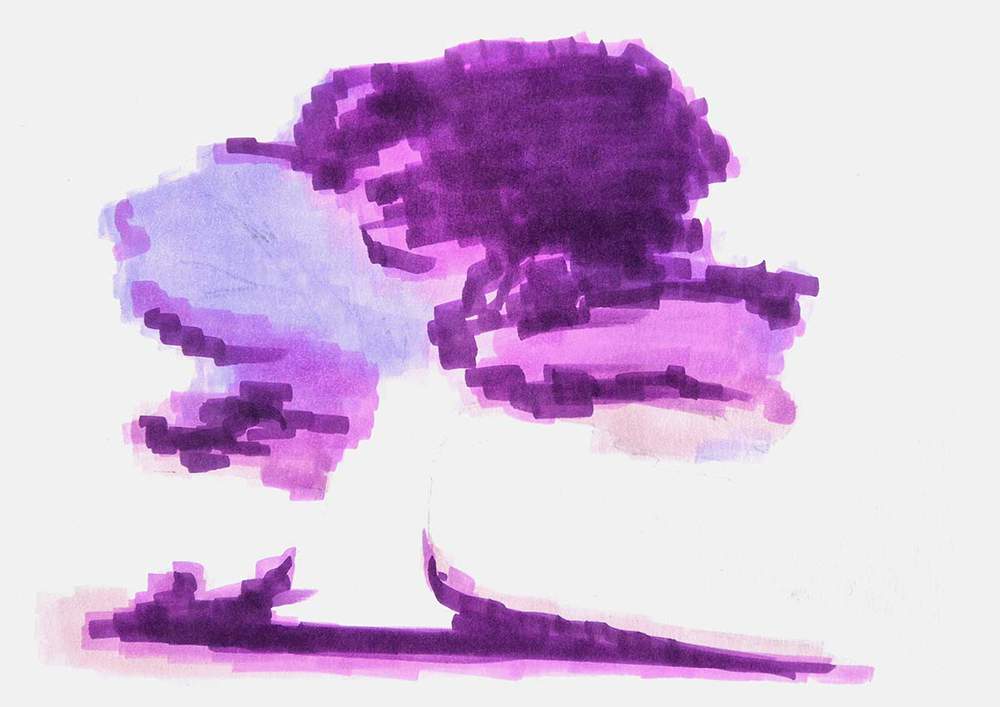
Lastly, I used Pansy (R17) to add a few shadows to the top right and the bottom left of the canopy, and I shaded some more of the ground below and around the trunk.
I also added some blue-purple to the bottom left with Clematis (R13).
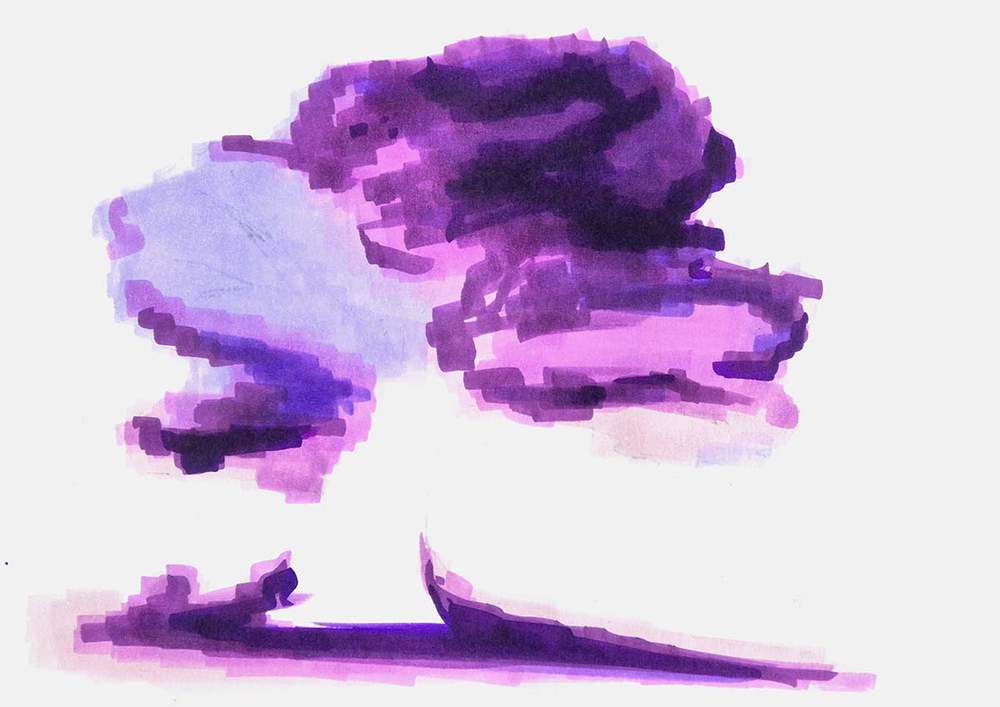
Step 6: Color the Trunk and the Branches of the Magical Tree
Next, I colored the old trunk and the branches of the tree.
I first added a base layer of Red Grey 05 (RG050) to the trunk and the branches.
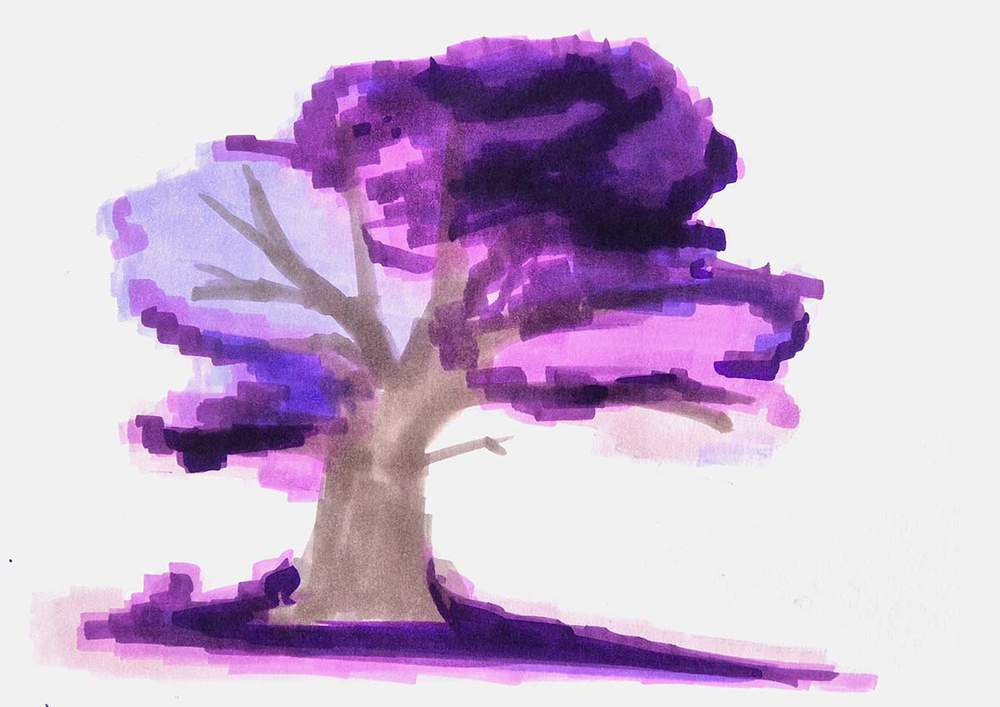
Then, I used Red Grey 08 (RG080) to add shading and texture to the branches and the trunk. I again used lots of scribbly lines to do this.
Lastly, I used Neutral Grey 6 (NG06) to add some really dark shadows to the base and the right side of the trunk.
I also added dark shadows to the bottom and right side of the branches on the right half of the tree.

Step 7: Add Some Magical Particles Around the Tree
Right now, the tree looks pretty boring and flat.
To make our magical tree less boring, I added particles all around it.
I used Pastel Violet (P3), Lavender (P4), and Pansy (R17) to add some dots around the canopy and on the ground.
This small change already made this drawing look so much better.
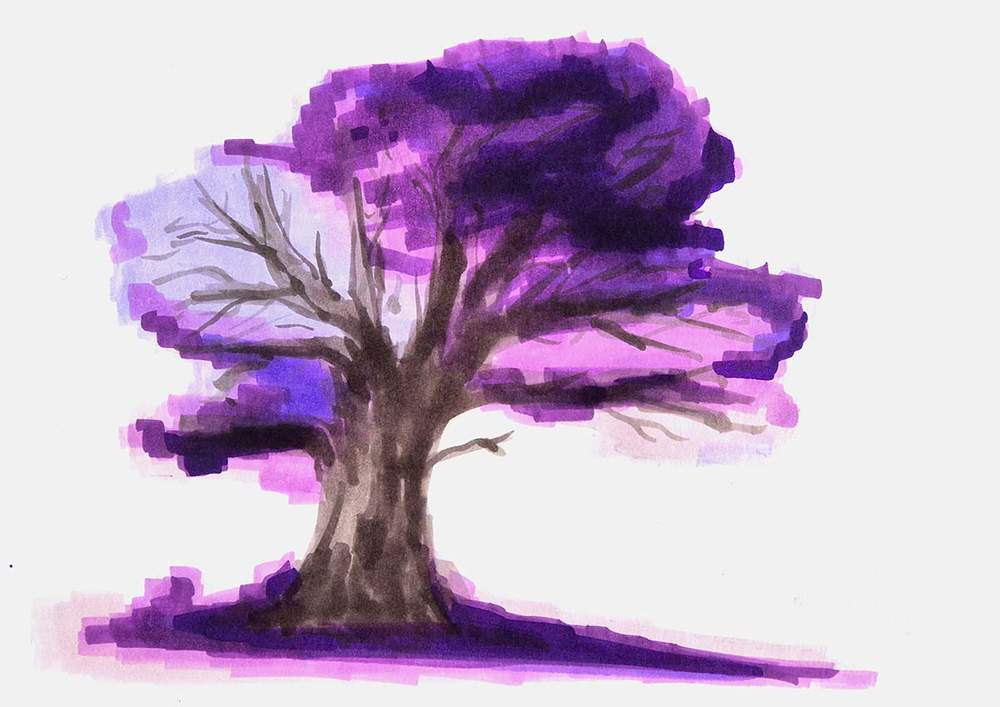
Step 8: Add Some Details and Highlights to Finish Your Enchanted Tree Drawing
To make this drawing just one little bit better and more interesting, I decided to add some white highlights to it.
I used my white Posca paint marker and added some scribbly lines where I thought they would look good. And I did the same with my white Derwent Chromaflow colored pencil.
I especially added some scribbly lines to the trunk of the magical tree.
Again, these lines give the magical tree drawing more texture.
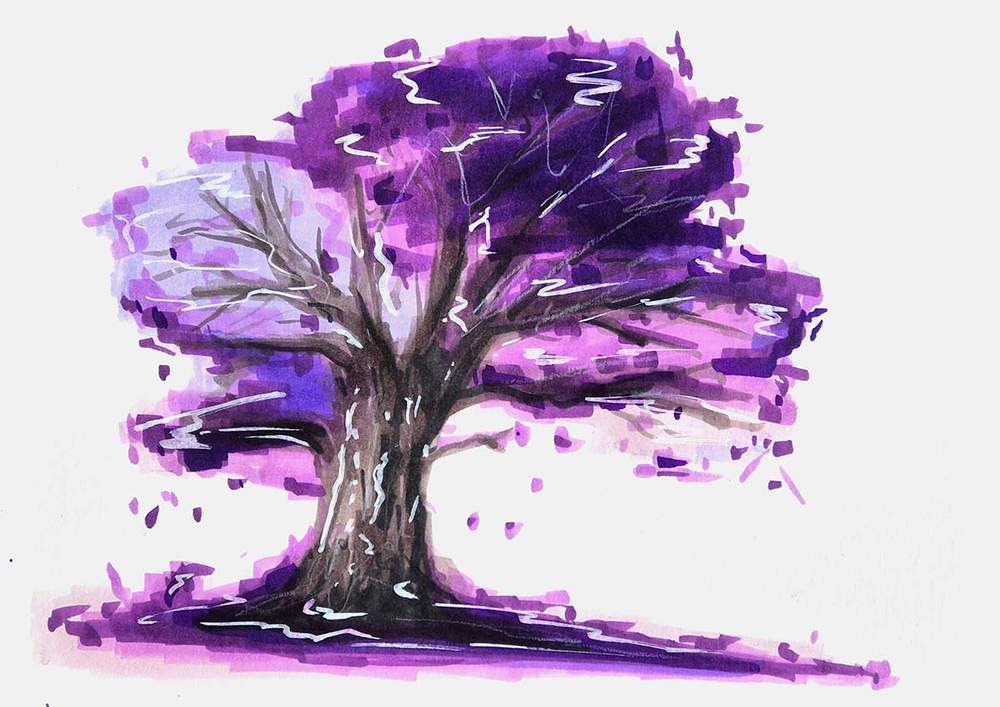
And that's the magical tree drawing all done!
I hope you enjoyed this tutorial!
And if your drawing didn't turn out as well as you wanted, just remember that getting good at drawing takes practice. It took me multiple tries to get to this drawing.
If you want to learn how to draw other things like flowers, a sunset, or anime characters, make sure to check out my other step-by-step drawing guides.
Articles You Might Also Like


I love bringing cars to life with alcohol markers and colored pencils.
Whether you're just starting out or looking to improve your skills, I'm here to help!
Click here to learn more about me.


Add a comment
Comments
who needs an art academy when we have teachers like these?