How to Draw a BMW M4: A Step-by-Step Guide to Drawing a Stunning Purple Masterpiece
This guide is all about how to draw a BMW M4 step by step and is perfect for people who want to learn how to draw a realistic car.
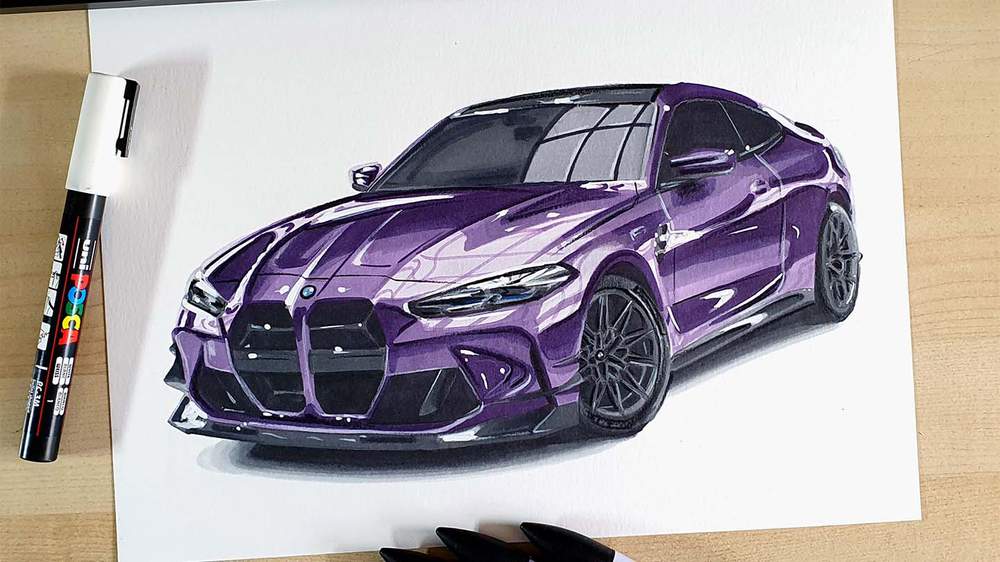
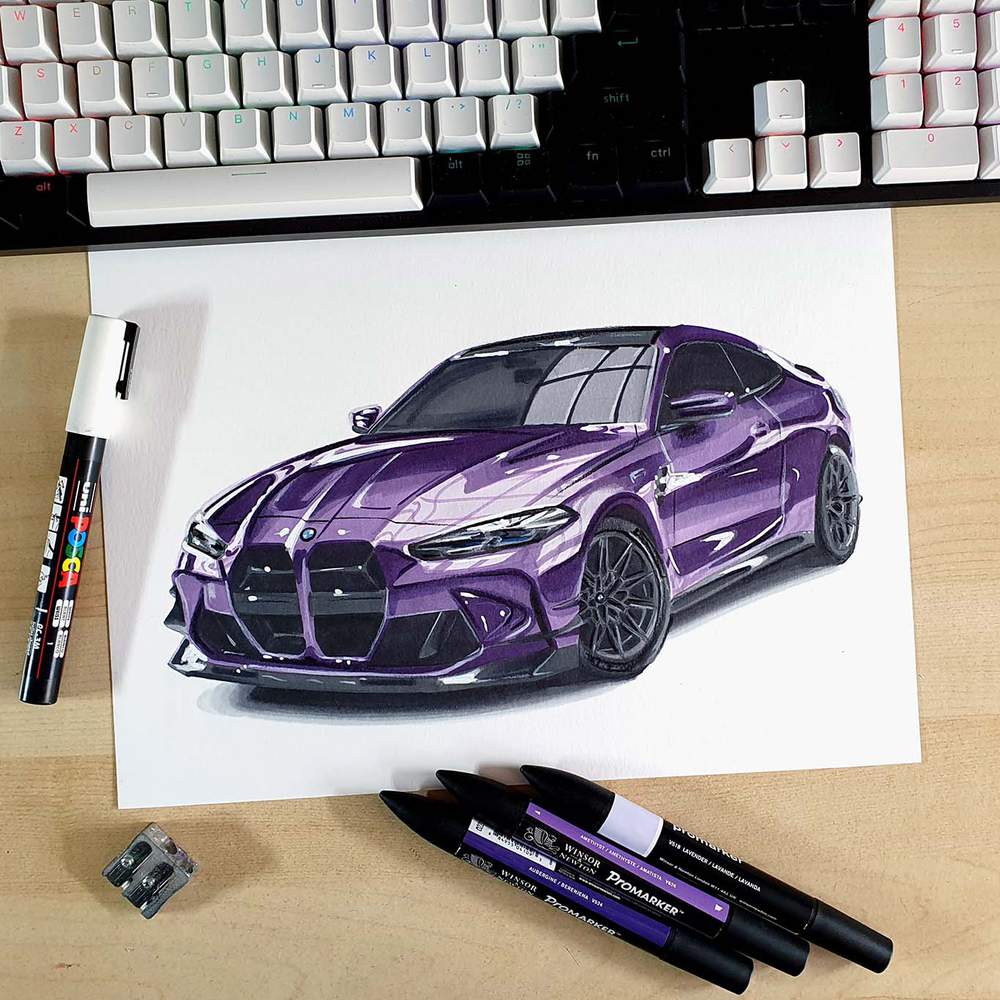
In this week's car drawing tutorial, I'm going to show you step-by-step how I drew this beautiful purple BMW M4.
A purple BMW M4 has been on my list for soooo long! I finally decided to draw one and OMG it turned out so well!
Here's exactly how I made it! Explained as simple and straightforward as possible. The full guide is broken up into simple steps with plenty of images so you can easily follow along.
Disclaimer: In the name of full transparency, please be aware that this blog post contains affiliate links and any purchases made through such links will result in a small commission for me (at no extra cost for you).
In This Guide
- Drawing Supplies You'll Need
- The Reference Photos
- Sketching the BMW M4 using the Grid Technique
- Coloring the BMW M4 with Markers
- Adding Details and Highlights with Colored Pencils and a White Posca Paint Marker
- More car drawing guides you'll love
Drawing Supplies I Used in this Tutorial
To draw the BMW M4, I used the following art supplies:
A4-sized Canson Illustration Manga paper (by far the best paper for alcohol markers in my opinion).
A graphite pencil, a ruler, a kneaded eraser, and a regular eraser.
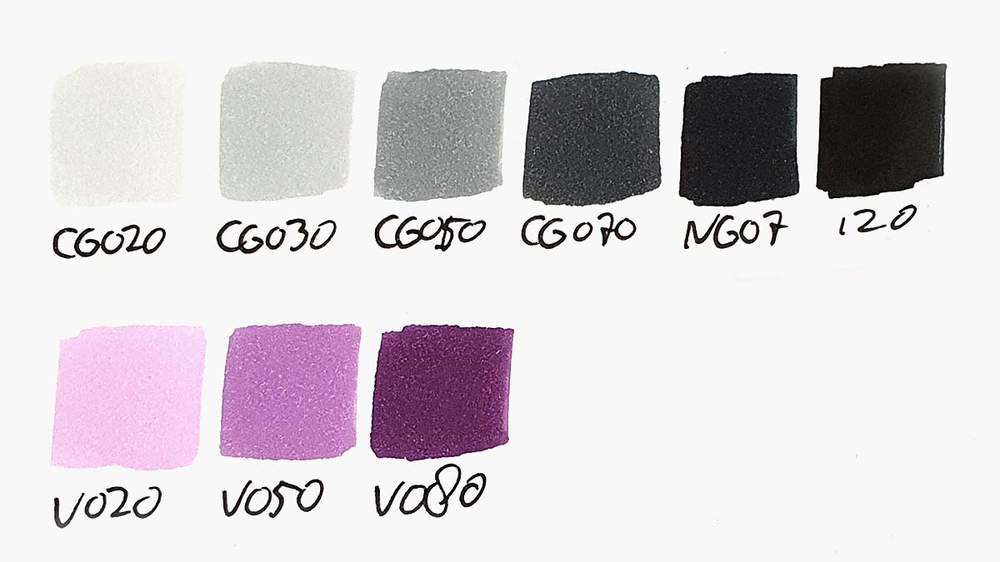
Ohuhu Honolulu markers in the colors Neutral Grey 02 (CG020), Neutral Grey 03 (CG030), Neutral Grey 05 (CG050), Neutral Grey 07 (CG070), Neutral Grey 7 (NG07), Black (120), Pale Lilac (V020), Pearl Violet (V050), and Dark Violet (V080). You can buy these markers in the 320 set on Amazon or on Ohuhu's website. Or you can buy these colors individually here on Ohuhu's website.
Derwent Chromaflow pencils in the colors White 2400, Platinum 2200, Black 2300, and Blue 1300 to add details.
And a white Posca PC-3M to add white highlights on the BMW drawing.
Reference Photos I Used to Draw this BMW M4
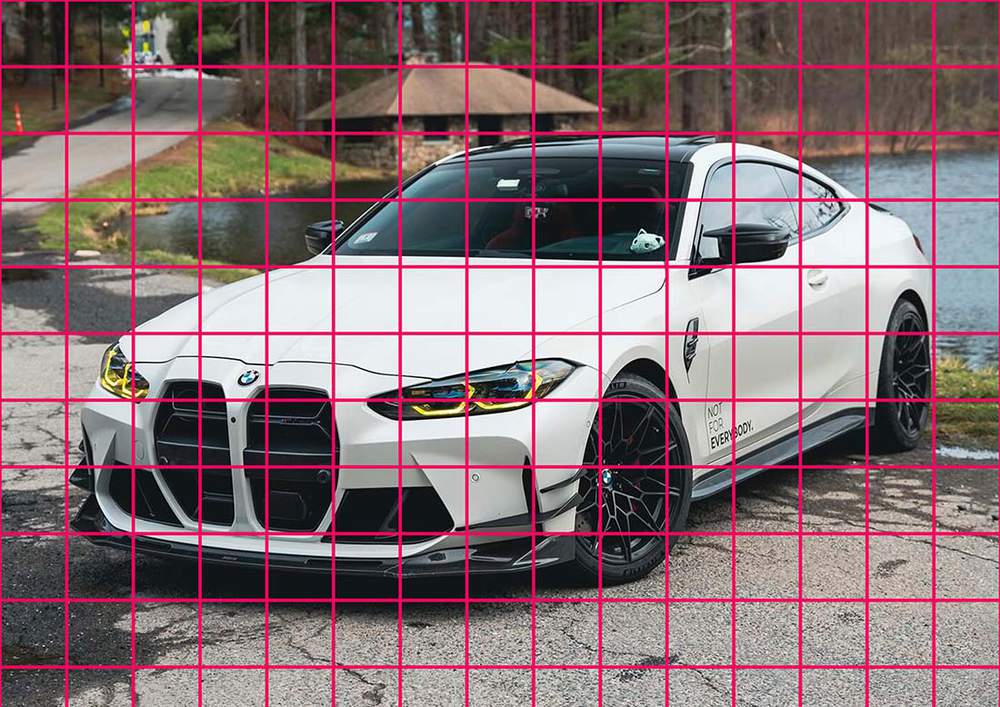
Normally I woud use 3 reference photos, but to make this drawing, I only used 2 reference photos. 1 for the proportions and the perspective and 1 for the lighting and the reflections.
I used this photo for the perspective.
And I used this photo for the reflections.
If you'd like to know how I make sure I pick good reference photos so my drawings turn out realistic, I highly recommend you check out this guide I wrote on how to pick the perfect reference photos for your car art!
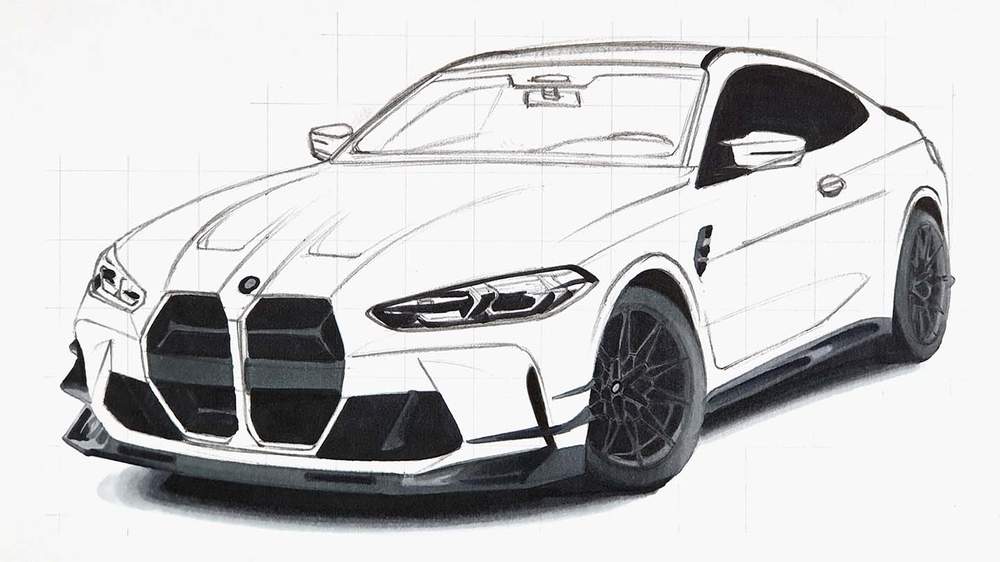
How to Draw a Realistic BMW M4?
To make a realistic drawing of a BMW M4, I first gathered a few reference photos for the perspective, proportions, lighting, reflections, and color. This is essential if you want to create a realistic car drawing.
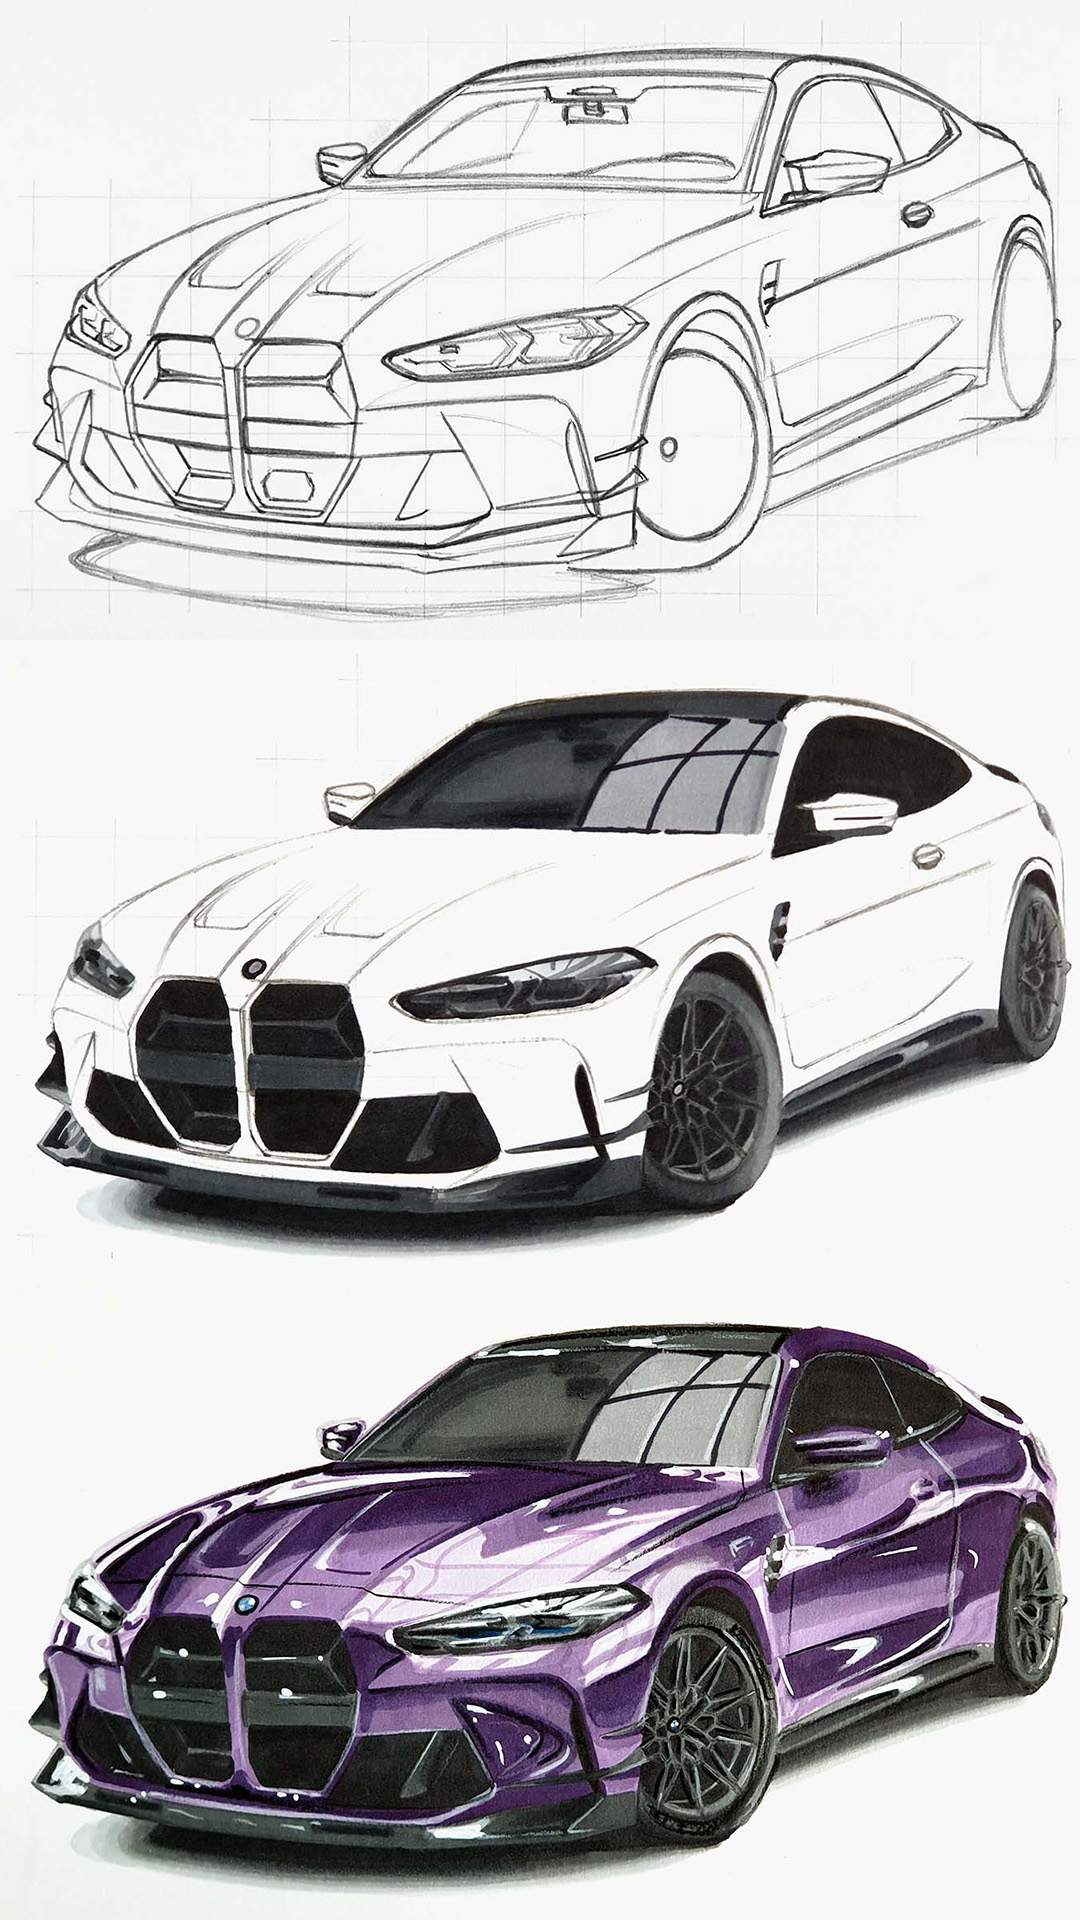
After that, I created a sketch of the outline of the car using the grid method, which is a great method for beginners to get the proportions of the car right.
Next, I color the car with alcohol markers starting with the black and the grey parts, before moving on to the main body of the car.
Lastly, I added some details with colored pencils and highlights with a Posca paint marker.
Step 1: Sketch the Basic Outline of the BMW M4
Sketching cars like the BMW M4 can be quite difficult and daunting, at least if you're trying to freehand it.
But there are other techniques you can use to sketch the car like the grid method, for example, which is the technique I'll be using in this tutorial. This technique makes sketching cars with accurate proportions a lot easier. You can find more on how to use the grid method here.
I start by overlaying a grid over the reference photo for the perspective that I resized to A4 size. The grid I'm using for this drawing is 15 by 10.5 squares with squares of 2 by 2 cm which works well for A4-sized paper.
With my grid overlay tool, you can easily add a grid overlay on your reference photo. Just upload a photo, enter the size of your paper and how many squares you want.
Once I'm done with that I recreate that same grid on my piece of paper.
I like to only sketch the squares needed to sketch the car, but if you're new to the grid method, I recommend you sketch the whole grid instead as it is a lot easier.
When drawing the grid, make sure to measure precisely where each line needs to be. Each line is 2 cm apart. If you don't do this, your BMW sketch won't have realistic proportions.

Now that the grid is done, it's time to start sketching the BMW M4.
I did shorten this part of the guide quite a bit. So, if you'd like me to create the full step by step guide of how to sketch this BMW M4, send me an email here.
I like to sketch the general outline of the car first. This makes it easier to add in all the details later.
I usually start on the left and work my way up and around the car until I have sketched the full outline and the basic shapes of the BMW M4.
When sketching, look closely at where the lines of the car cross gris lines and where they start and end. Marking those points first makes sketching the lines a lot easier. This is how I sketch every line.
It's important to make sure the shape of the car is as accurate as possible, otherwise your drawing won't look realistic in the end.
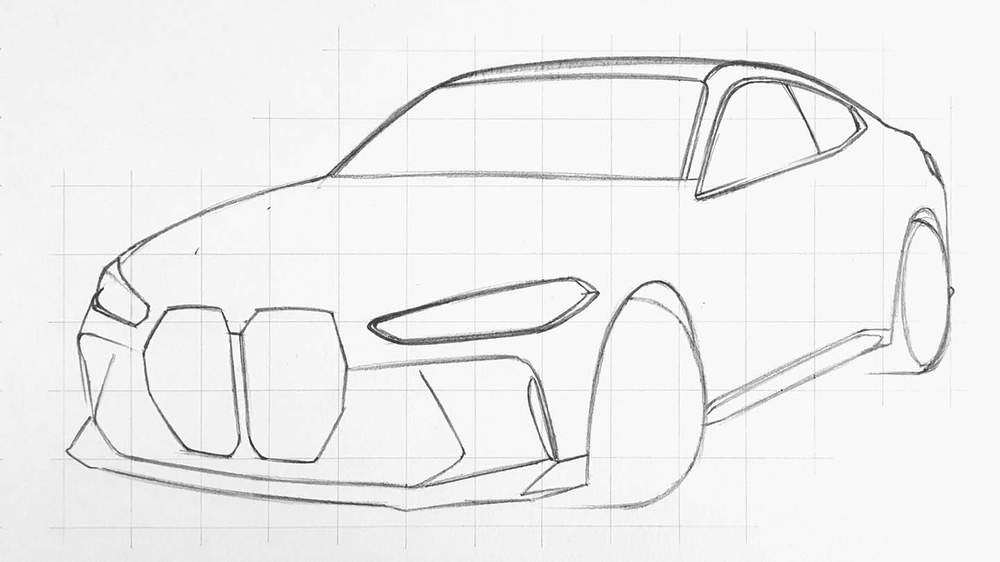
Step 2: Sketch the Details of the BMW M4
Now that the basic shape of the car is done, it's time to sketch all the details of the BMW M4.
This might seem like a big step, but with the basic shapes already in place it's just a case of slowly adding detail after detail to the shapes that you've already sketched.
I started adding details on the front first. Next, I added the body lines on the hood and on the side. Then I sketched the windshield and the headlights. And so on.
I haven't sketched the wheels yet as I wanted to explain how I sketched them in more detail.
Take your time.
A good sketch is way easier to color in than a sketch made in a hurry.
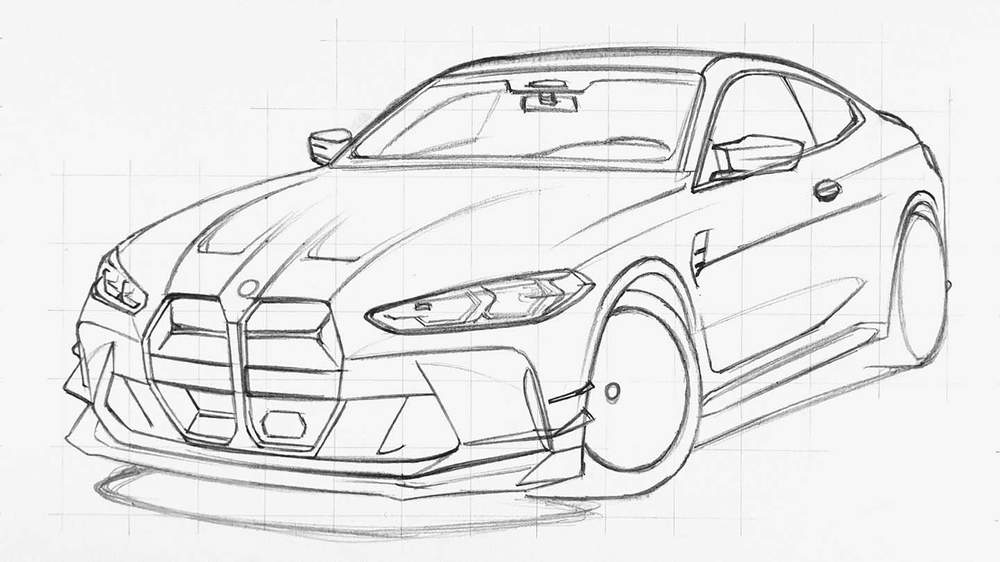
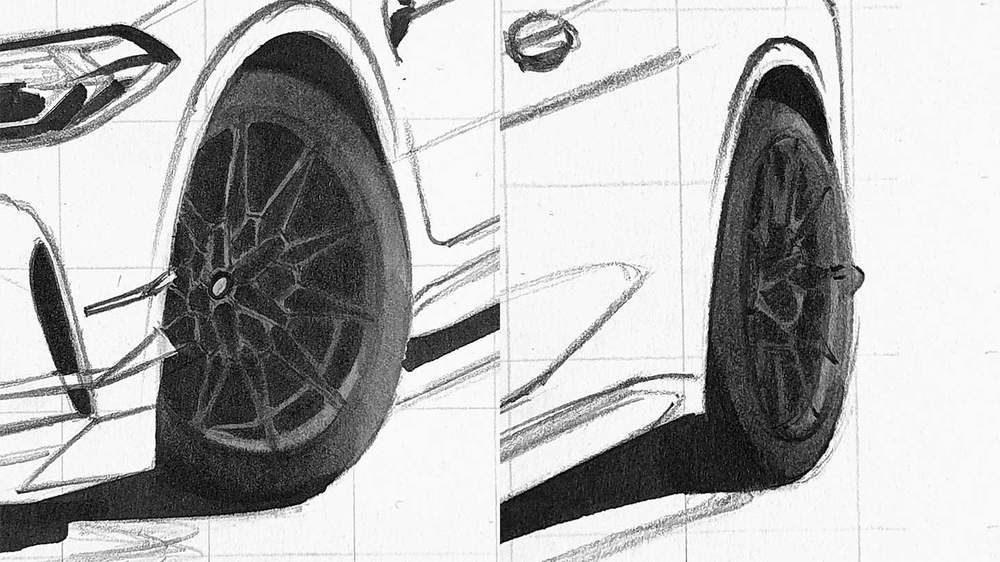
Step 3: Sketch the Wheels of the BMW M4
All that's left to sketch now are the wheels. And they aren't the easiest ones... But tried my best to capture as many images of this step as possible to make it easier to draw these wheels correctly.
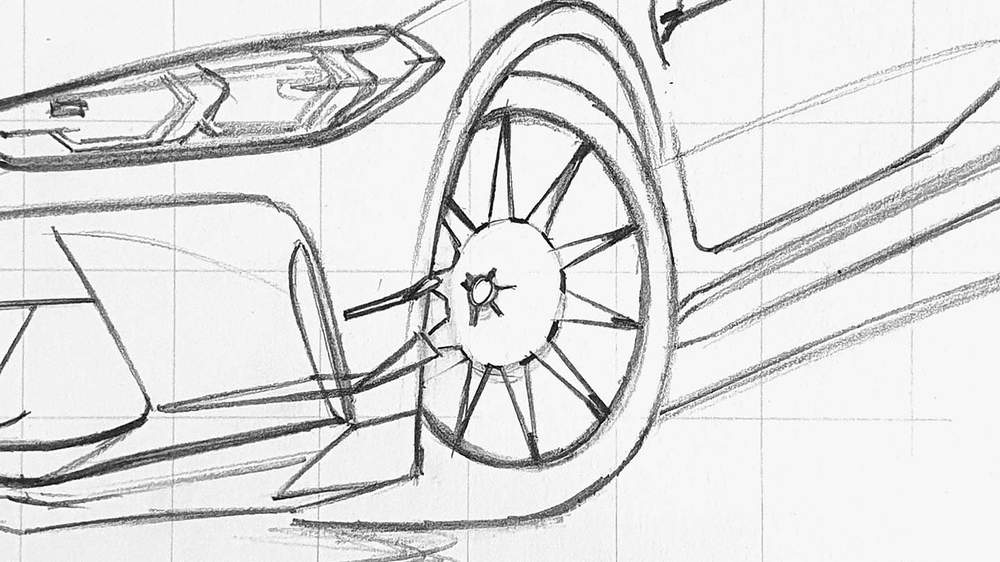
I had already marked where the center of the wheel is when adding the details as well as the outer rim of the wheel. The center of the wheel is closer to the left side of the wheel as we're viewing the wheel from an angle and the center is a bit inset into the wheel.
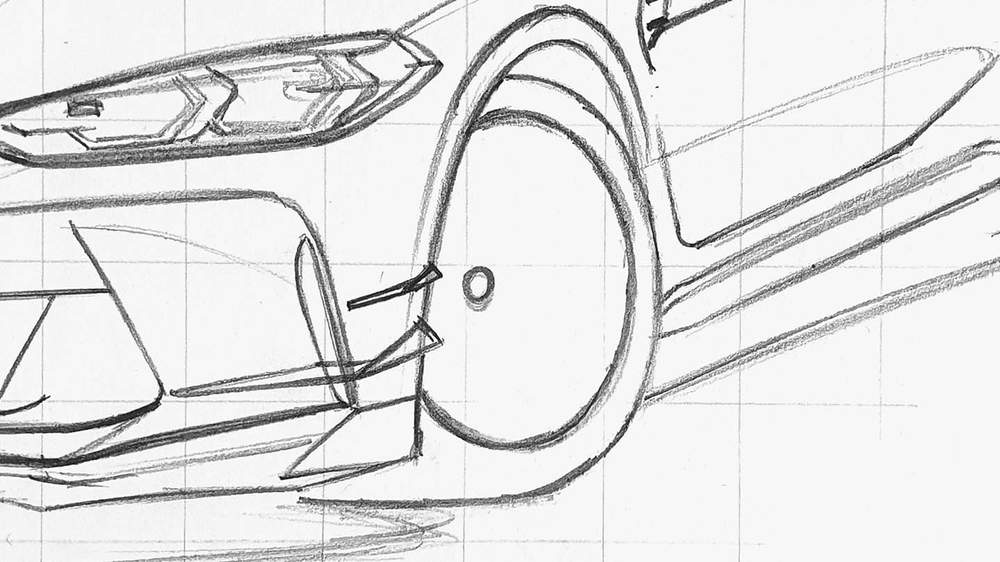
I started sketching the wheel by marking where each of the spokes attaches to the outer rim. I also sketched a smaller circle around the center of the wheel. The center is also closer to the left of this circle as it's inset into the wheel a bit.
This smaller circle functions as a guide for the spokes.
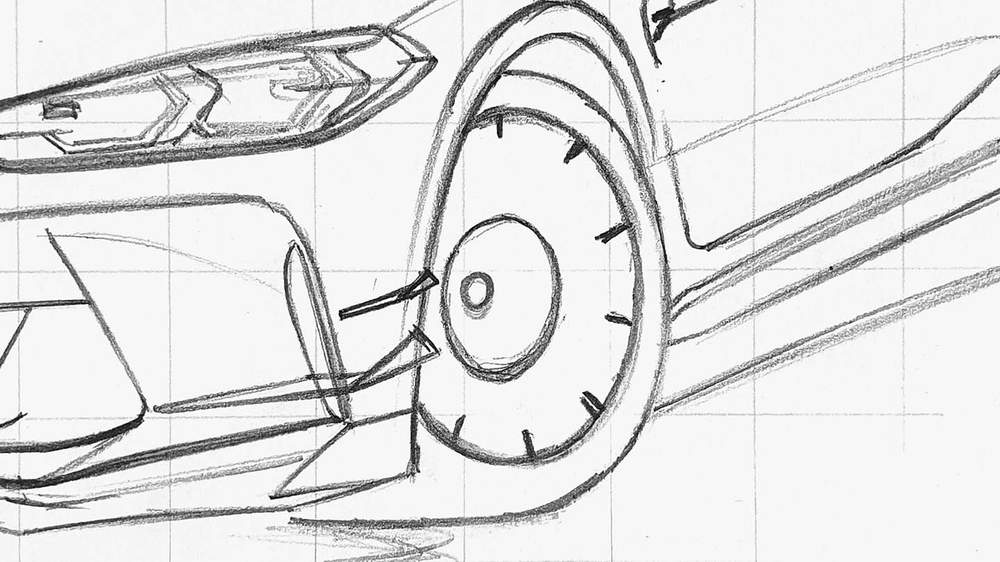
Next, I marked 10 short lines on the smaller circle we just sketched.
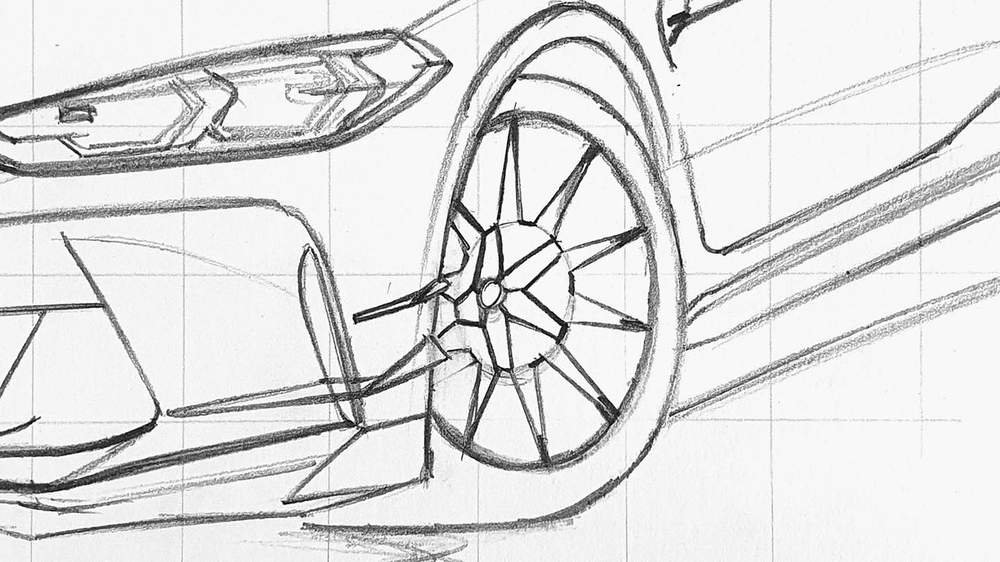
After that, I sketched the spokes connecting the short lines to the outer rim.
I also sketched 5 short lines starting from the center each pointing to one of the lines on the small circle we sketched before.
Then, I sketched 2 diagonal lines from each end of those short lines and connected them to an end of a line on the smaller circle.
After that, I sketched in the last bits of the spokes. These bits start at the ends of short lines on the smaller circle that do not have a line attached to them yet and attach to the center of the longest lines within the smaller circle.
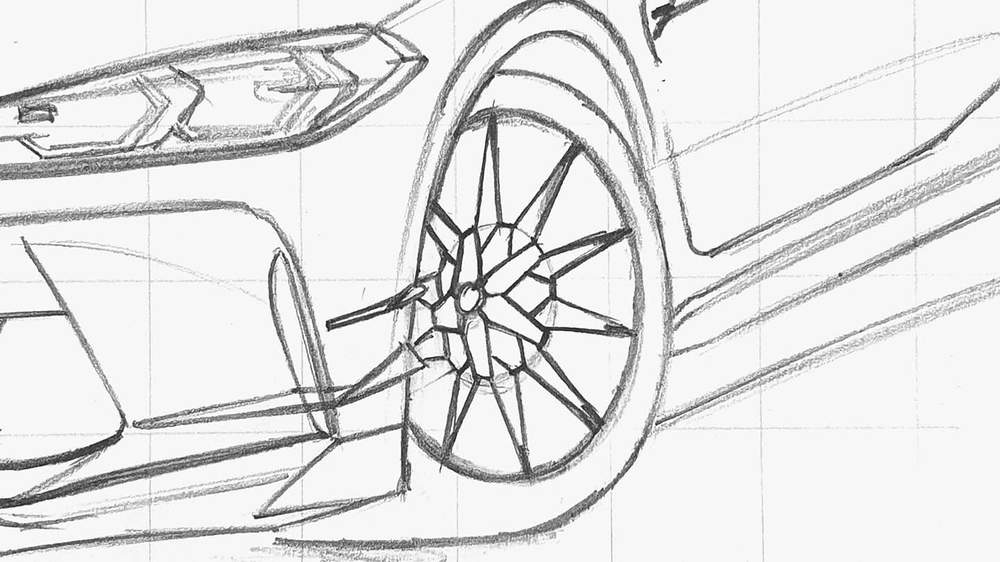
And that's all spokes sketched! I hope it was somewhat understandable...
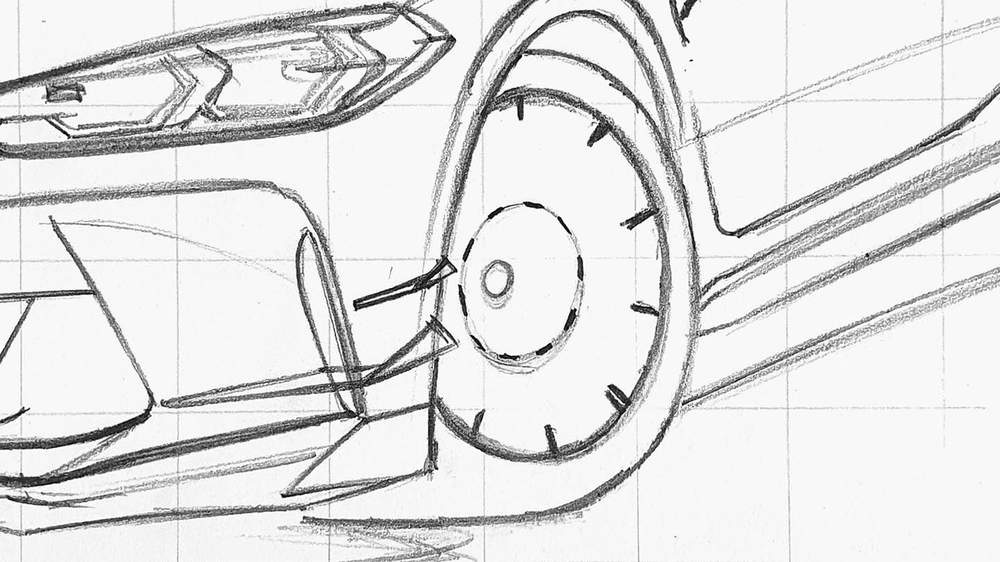
The wheels aren't done yet though.
I added some depth to the spokes by adding a line to the left of each spoke. I also added more rim lines, the brake disc, and te bolts.
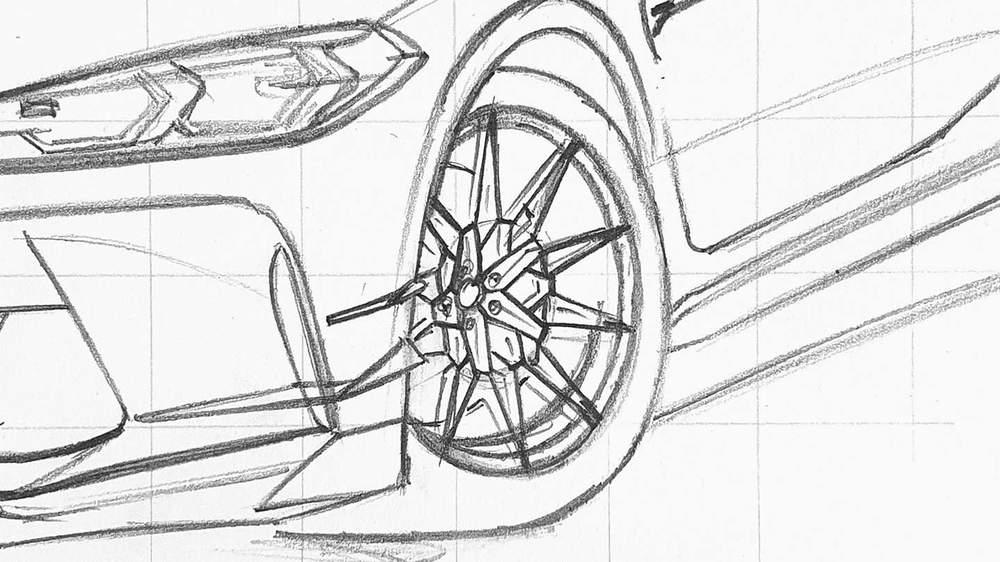
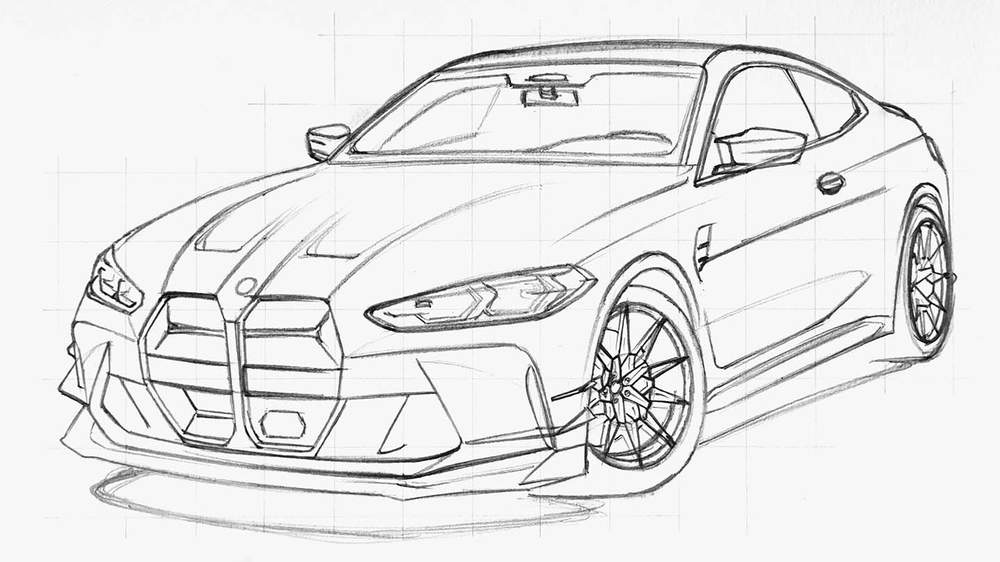
The most difficult part of the BMW M4 drawing is now done.
Now all that's left is to color this BMW M4 sketch with markers.
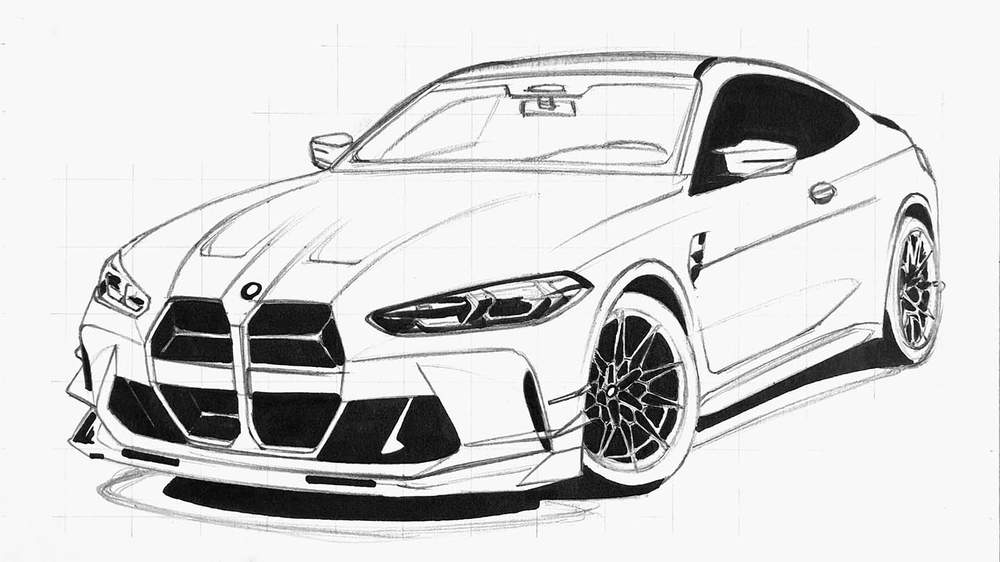
Step 4: Color All Pure Black Parts of the BMW M4
Now that the sketch is done, it's finally time to start coloring the BMW (my favorite part of any drawing).
If you're new to alcohol-based markers or want to learn how to use them, make sure to check out my alcohol marker guides here.
Before you color any part of the car, you will need to erase that part of your sketch first until you can only barely see it. This helps prevent the sketch from sketch and grid lines from showing through the ink of the markers.
To make the coloring process easier I like to start by coloring all pure black parts first with the Black Ohuhu marker.
Step 5: Color the Wheels of the BMW M4
Next up, it's time to color the wheels. And yes, coloring the wheels is a lot easier than sketching them.
I first used Neutral Grey 05 (CG050) to color the lightest parts.
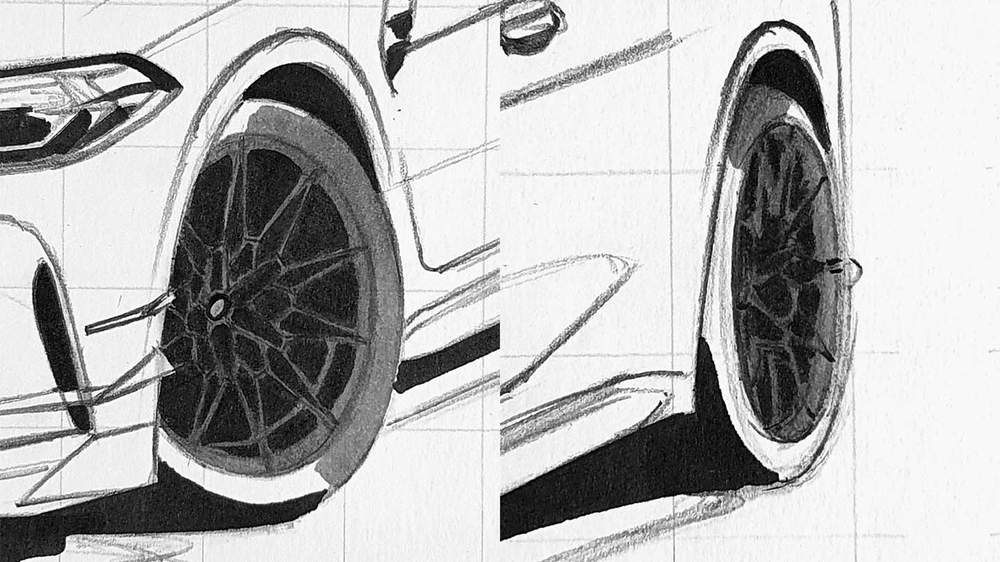
After that, I used Neutral Grey 07 (CG070) to color the darker parts and add some depth to the lighter parts. And to make the tire look smooth I went over the edge of the Neutral Grey 05 (CG050) and Neutral Grey 07 (CG070) with Neutral Grey 05 (CG050) and blended the 2 colors together.
Step 6: Color the Front Grills and Splitter of the BMW M4
Next, I colored the grey and black bits on the front bumper of the car which include the front splitter, the grills, and the canards.
I first colored the lightest parts with Neutral Grey 03 (CG030). These parts are mostly on the far left and a small bit more to the right.
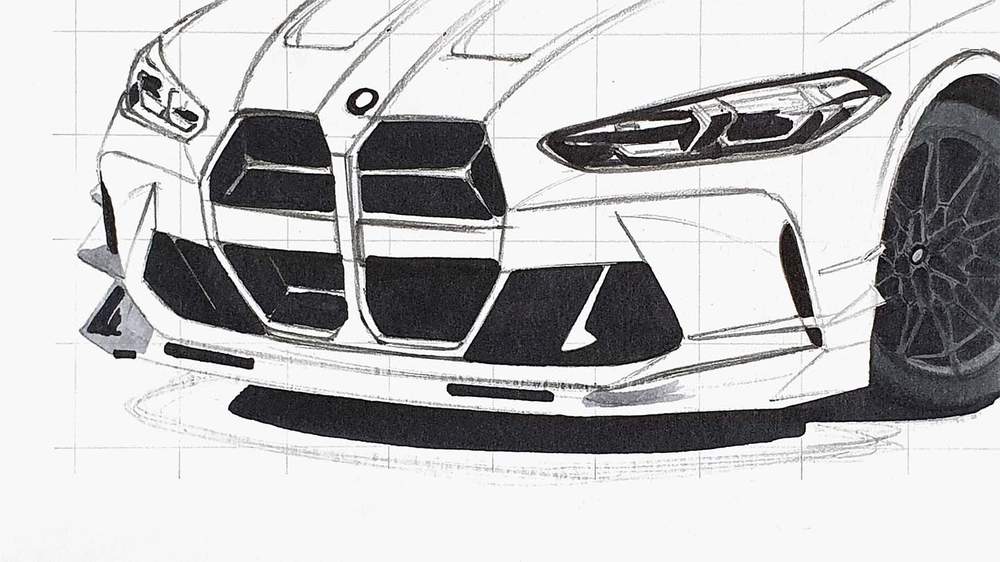
Next, I used Neutral Grey 07 (CG070) to color the rest. I also colored the logo with Neutral Grey 03 (CG030).

Lastly, I used Neutral Grey 7 (NG07) to add some darker tones to the splitter and the canards.

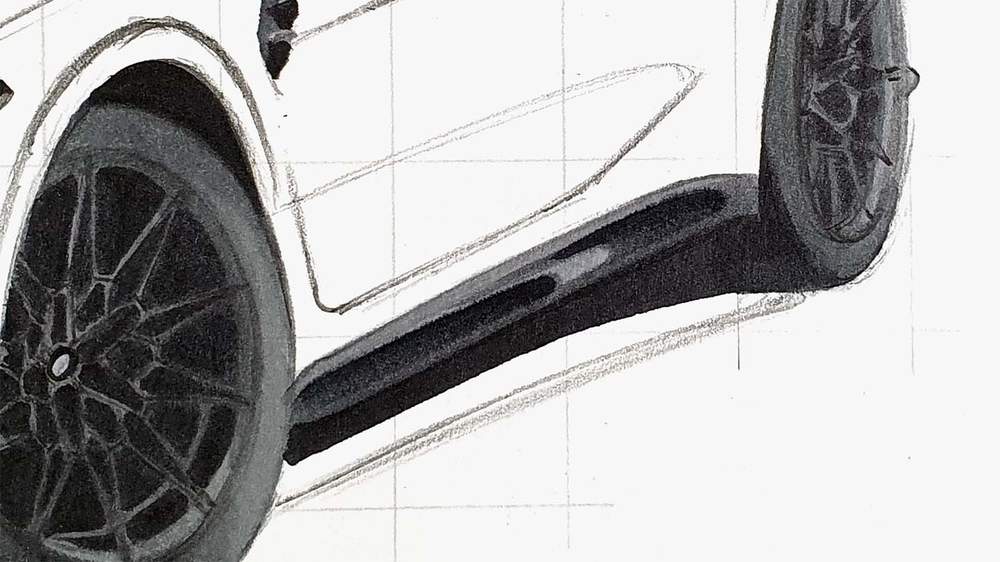
Step 7: Color the Side Skirt of the BMW M4
After that, I colored the side skirt.
I first colored the top edge with Neutral Grey 05 (CG050) and I colored the light reflection in the middle with Neutral Grey 03 (CG030). I also colored the right half of the air vent to the top right of the front wheel with Neutral Grey 03 (CG030).
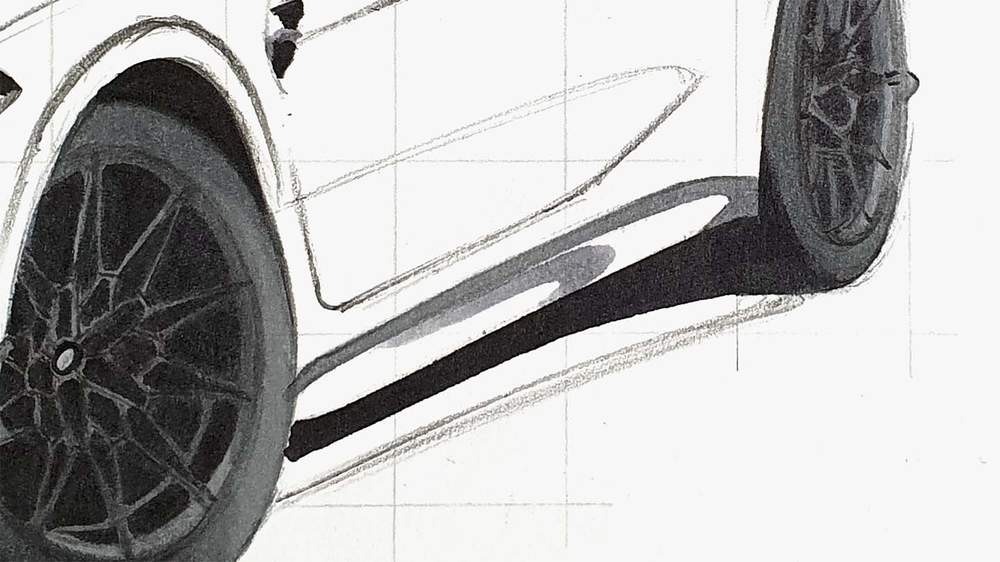
Then, I colored the rest with Neutral Grey 07 (CG070) and I added some darker tones with Neutral Grey 7 (NG07).
I also colored the left half of the air vent next to the wheel with Neutral Grey 07 (CG070).
Step 8: Color the Shadow of the BMW M4
Now it's time to color the shadow underneath the BMW M4.
I first colored the whole shadow with Neutral Grey 02 (CG020).

Next, I colored an edge of Neutral Grey 05 (CG050) between the light grey and the black.
Lastly, I blended all the shades of grey into a smooth gradient. I first blended the Neutral Grey 02 (CG020) into the Neutral Grey 05 (CG050) by going over the edge where the 2 colors meet with Neutral Grey 02 (CG020). Next, I blended the Neutral Grey 05 (CG050) into Neutral Grey 07 (CG070) and I blended the Neutral Grey 07 (CG070) into the black.
Step 9: Color the Headlights of the BMW M4
Next, I colored the headlights of the BMW M4.
I started by coloring the top half of both headlights with Neutral Grey 02 (CG020).
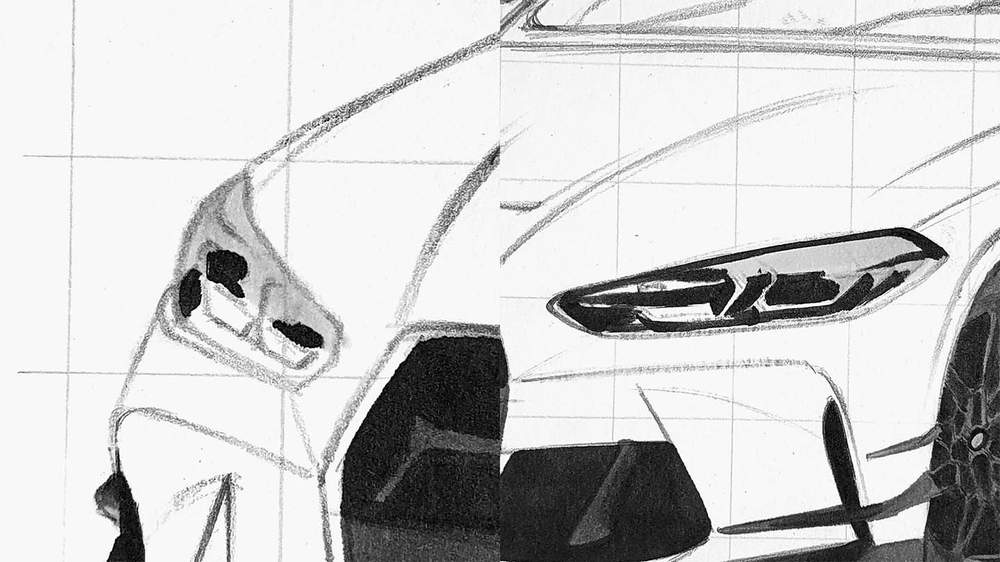
After that, I colored the bottom half with Neutral Grey 03 (CG030) and I added some reflections and details in the top half.
Lastly, I used Neutral Grey 05 (CG050) and Neutral Grey 07 (CG070) to add more depth and darker a few bits. I also used these markers to add a few reflections to the headlights.
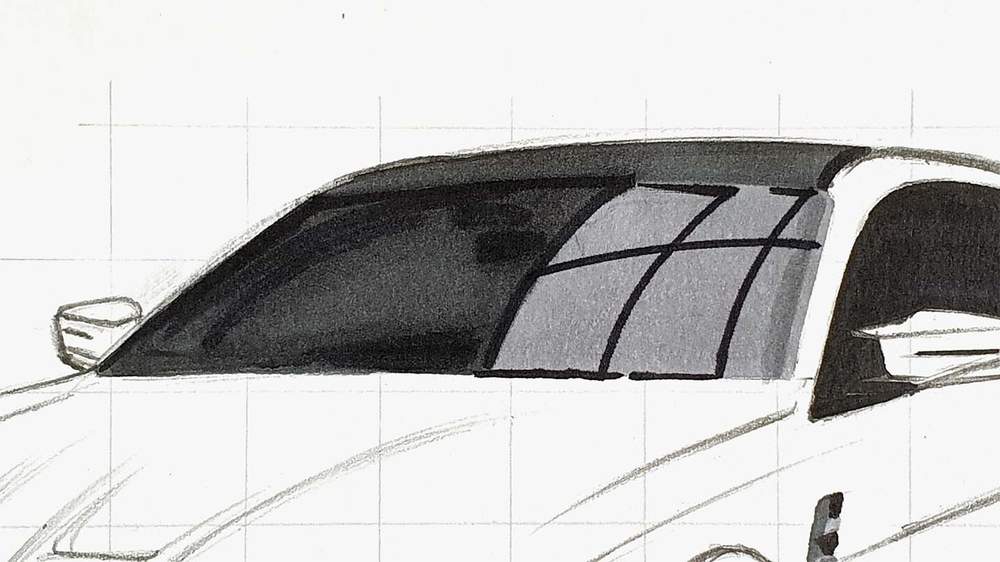
Step 10: Color the Windshield and the Roof of the BMW M4
After that, I color the windshield and the roof of the BMW.
I started by coloring the roof and the left half of the windshield with Neutral Grey 07 (CG070). I colored the right half of the window with Neutral Grey 03 (CG030).
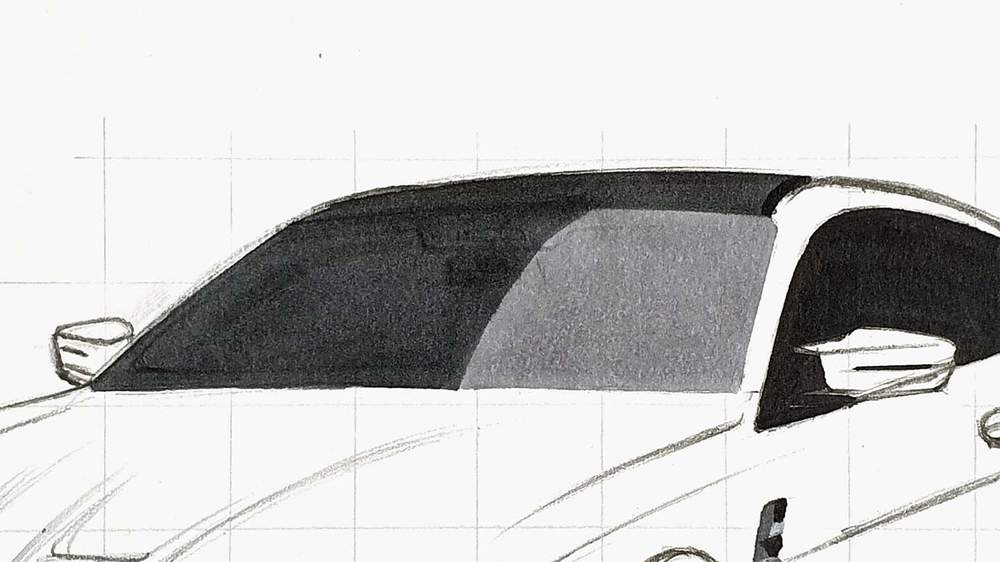
Next, I added some reflections and details. I layered more of the Neutral Grey 07 (CG070) and Neutral Grey 7 (NG07) on the left side to add more details like the rearview mirror and I darkened the A-pillar. and on the right side, I used Neutral Grey 7 (NG07) to add some reflections.
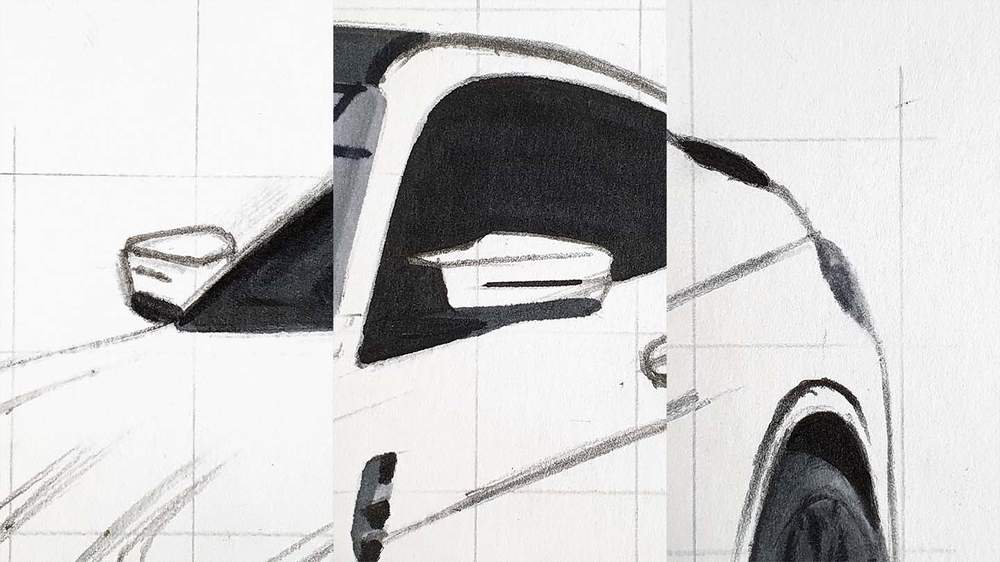
Step 11: Color the Wing Mirror Arms and the Tail Light
Then, I colored the door mirror arms with Neutral Grey 07 (CG070) and I colored the taillight with Neutral Grey 03 (CG030) and Neutral Grey 05 (CG050).
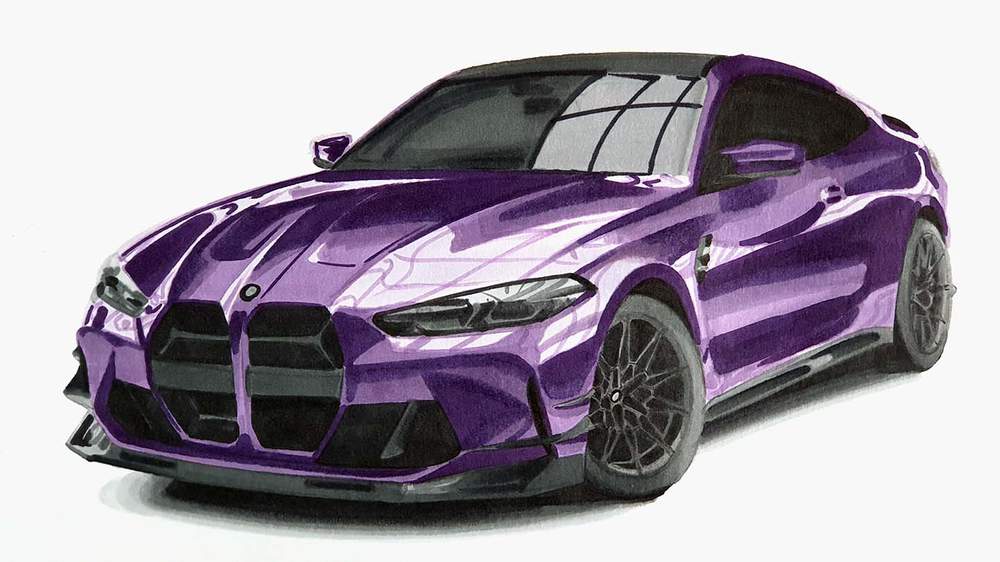
Step 12: Color the Main Body of the BMW M4
Now that all grey and black parts are done, it's time to color the main body of the BMW M4.
For this drawing, I started by coloring the mid-toned and dark parts first. And for that I used Pearl Violet (V050). I left the light parts uncolored for now.
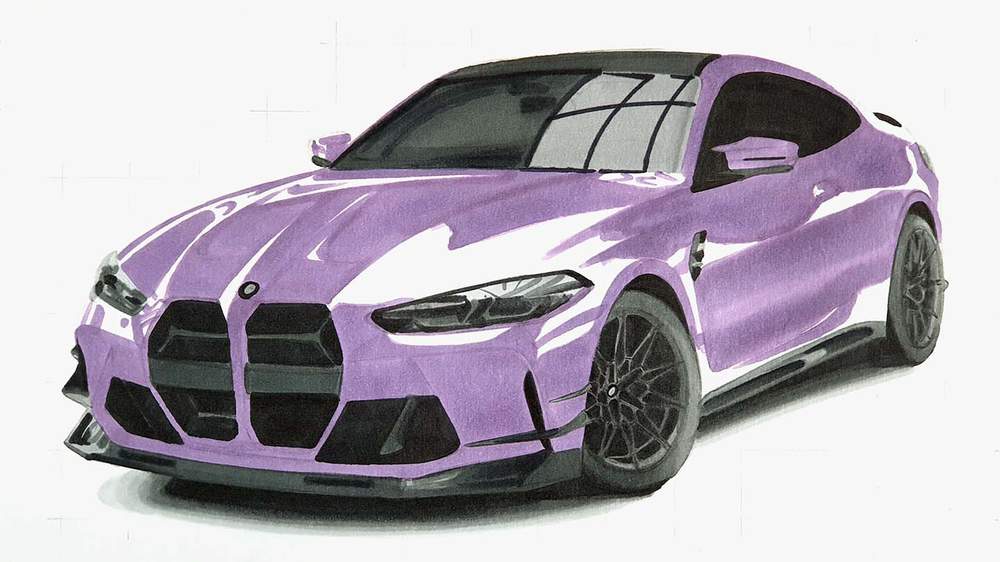
After that, I colored the remaining parts with Pale Lilac (V020). I also colored the darker parts and for that I used Dark Violet (V080). And to finish it off, I added some reflections on the lightest parts with Pearl Violet (V050).
Going from the previous step to this one might seem difficult, but just work part by part until you've colored every reflection.
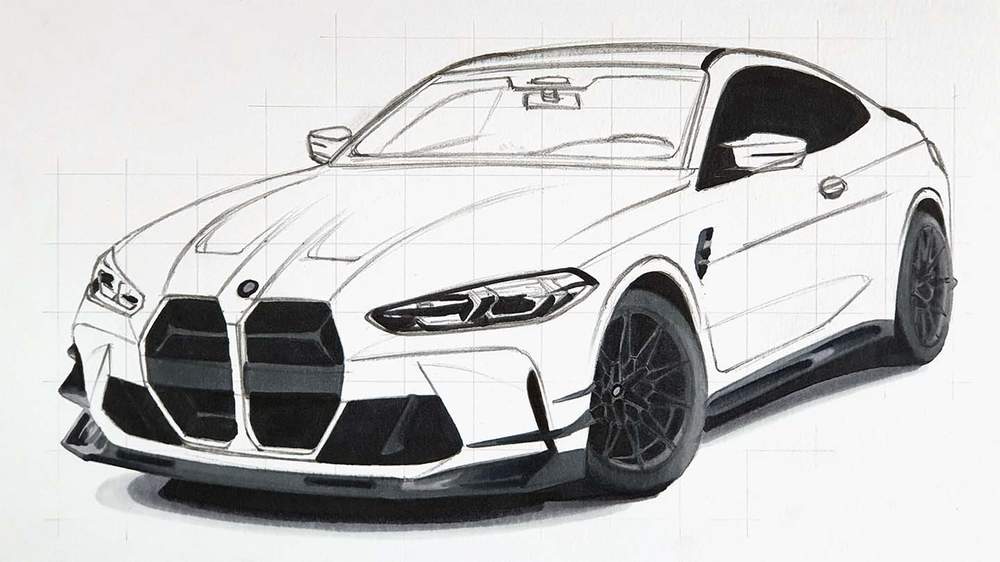
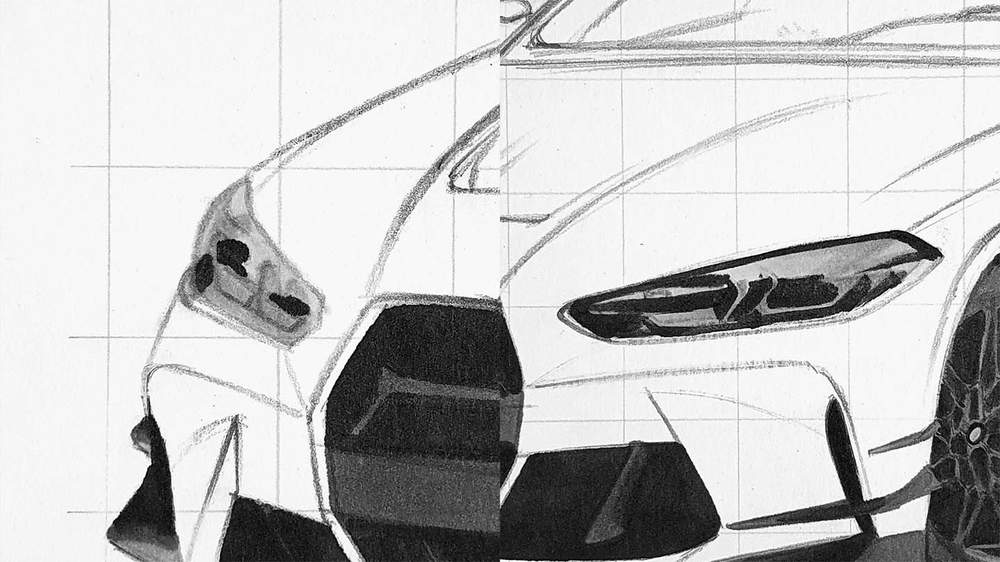
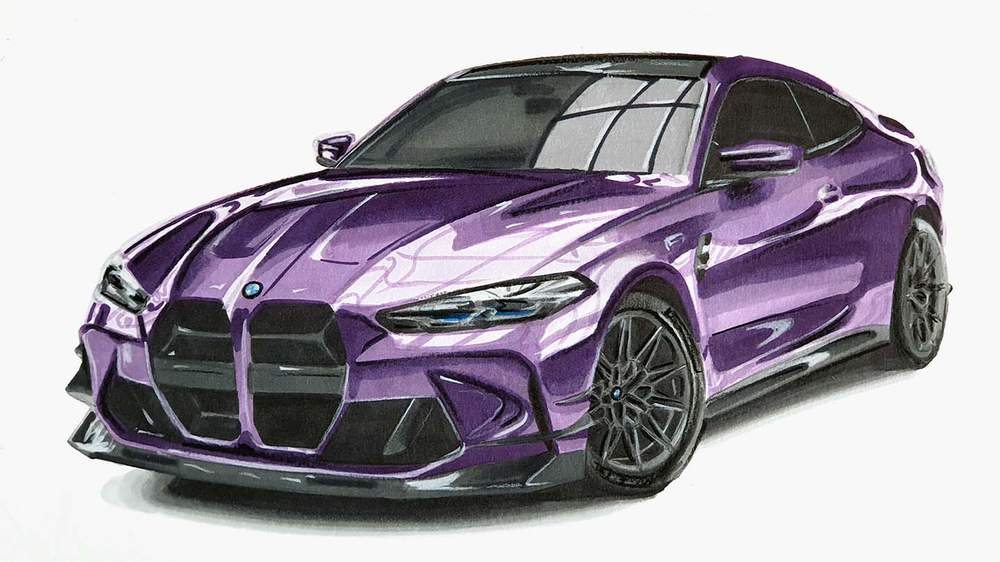
Step 13: Add Details to your BMW M4 Drawing
The whole BMW M4 is fully colored now, but it's missing a lot of details. And that's what we're going to add in this step.
I used the White 2400 Derwent Chromaflow pencil to add some highlights and reflections all over the car, but mainly on panel edges and the headlights.
I used Platinum 2200 to refine the spokes of the wheels and to refine the headlights a bit more.
I used Black 2300 to add more depth to the headlights, add the panel gaps, and refine the wheels more.
And to color the BMW logo I used Blue 1300.
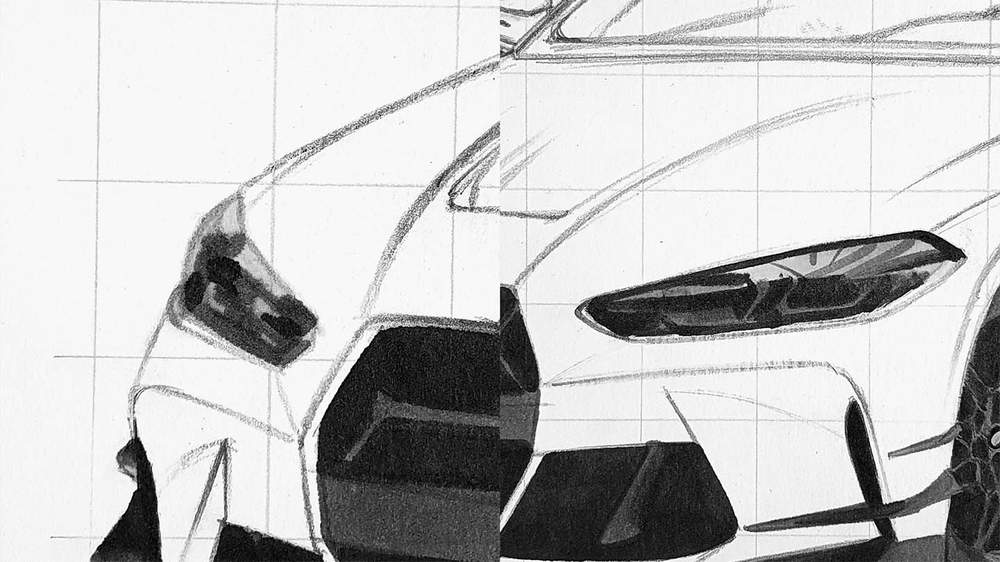
Step 14: Add White Highlights to Make your BMW M4 Drawing Come to Life
To make the drawing really come to life I added a few pure white highlights all over the car with my Posca PC-3M paint marker.
I added highlights to the edges in the grills, on the splitter, on edges of the body, and on the lights reflections. This does not need to be perfect. Just look at the reference photo for the reflections, spot the highlights, and add them to your drawing.
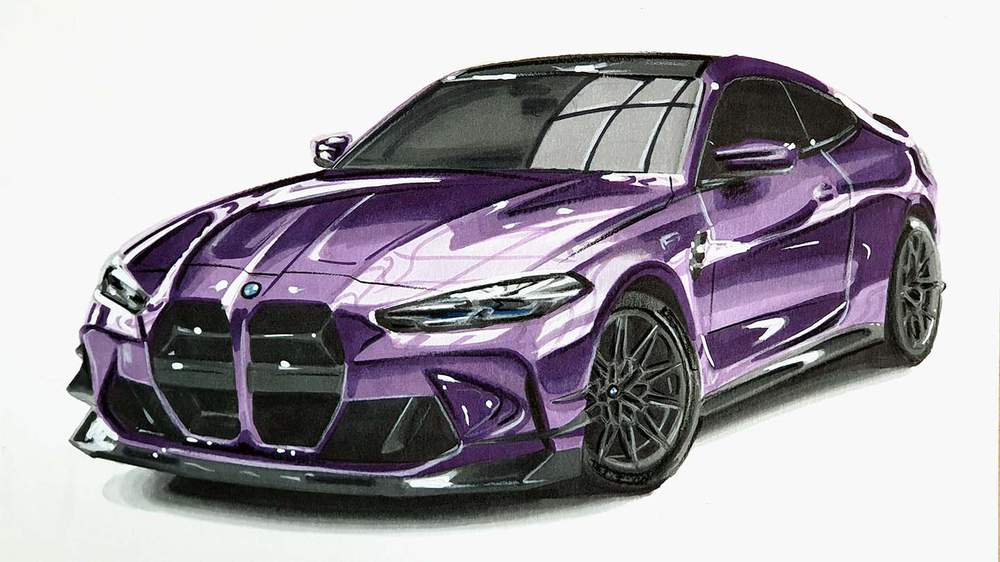
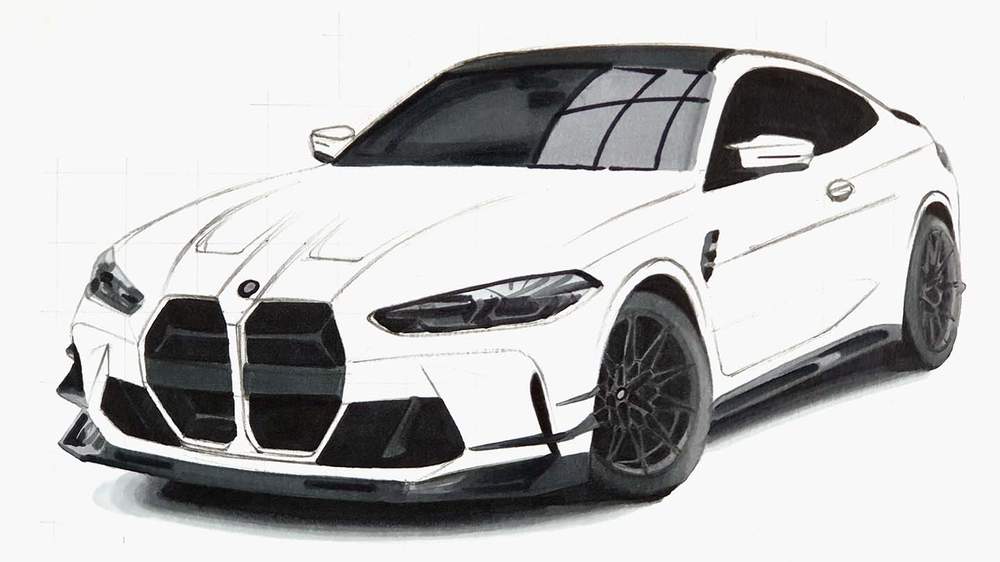
And That's How I Draw Cars Like the BMW M4
It's done!! This drawing turned out so well! I hope yours did too!
I hope you found this helpful. If you did, I'd really appreciate it if you'd share this tutorial with other people who might like it. It would help me out a lot!
And if you followed along with my tutorial and decide to share your drawing, please tag me on Instagram (@luukminkman). I'd love to see it!
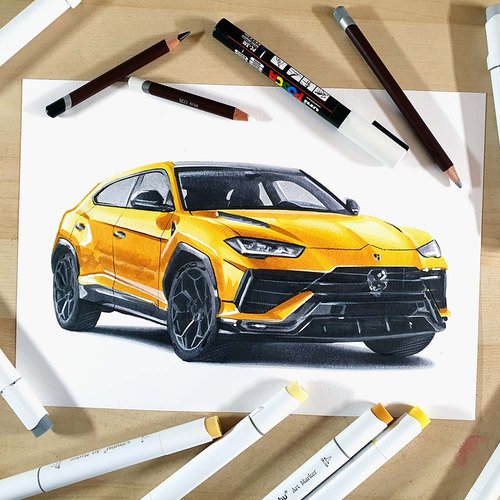
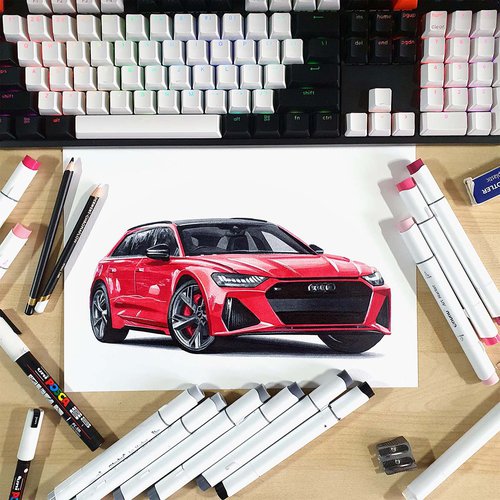
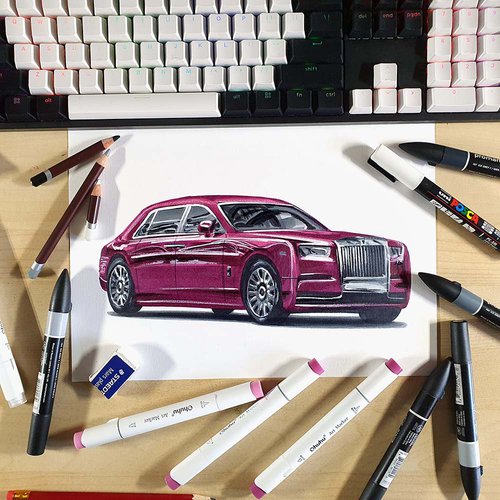
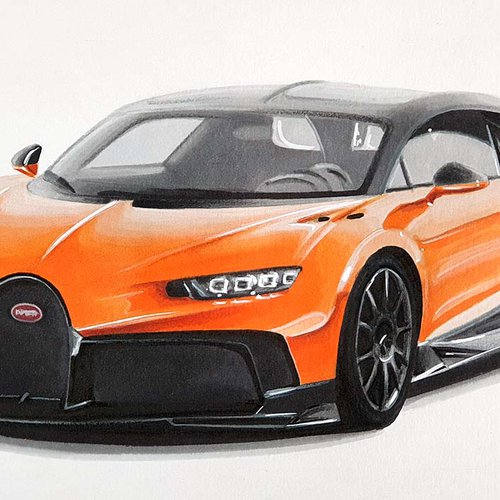
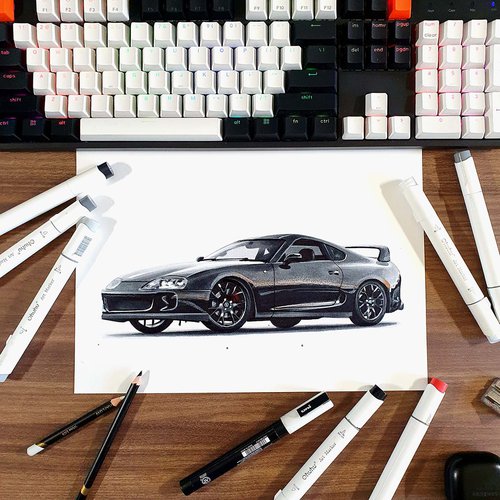
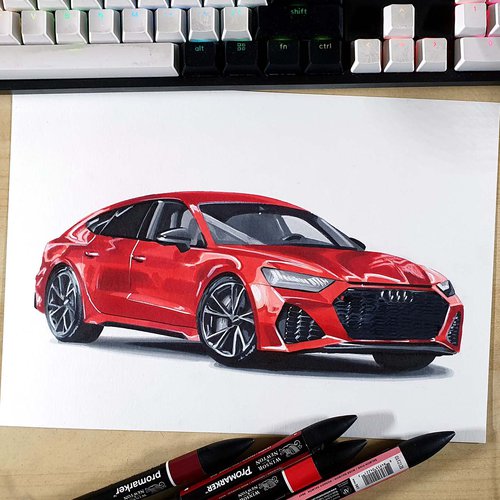
Want to draw other cars? Here are all my car drawing tutorials.
Thank you!

Articles You Might Also Like

I love bringing cars to life with alcohol markers and colored pencils.
Whether you're just starting out or looking to improve your skills, I'm here to help!
Click here to learn more about me.


Add a comment
Comments
The sketch turned out too much good than expected . It was a very helpful tutorial . But I got messed up which the grills of the M4
Keep going man 💪🏻💪🏻👌🏻