Easy AND Realistic McLaren 720S Step-by-Step Tutorial
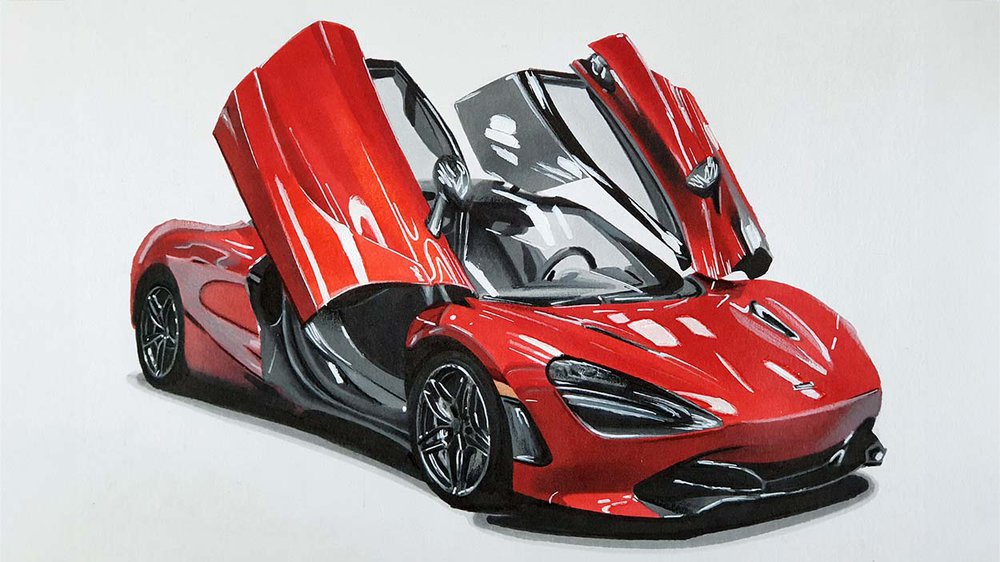
In this article, I'm going to show you how to draw a car, specifically how to draw a McLaren 720S.
Disclaimer: In the name of full transparency, please be aware that this blog post contains affiliate links and any purchases made through such links will result in a small commission for me (at no extra cost for you).
Art Supplies I Used for this Tutorial
I used Ohuhu Honolulu markers in the colors Neutral Grey 02 (CG020), Neutral Grey 03 (CG030), Neutral Grey 05 (CG050), Neutral Grey 07 (CG070), Neutral Grey 6 (NG06), Black (120), Rose Buvard (R12), Zinnober (R150), Cadmium Red (R160), Deep Red (R4), Geranium (R8), and Peach Pie (YR090).
My go-to alcohol markers for blending, rich color payoff, and amazing value. The brush tips feel super natural to draw with — a must-have for smooth gradients and realistic shading!
- Brush + chisel tips
- Great for beginners & advanced artists
- Budget-friendly alternative to Copics
I also used Derwent Coloursoft colored pencils in Dove Grey, White, and Black.
And I used a white Posca PC-1MR marker to give the car its shiny look.
I made this drawing on Canson Illustration paper, which is, in my opinion, by far the best paper for making alcohol marker drawings. It makes the ink look so solid and even and it makes blending so much easier than most other brands of paper.
The Reference Photo for this Car Drawing Tutorial
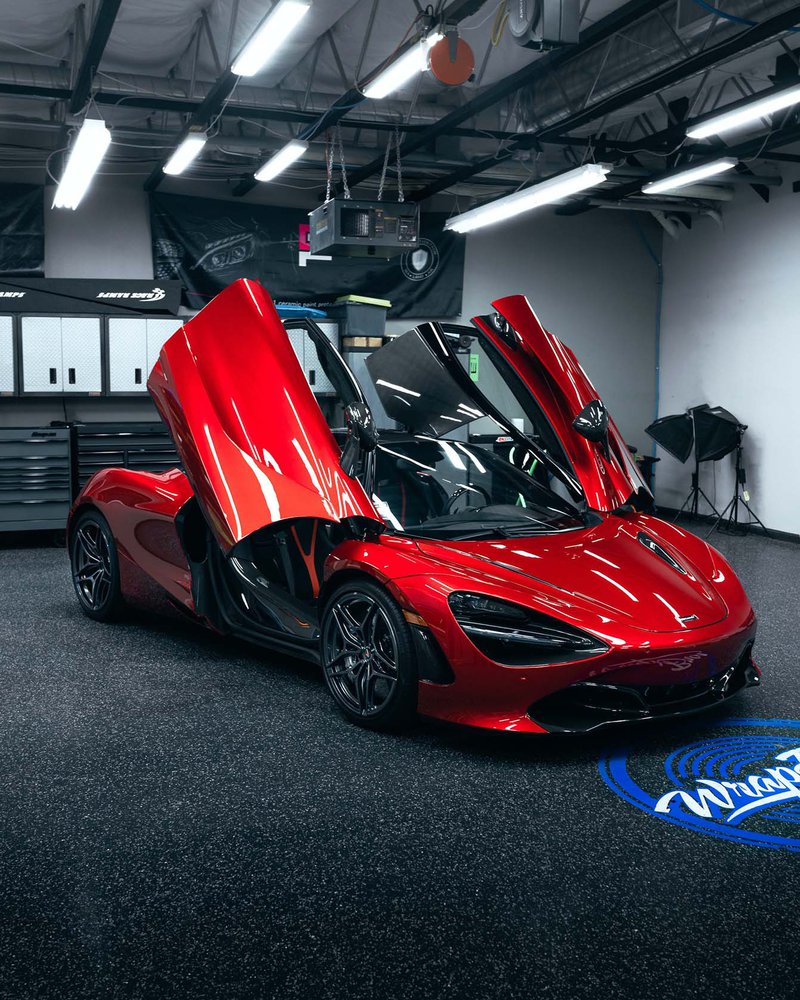
I found this really nice photo of a McLaren 720S on Pexels.com uploaded by Lazaro Rodriguez Jr. The car has some amazing reflections which I really like.
How Do You Draw a McLaren 720S?
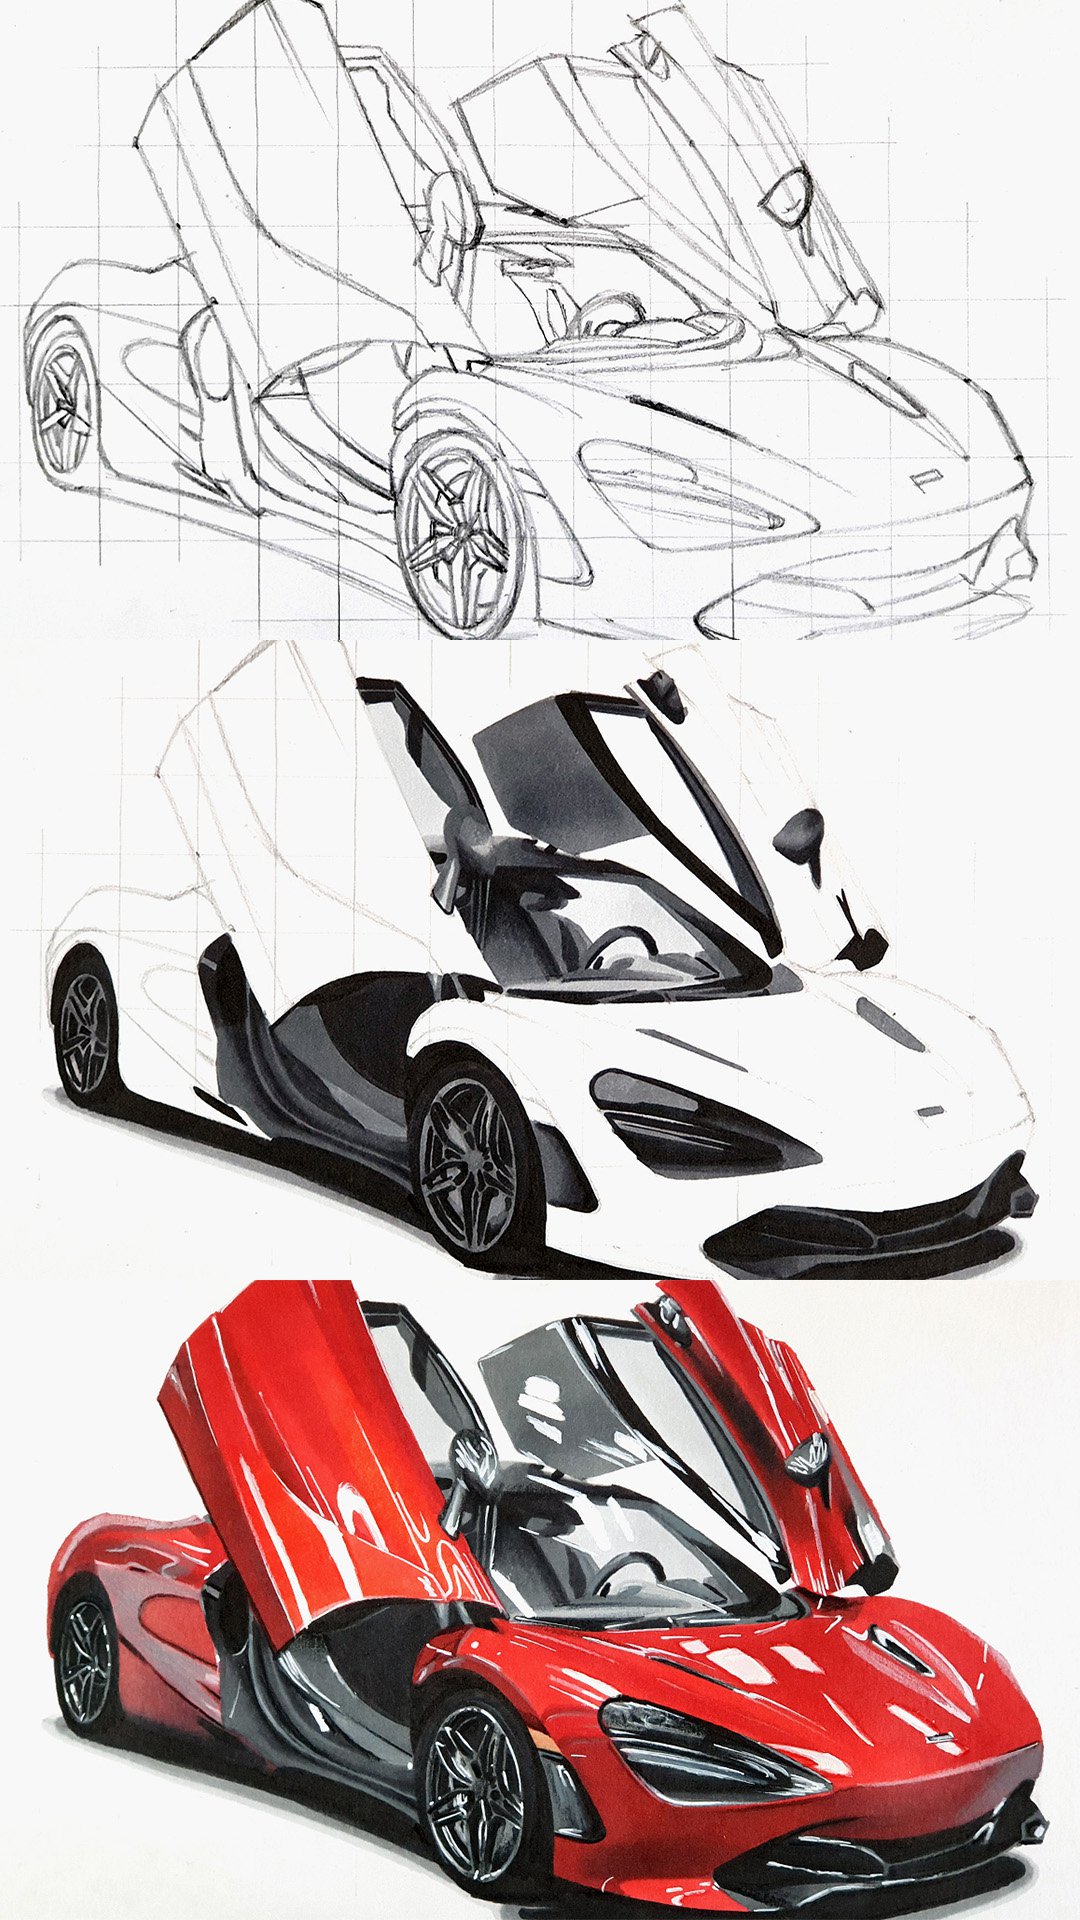
Step 1: Sketching the Outlines of the McLaren 720S
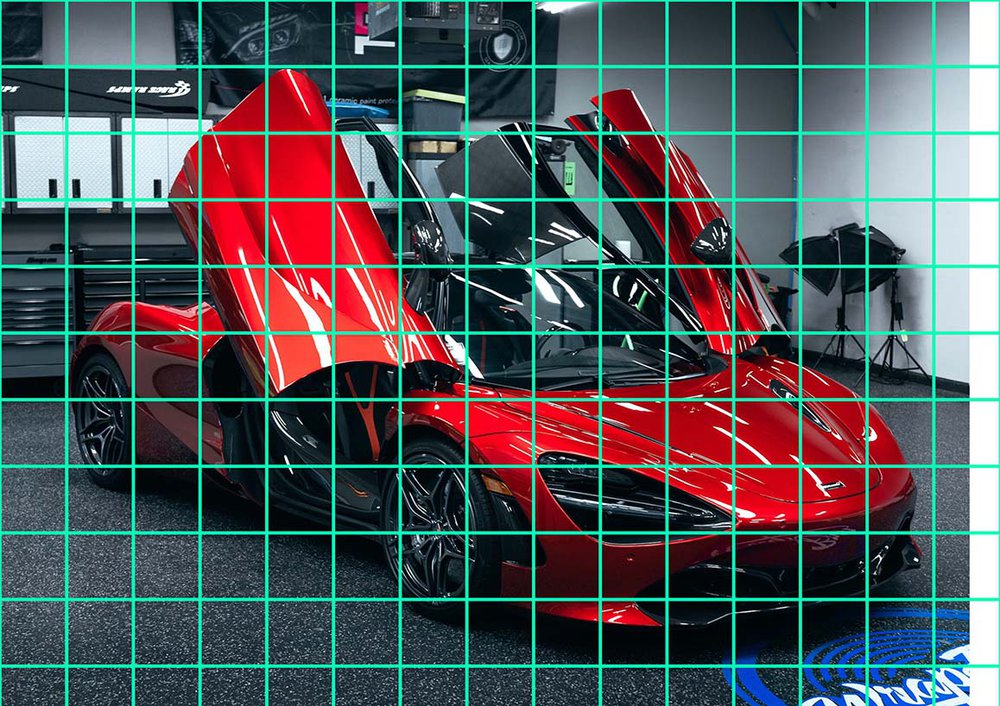
To make the sketch of the car, I used the grid method. This is a relatively simple technique to make it easier to get the proportions of the car correct. But feel free to use any other sketching technique.
I started by making a grid on the photo in Photoshop and then drew that grid with the same number of squares on my A4-sized paper.
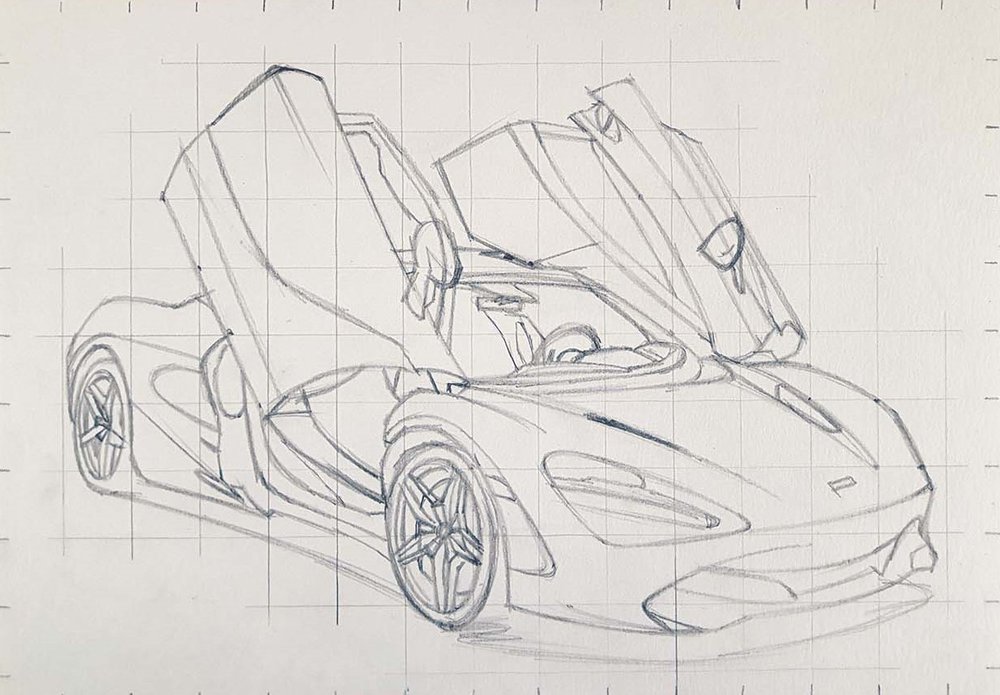
After that, I started sketching. I started by sketching the back, then moving to the doors and the roof, and then the front, leaving the most difficult parts (the wheels) to sketch for last as usual... And in this case, the wheels seemed even more detailed and complex than usual.
But just be patient and don't rush it.
The wheels are the most important when drawing cars. They make or break the drawing.
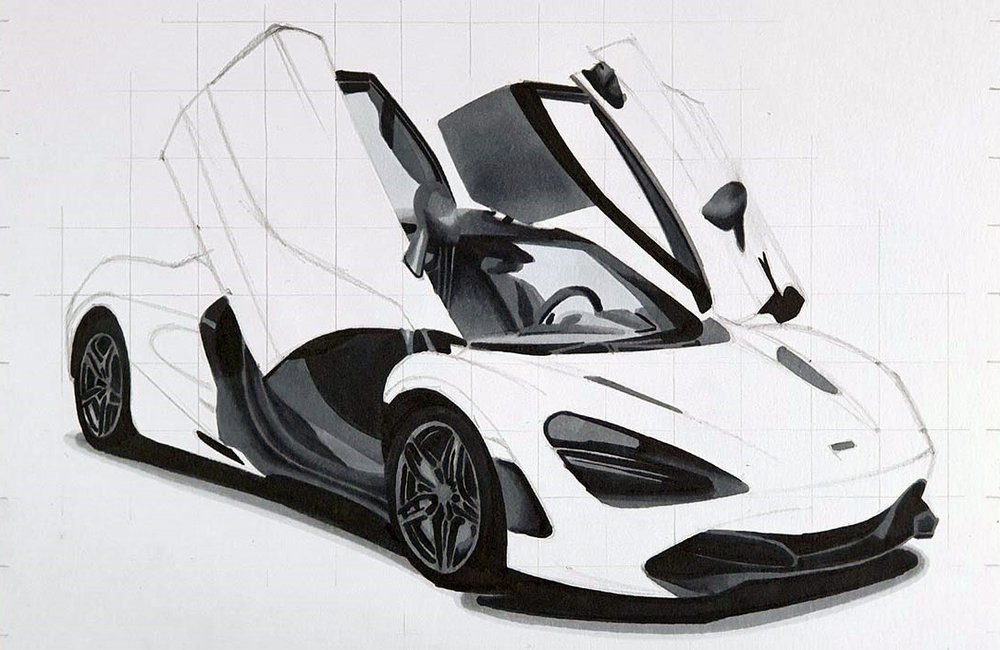
Step 2: Coloring All Black Parts of the McLaren 720S
To make the drawing a lot clearer and less intimidating, I start by coloring all black parts with the Black (120) Ohuhu marker.

Step 3: Coloring the Wheels of the McLaren 720S
Next up are the wheels. Now that all the black parts of the wheels are already colored, they look a lot less complex.
I first colored the rear wheel. I started by mostly erasing the sketch, making it just about visible.
Then I colored everything except the bottom left of the wheel with Neutral Grey 07 (CG070).
I then colored the bottom left part with Neutral Grey 03 (CG030).
Finally, I colored the tire with Neutral Grey 6 (NG06).

Then I did the exact same for the front wheel.
I colored most of the wheel with Neutral Grey 07 (CG070), but this time I left the brake caliper and a bit between the top spokes uncolored.
Then I colored the brake caliper with Neutral Grey 03 (CG030) but decided that wasn't dark enough, so I colored it again with Neutral Grey 05 (CG050) and added some more black details.
And lastly, I colored the tire using Black (120).

And that's the wheels already done!
Step 4: Coloring the Shadow of the McLaren 720S
Most of the shadow is already colored as the majority is black, but I wanted to make the edges transition into light grey, so that's what we're going to do.
To do this, I first outlined the black shadow with a thick border of Neutral Grey 03 (CG030).
Then I colored the middle part with Neutral Grey 05 (CG050). You could go back in the Neutral Grey 03 (CG030) and blend the edge of the Neutral Grey 05 (CG050), but I kind of like it not blended.

Step 5: Coloring the Air Vent in Front of the Front Wheel
I colored this part fully with Neutral Grey 07 (CG070), and then I used the Black (120) to color the edge.
Then, I blended that with the Neutral Grey 07 (CG070) marker to make the transition a bit more seamless.

Then I forgot to color the reflector right above this part...
I later colored it orange with Peach Pie (YR090), and then I layered Neutral Grey 03 (CG030) on top of it.
Step 6: Coloring the Headlight of the McLaren 720S
Now it's time to color the headlights.
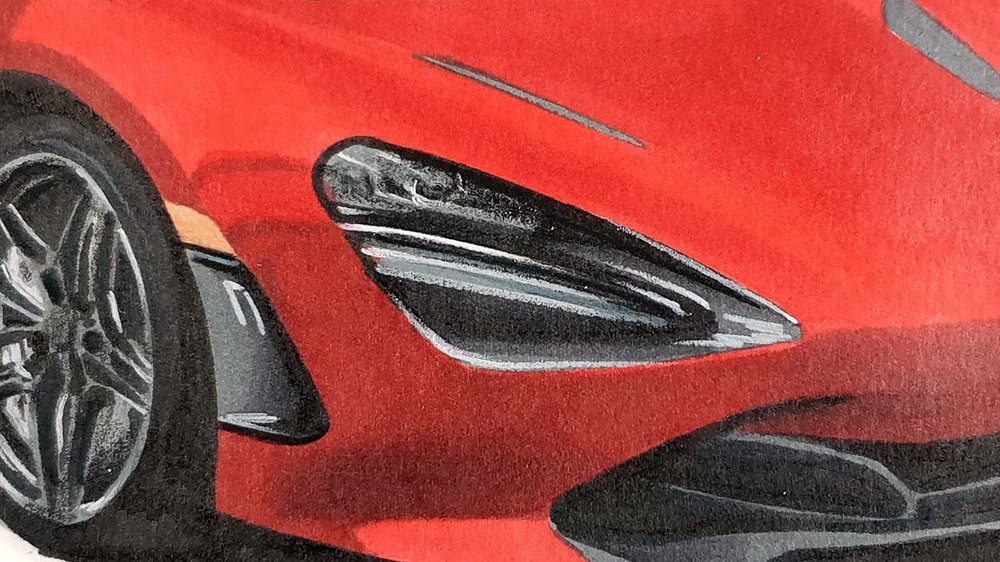
I started by coloring some parts with Neutral Grey 05 (CG050), and then I colored most of the remaining parts with Neutral Grey 07 (CG070). I also used some black and later Neutral Grey 07 (CG070) again to blend some edges.
Then I colored the last part with Neutral Grey 03 (CG030).
And finally, I added some more details with Black (120).

Step 7: Coloring the Vents on the Hood and the Logo
Next up are some parts on the hood of the car: the logo and 2 air vents.
I colored all three of them with Neutral Grey 07 (CG070), and that's it.

Step 8: Coloring the Front Splitter of the McLaren 720S
This is again a very short step.
I colored every part that hadn't been colored on the front splitter with Neutral Grey 07 (CG070). I did add some black details, a pentagon shape to the right of the splitter, and on the left, I blended the dark grey into the black.

Step 9: Coloring the Door Sills of the McLaren 720S
The McLaren we're drawing has the doors up, which looks really cool, but it also shows some parts of the door sills and the interior, which we're going to draw next.
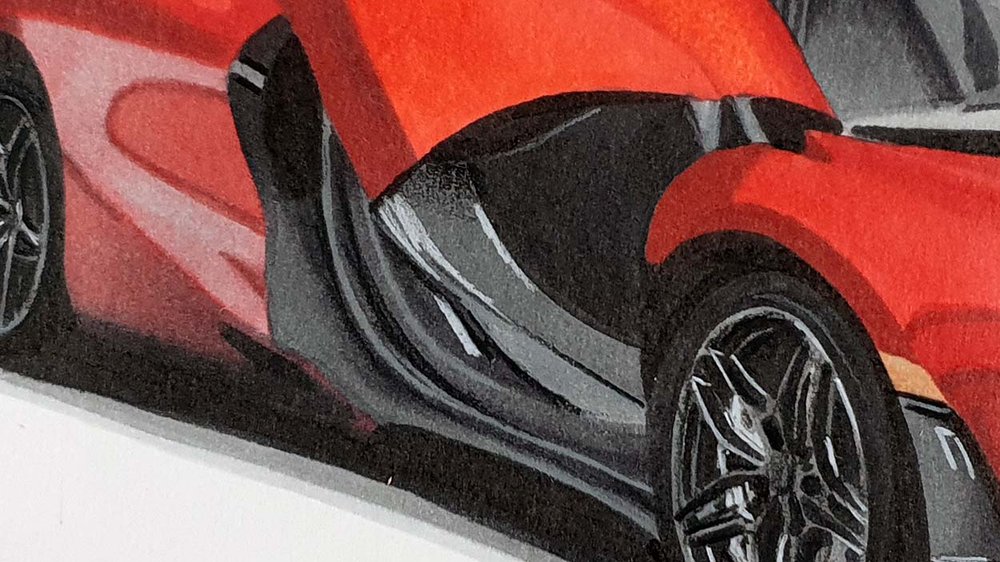
I started by coloring the door sills with Neutral Grey 07 (CG070).
Then I added some black with the Black (120) Ohuhu marker.
After that, I blended most of the edges of the black with Neutral Grey 07 (CG070) to soften them a bit.
I then colored the interior black using Black (120).
And lastly, I colored the door arms with Neutral Grey 03 (CG030), Neutral Grey 07 (CG070), and Black (120).

Step 10: Coloring the Windshield of the McLaren 720S
To color the windshield, I started by coloring some parts of the interior and the lower part of the windshield where the windshield wipers are with Neutral Grey 07 (CG070).
Then I added some black on the steering wheel, on the air intake just toward the left of the steering wheel, and some parts around the rearview mirror and the seats.
Then I added some Neutral Grey 03 (CG030) on the dashboard.
After that, I colored the remainder of the interior with Neutral Grey 07 (CG070) and blended that into the black.
And lastly, I colored the part where you can see straight through the window with Neutral Grey 02 (CG020).

Step 11: Coloring the Roof of the McLaren 720S
To draw the roof, I first colored it fully with Neutral Grey 03 (CG030).
Then I added Neutral Grey 05 (CG050) on top of it, but leaving the top part, and then I blended that edge with Neutral Grey 03 (CG030).
After that, I colored most of the roof with Neutral Grey 07 (CG070) but left the far left part and a small part toward the top left.
And finally, I colored the part around the door hinge Black (120) and blended that into the dark grey with Neutral Grey 07 (CG070).

Step 12: Coloring the Black Parts of the Left Door
I started by coloring the mirror first.
First, I colored it with Neutral Grey 03 (CG030).
Then I added some Neutral Grey 07 (CG070), but leaving some areas light grey.
And lastly, I added some Black (120) around the arm and the bottom right part of the mirror.

After that, I colored the window sills Neutral Grey 07 (CG070), and then I added some black details, and I colored the part where you can see through the window with Neutral Grey 02 (CG020).

Step 13: Coloring the Black Parts of the Right Door
Now it's time to do this again, but for the other door.
I again started with the door mirror.
I started by coloring it fully Neutral Grey 05 (CG050).
Then I added Neutral Grey 07 (CG070) to most parts, but not the middle left.
And finally, I added some black toward the bottom and the arm.

Then I colored the remaining black parts of the door.
I started by coloring the window sill, the part to the roof that's attached to the door, and the part towards the top with Neutral Grey 05 (CG050).
Then I colored more of the window sills with Neutral Grey 07 (CG070). I also colored some of the parts on the top with Neutral Grey 07 (CG070), and I added some Neutral Grey 07 (CG070) on the roof part and I blended that with Neutral Grey 05 (CG050).
And lastly, I added some black details to all of those parts.

Step 14: Coloring the Rear of the McLaren 720S
All black parts are now colored, and all that's left is coloring the whole car red! However, it's not as simple as just coloring it plain red.
To color the part around the rear wheel, I started by coloring some parts with Zinnober (R150).
Then I layered Neutral Grey 03 (CG030) on the top left, on the bottom left, and on the middle part.
After that, I layered Neutral Grey 07 (CG070) on the bottom right and blended that into the Neutral Grey 03 (CG030) on the bottom left. I also added Neutral Grey 07 (CG070) line on the top left and on the outside of the reflection in the middle.
Then I added some Lipstick Red (R170) on the bottom and the right part of the top, and I darkened some of those parts with Geranium (R8).
Lastly, I colored the remainder with Rose Buvard (R12) and colored Neutral Grey 03 (CG030) on top of it.

Step 15: Coloring the Left Door of the McLaren 720S
I started coloring the door by coloring most of it, except the big fin part, with Zinnober (R150). I also added some Geranium (R8) on the bottom of the door.
Then I colored the big fin with Peach Pie (YR090). I also added this color on top the the red from the bottom right corner toward the middle of the door.
Finally, I added Geranium (R8) in the crease toward the left of the door, and I added some Deep Red (R4) from the top right toward the bottom right corner.

Step 16: Coloring the Right Door of the McLaren 720S
To color the right door, I started by coloring it with Zinnober (R150), but leaving the bottom right part uncolored.
I then colored that part with Neutral Grey 03 (CG030). I also added some Geranium (R8) toward the left of that grey part and on the left of the door. And I darkened the part on the left of the door with Black (120) and blended it into the dark red with Geranium (R8).
Lastly, I added Deep Red (R4) to most of what's above the mirror, and I added 2 lines above the mirror and a triangular shape below the mirror with Geranium (R8).

Step 17: Coloring the Front of the McLaren 720S
It's finally time to color the last part: the front.
I started by coloring the whole front with Zinnober (R150).
Then I added some Geranium (R8) toward the bottom, but leaving a small part lighter as it reflects some light. I also colored some shadows/reflections of the doors and the edge around the front wheel.
After that, I added Cadmium Red (R160) to most of the front, but I left the part to the bottom right and the top left of the right air vent lighter red. I also left a part to the top left of the headlight lighter red, and I left a part from the bottom right of the headlight toward the left edge of the windshield lighter.
Then I added some Neutral Grey 03 (CG030) over the dark red on the bottom right of the front, and I added some Neutral Grey 07 (CG070) on the bottom left above the light reflection. I also refined the edge just above the top left of the front splitter with Neutral Grey 07 (CG070) and black.

The car is now fully colored! You might think it already looks good, but we're going to make it look even better!

Step 18: Adding Details with Colored Pencils
The first thing we're going to do is add details with colored pencils.
I started by refining the spokes of the wheels with the Dove Grey and white colored pencils. White for the highlights and Dove Grey for the rest. Then I lightly layered some black over some spokes to darken them a bit.
For the front wheel, I also added some white on the brake caliper and some black on the bottom right of the brake disc.
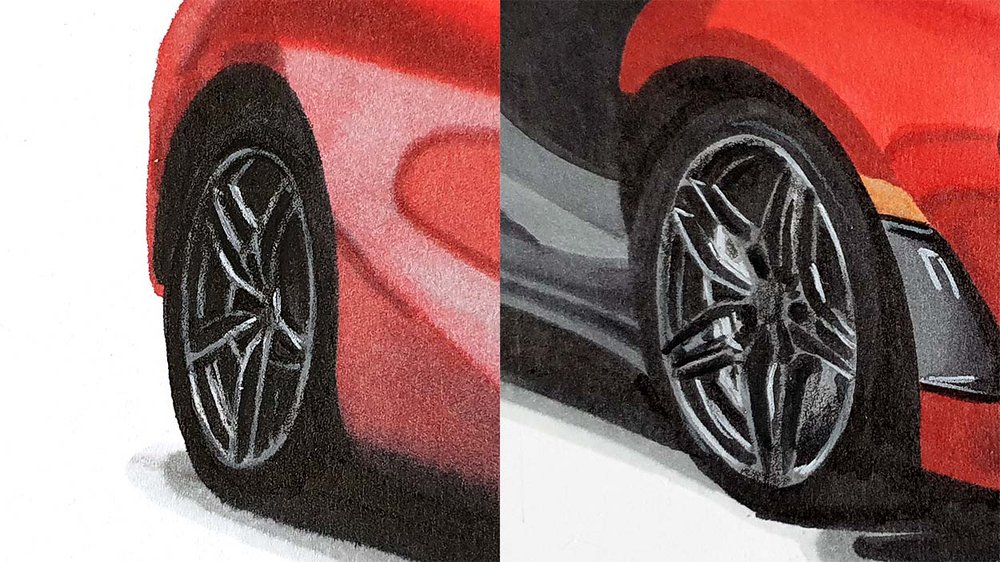
Next, I added some white highlights to the door sills and I darkened some parts with black.
I then colored the headlight with colored pencils. I added some details toward the light unit and on the horizontal light. I also added some white highlights around the edges.
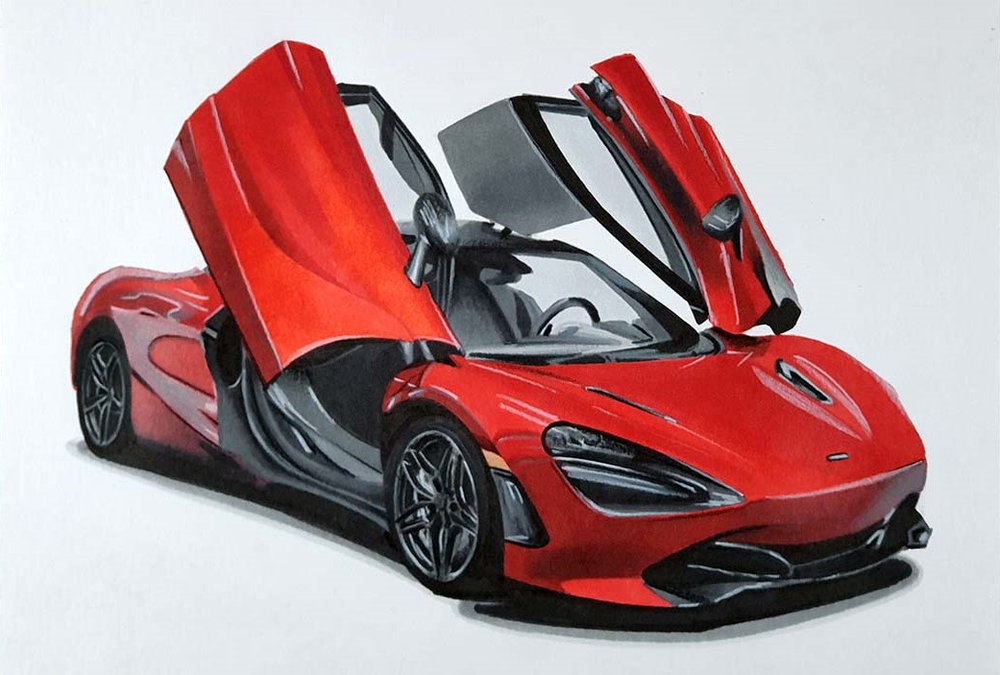
After that, I added some highlights on the red part around the rear wheel and I layered some grey over the light grey-pink.
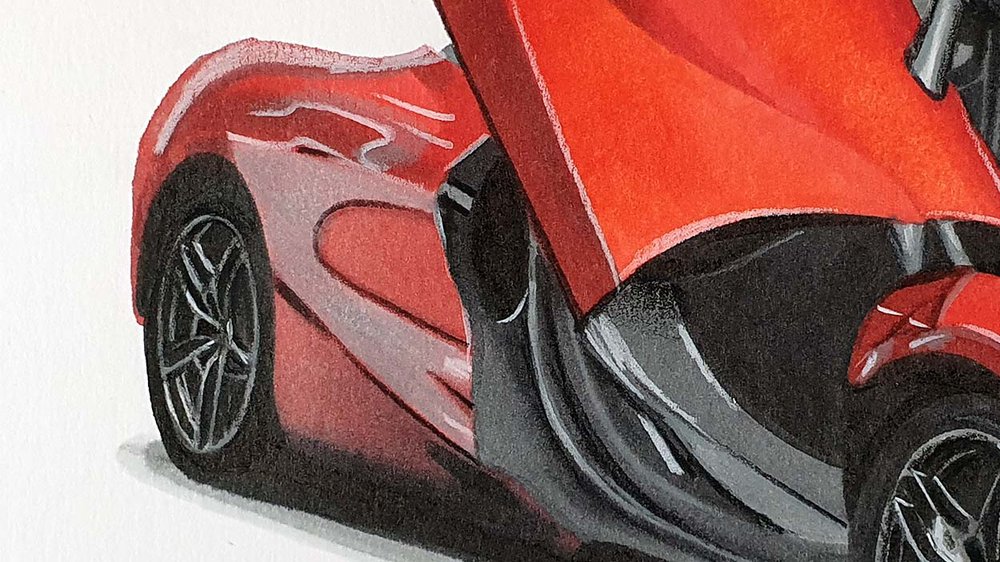
Finally, I added some White highlights on the front, the doors, the mirrors, and on the front (mainly around the air vents). I also darkened the top left and the bottom right of the left mirror and the top right of the right mirror with black. And I added a few highlights on the air vent in front of the front wheel.
Step 19: Adding Bright White Highlights
Now it's time to make the car come to life!
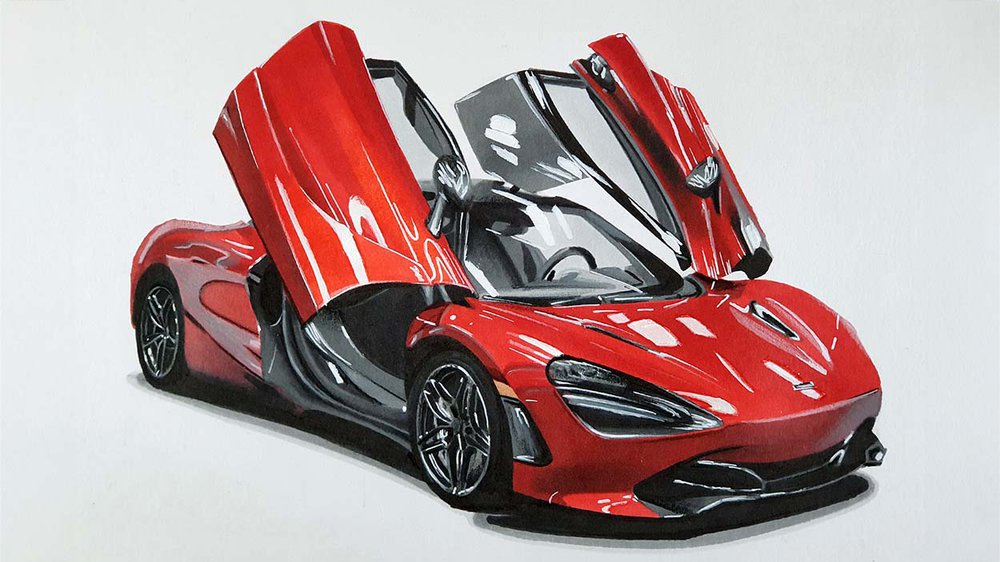
We're going to add loads of white highlights with the Posca pen. However, mine was almost empty, so I used acrylic paint.
But that didn't go so well...
First of all, I didn't have any paintbrushes as tiny and precise as I wanted.
But more importantly, the acrylic paint started to mix with the red ink of the markers. So some reflections turned out more of a light pink... But it still turned out really well.
When adding all of these bright white highlights I constantly looked at the reference photo and just added the highlights wherever I saw them in the photo.
Your McLaren 720S Drawing is Done!
And that's it!
Your McLaren 720S drawing is done!
If you followed along with me, I would love to see how your drawing turned out, so if you decide to share it on Instagram, make sure to tag me (@luukminkman) so I can see it!





Be the first to comment!
Comments
There are no comments yet.