How to Get Better at Drawing for Beginners
This post is all about how to get better at drawing if you're a beginner.
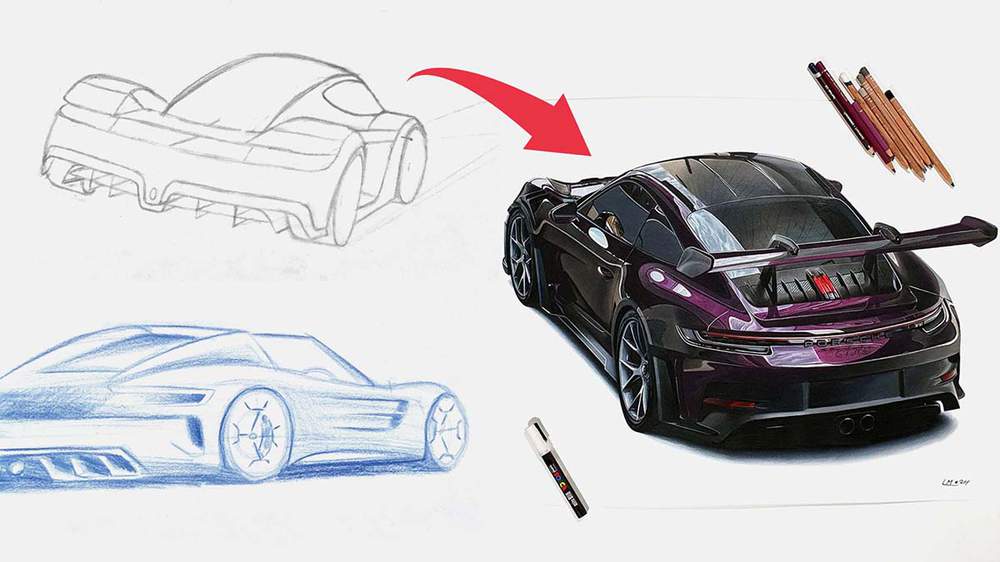
So you've decided that you want to get better at drawing. Now what? Where do you even start?
If you’ve ever looked at your drawings and thought, “Why doesn’t this look right?” or “Maybe I’m just not talented enough,” you’re not alone. Every artist, even the really good ones, started exactly where you are right now: confused, frustrated, and wondering what they were doing wrong.
And don't worry, drawing is a learnable skill. You don't need talent. The only thing you need is persistence. Most people don't fail because they can't draw. They fail because they quit before their skills have time to grow.
The good news? Improving at drawing isn’t random. There are clear, practical things you can do that will make you better, faster. In this guide, I’ll walk you through the exact habits, skills, and practice methods that actually help beginners improve without feeling overwhelmed.
Let’s start with the most important step of all.
Disclaimer: In the name of full transparency, please be aware that this blog post contains affiliate links and any purchases made through such links will result in a small commission for me (at no extra cost for you).
In This Guide
- How to Make Drawing a Habit
- Focus on Fundamental Skills
- Study Your Subject (Don't Just "Look" at It)
- Practice Deliberately
- Experiment with Different Techniques
- Tools Matter Less Than You Think
- Learn From Your Mistakes
- Getting Better Takes Time
This is How You Get Better at Drawing
1. Make Drawing a Habit
5 Minutes a Day > 3 Hours Once a Week
To get better at drawing, you need to make it a habit and do it consistently every day. Try to spend 5 to 30 minutes every day drawing. Drawing for just 5 minutes a day is better than drawing once a week for 3 hours.
Remove All Pressure
Drawing every day might sound overwhelming, but it can be super simple. Just remove all pressure and expectations. Just plan to make a bad sketch. This alone removes most of the pressure.
Simple doodles, warm-up exercises, and failed sketches all count as practicing. And by doing this daily, you will get better.
Now, how do you stick to practicing every day?
What works really well for me is habit stacking. For example, I want to write in my journal every day for 5 minutes. When I first tried this, I missed a lot of days as it just wasn't a habit of mine. But when I started to add it as part of my routine, it became so much easier to do every day. Now, every time I get home from walking our dog, I go upstairs to change back into my comfy clothes. Now, I'm already in my room where my journal is. This is the perfect time for me to write in it, and I haven't skipped a day since.
You can do the same thing for drawing.
How do you know you're actually getting better?
The easiest way to track your progress is to keep all your drawing exercises and add a date to them. Then, once a week or every 2 weeks, look through your sketches. Compare your first ones to where you are now. Did you get better? What are some areas you need to improve? Work on those next, and then in a few weeks, compare your drawings again.
If you have a sketchbook, this tracking is a lot easier, as all your sketches are already bundled and ordered chronologically.
Getting better at drawing comes from practicing every day for a long time. It doesn't happen overnight. It takes time, so be patient.
Daily Drawing Exercise Ideas
If you don't know what to draw, here is a list of simple exercise ideas.
- Draw objects around you.
- Draw something you photographed in the past week.
- Do some sketching exercises: straight lines, circles, scribbly lines, etc.
- Practice shading simple 3D shapes: cubes, cones, cylinders, etc.
- And if nothing inspires you, just grab a pencil and draw on the paper wherever you feel like. It doesn't need to become anything.
You don't need to create a masterpiece every day. Just create a bad sketch
2. Focus on Fundamental Skills
Knowing the foundations of drawing is super important if you want to get better.
Knowing how to draw break complex objects into simple shapes, how to draw in perspective, how to shade, and being able to sketch proportions accurately are the 4 fundamental elements of drawing. If you understand these, you're already better than 99% of people.
Construction & Simple Shapes
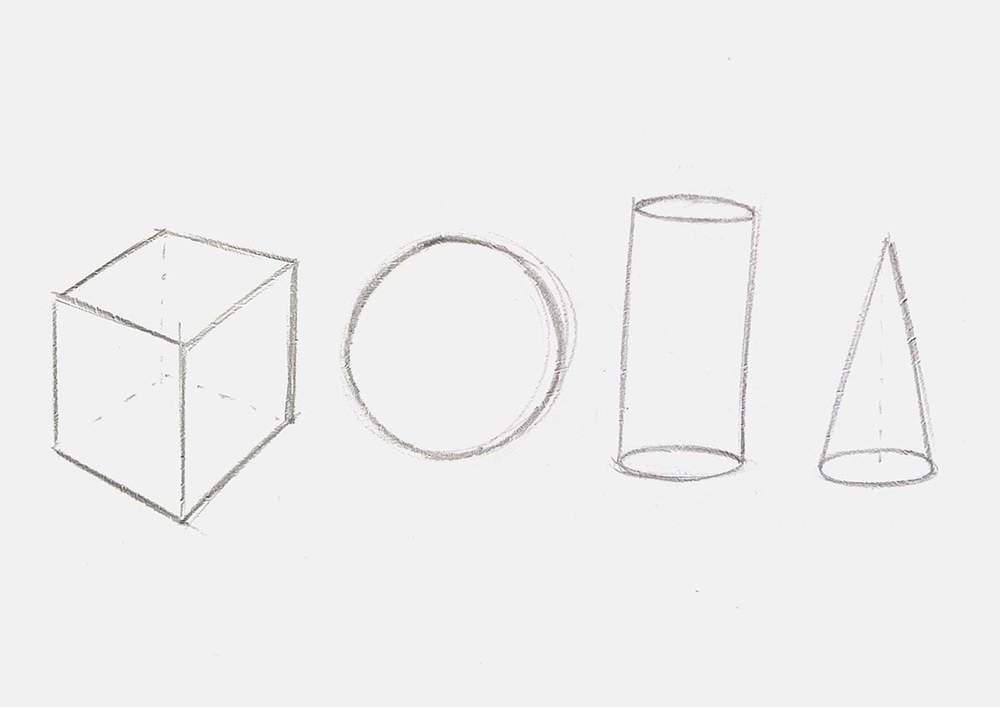
Every drawing subject can be broken down into a few simple core shapes: cubes/beams, spheres, cylinders, and cones. If you know how to draw these, you can draw almost everything.
Now, how do you use these shapes to construct more complex shapes?
To create more complex objects, you need to know which basic shapes and forms they are made of. You need to break it down. When you know what shapes it's made out of, you can start to put those shapes together to form the object.
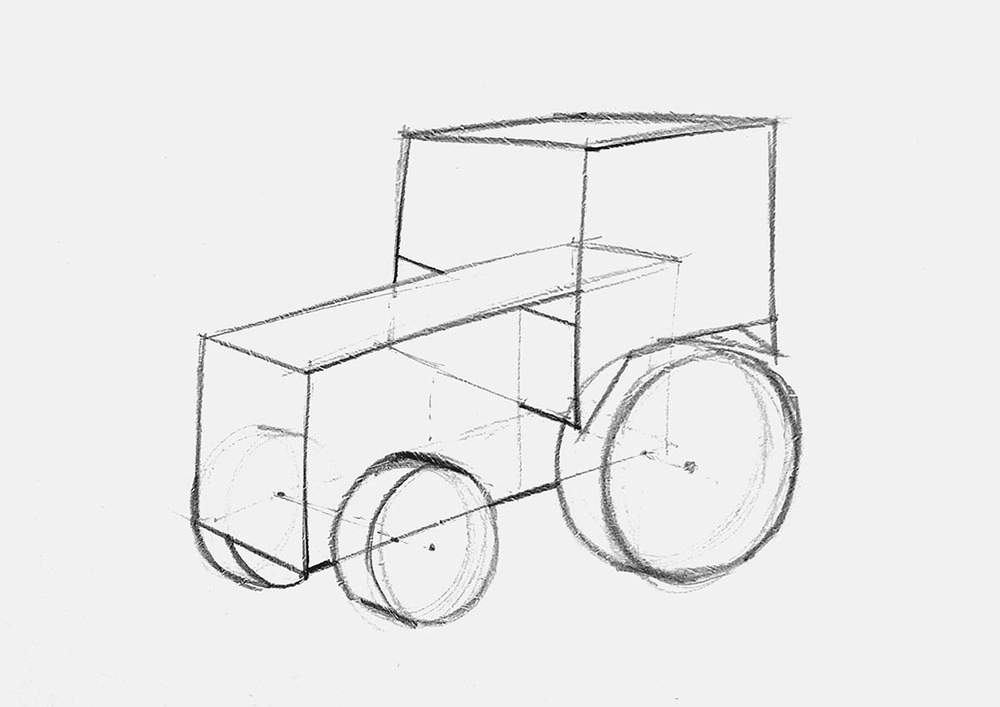
Here is an example of a simplified tractor I sketched. Notice how it's just a bunch of beams and cylinders.
Perspective
When I was younger, I was obsessed with perspective. It's so interesting how this works and how you can use this to add depth to your drawings.
Perspective is the first element that will make your drawings look 3D and more realistic. Everywhere you look, you see perspective: converging lines, vanishing points, the horizon line.

The most popular types of perspective are 1-point and 2-point perspective. 1-point perspective has one vanishing point where all lines converge towards, and 2-point perspective has two vanishing points.
You might have noticed that I used 2 point perspective to draw the cube and the tractor in the images above.
If you want to learn more about perspective and how to use it, I highly recommend you check out this guide I made on how to draw perspective.
Proportions & Anatomy
The next drawing fundamental is knowing how to draw anatomically correct and accurate proportions.
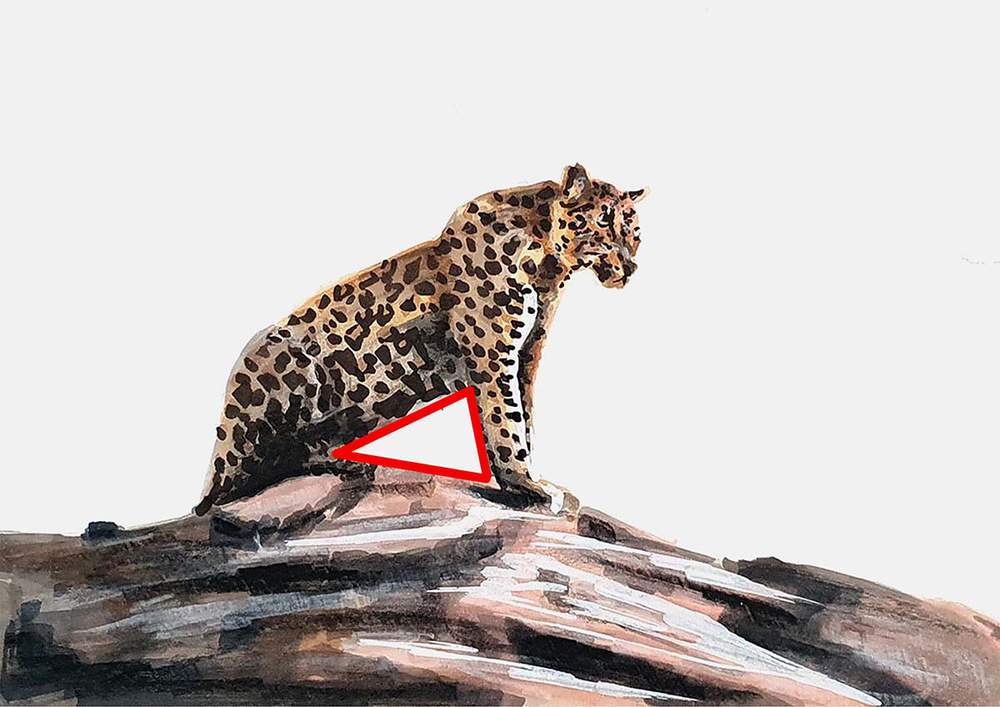
The easiest way to draw more accurately is to compare relations between parts. Is it twice as long as this other part? What angle does it point at compared to this other line? Are there triangle shapes you can find?
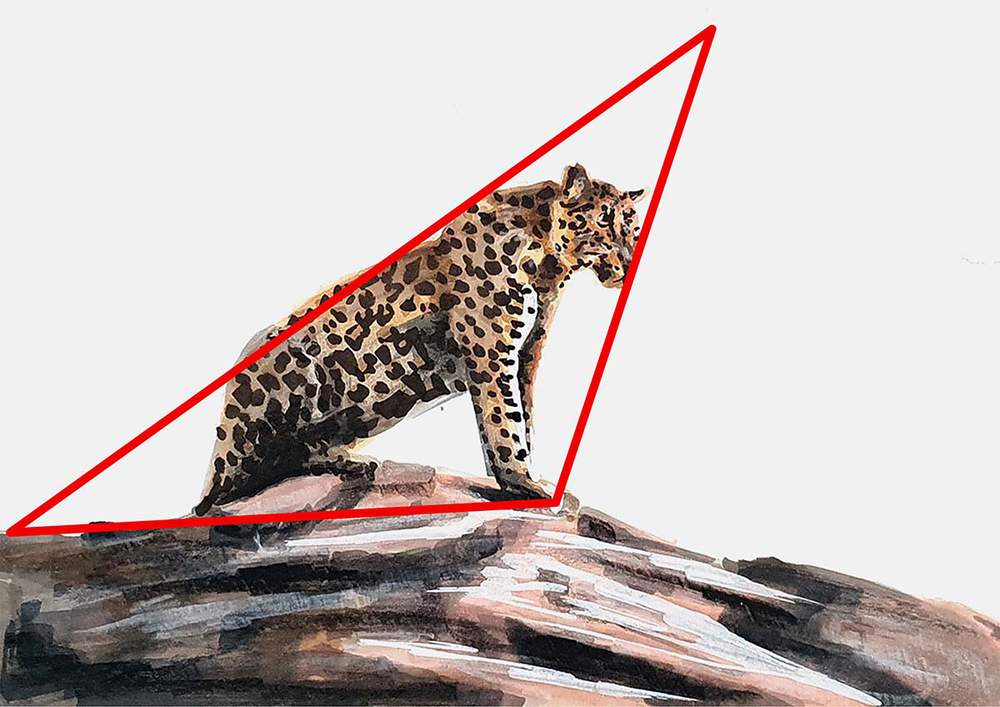
Finding triangles makes sketching accurately so much easier. Take this jaguar, for example.
When you're drawing people, you can use guidelines for human proportions. For example, humans are approximately 7 or 8 heads tall, the knees are at 2 heads from the ground, the hips are at 4 heads, the shoulders are half a head below the head, the elbows are 5 heads from the ground, and so on.
To draw an animal, you can determine relational dimensions like this, too. How long are the legs compared to the head? How thick is the body compared to the legs?
Light & Shadow (Values)
After perspective and proportions, values are the most important if you want your drawing to look more realistic.
To add accurate shading to your subject, you need to figure out where the light source is. Then, every side that points towards the light source is light, and every surface that points away from it is dark, and the sides that don't point away, but also not towards the light source, are mid-toned.
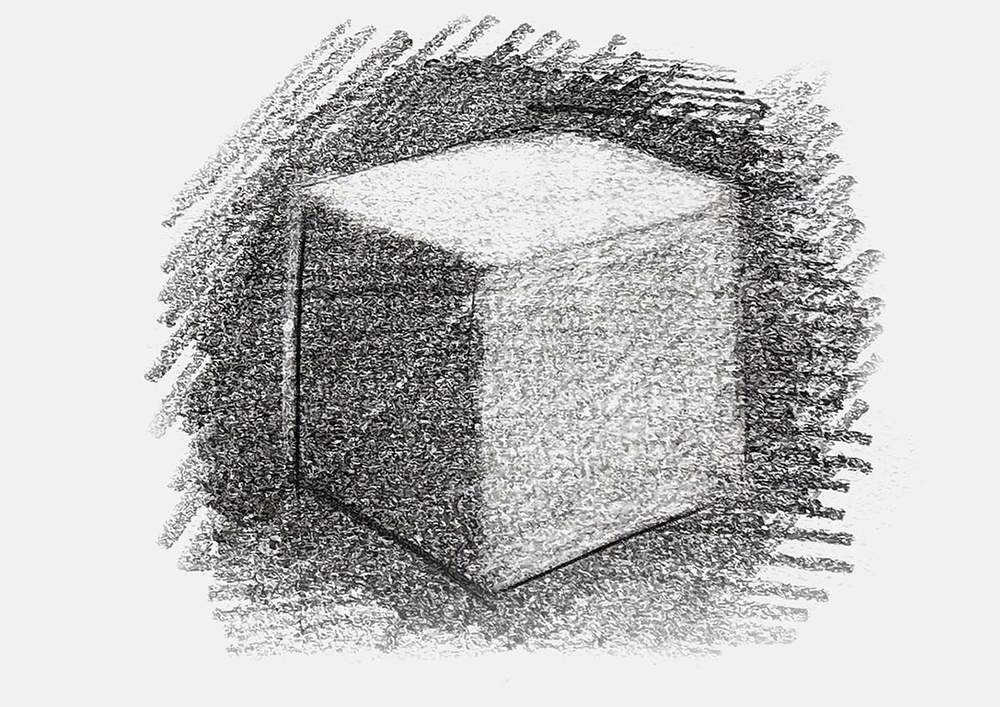
Don't be afraid to make the shadows very dark and the lights very light. This creates more contrast and makes your drawing look more realistic.
Forget About the Details
You might be wondering why I haven't covered how to draw details here. Honestly, details are not important, especially if you're a beginner who wants to get better at drawing. These 4 core fundamentals are more important than details. If your proportions are off, your details won't matter. If the lighting is wrong, your details won't fix that. If the perspective is wonky, so will the details.
Focus on getting good at the fundamentals first before worrying about details and textures.
3. Study Your Subject (Don't Just "Look" at It)
Studying your subject might sound a bit abstract. What do you need to look at? And how do you translate that into your drawing?
How to Draw What You See
To get better at drawing, you need to know how to draw what you see. This sounds easier than it is. Most beginners tend to look at something, then instead of drawing what they see, they guess what it looks like and draw that.
To actually draw what you see, here are some observational tips.
Tip 1: Look for Triangles
Triangles make drawing so much easier, and they can tell a lot about the basic shape of your subject or a part of it.
Even though you can't see them, most subjects have triangles. You just need to know what you're looking for.
For example, the jaguar from earlier has a pretty obvious one.
When you've spotted a triangle, you can recreate it. And luckily, triangles are super easy to draw. Just make sure to keep the relations between the line lengths and angles the same.
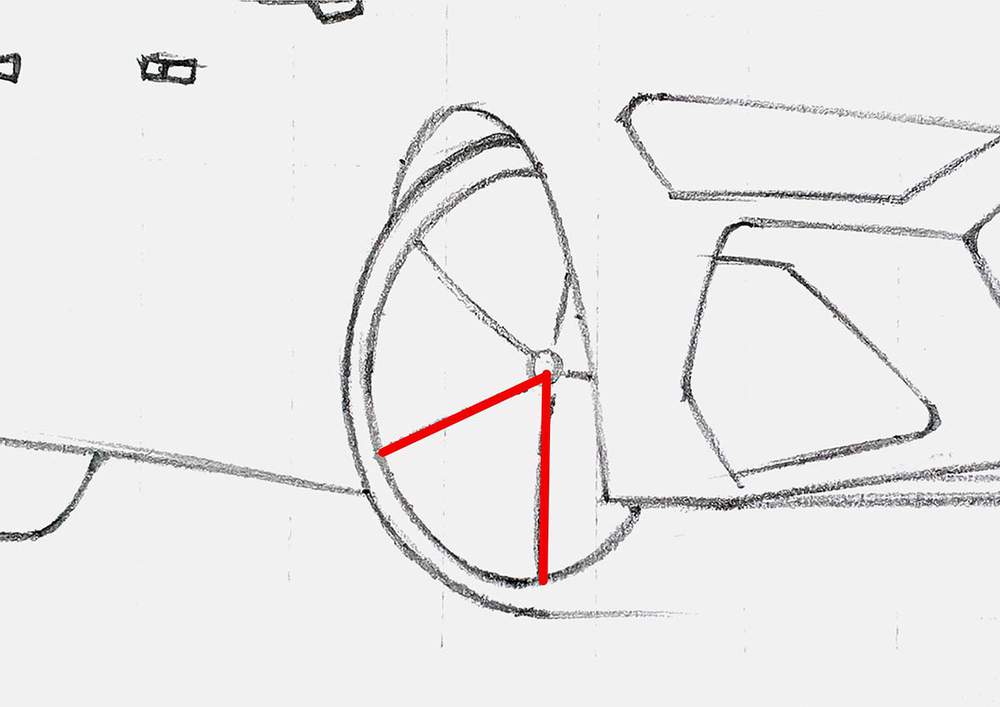
Tip 2: Focus on Angles
Another way to observe your subject is by looking at angles between different lines.
I use this technique all the time when sketching complex car wheels. It makes sketching the spokes in the right direction so much easier.
Tip 3: Negative Space Tells a Lot
Lastly, make sure to use the negative space of your subject, too. It can make otherwise complex shapes look a lot more digestible.
Take the jaguar again, for example. The space below its belly, the ground, and its front legs, there is another triangle hidden. By sketching this triangle, you are already a lot closer to the full shape of the jaguar, just by using negative space.
How to Practice Your Observational Skills
1. Use References
Using reference photos is a great way to study your subject. You don't need to go out and look for a jaguar, for example. Pretty handy. And since it's a photo, you can actually take your time before it runs away.
I almost always use photos to create my drawings, as expensive cars are not commonly found where I live. Plus, I like to draw in my atelier instead of on the streets.
2. Draw from Real Life
If your choice of subject allows it, it's better to draw it from real life. When you have it in front of you, you can better see how it "behaves" in its environment, and judging depth becomes easier as you can move around the object and see how it moves.
This might seem daunting at first, but it's a great way to get better at drawing quickly.
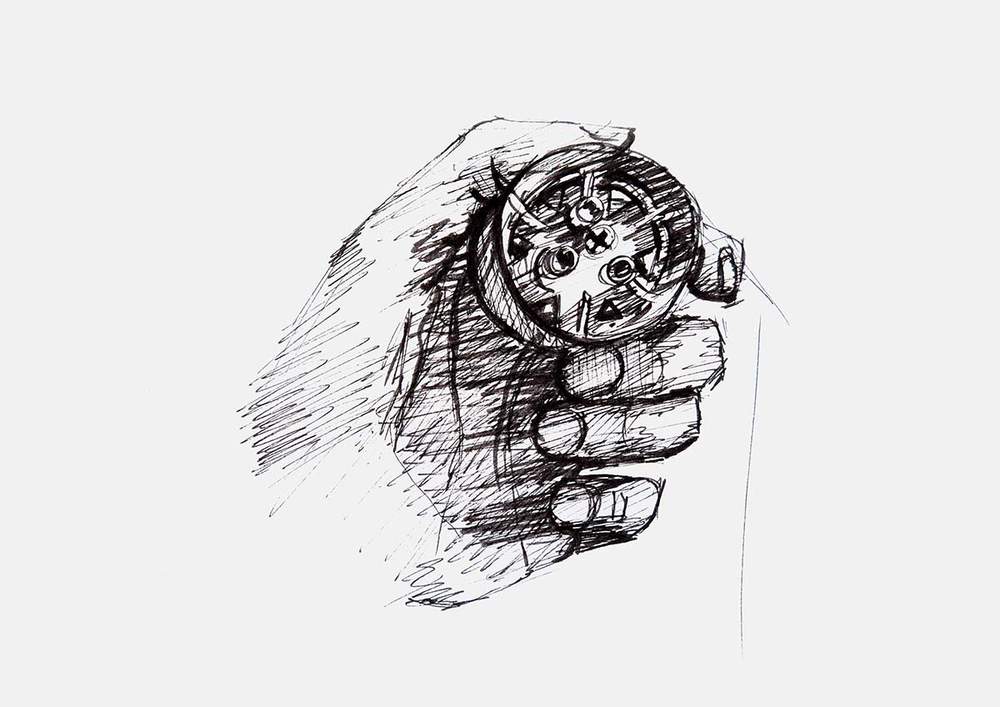
3. Study Your Subject, Then Draw It from Memory
When you've spent some time studying reference photos and real-life objects, trying to draw them from memory is a great exercise.
Just pick a simple object to start with, a sharpener for example, study the shapes (find triangles, look at the relations between the length of the lines, look at angles), then put it away and try to draw it. Don't focus on details or shading yet, just the basic shapes.
After you're done, compare your drawing to the object. What did you miss? Where were the proportions off? Then try it again, but now focus on the things you forgot or messed up.
Don't worry, it will look bad at first, but after a few times of drawing from memory, you'll see that you've actually gotten better. And you don't need a photo anymore to draw it!
4. Practice Deliberately
When practicing, you should focus on something specific, not just drawing for the sake of drawing. This doesn't have to be difficult. For example, you can focus one session on getting better at drawing straight lines or drawing noses from different angles.
Some easy drawing exercises for beginners are:
- Practicing drawing circles
- Practicing smooth line control
- Sketching boxes and other basic shapes in perspective, and adding shading
- Breaking down complex shapes into basic forms
And when you're getting better, you can try:
- Drawing noses (or any other subject) from 5 different angles
- Creating different wood textures
- Drawing a dog in different positions, just simple shapes.
- Studying an object, then drawing it from memory
There are tons of things you can practice. Just choose one. And if you don't know what to practice, practice straight lines, ellipses, and drawing cubes.
5. Experiment with Different Techniques
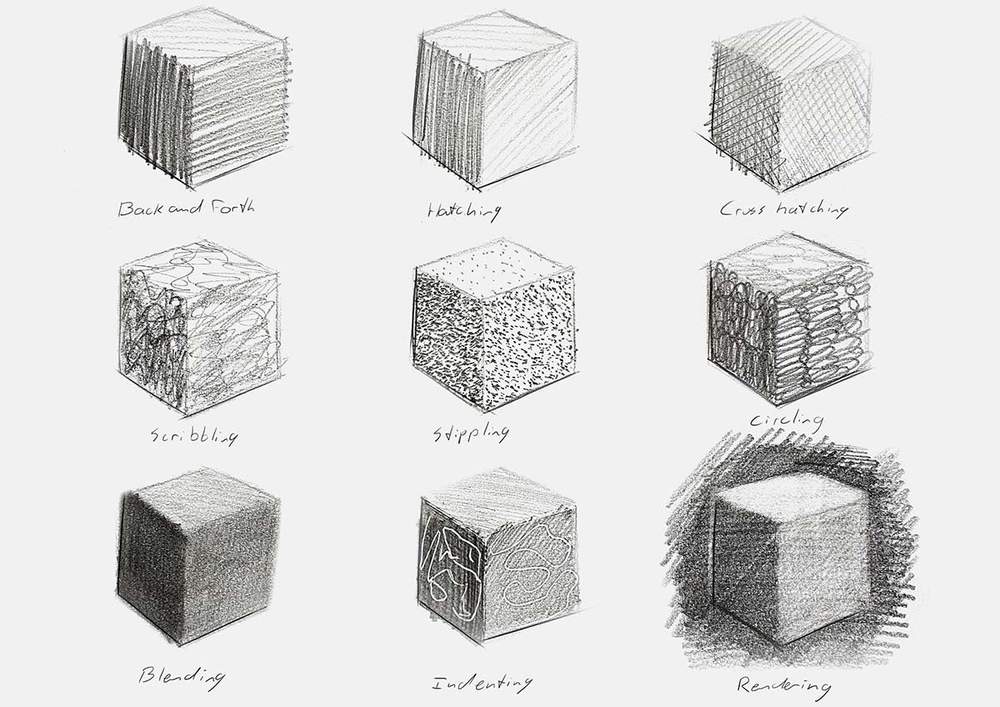
When you understand the basics of drawing, you can start to experiment with different drawing techniques.
You can start to add shading to your drawings with hatches or cross-hatches, or you can try to make super soft transitions from light to dark by blending out the pencil with a paper towel or a Q-tip. Here are more pencil drawing techniques for beginners you can try out.
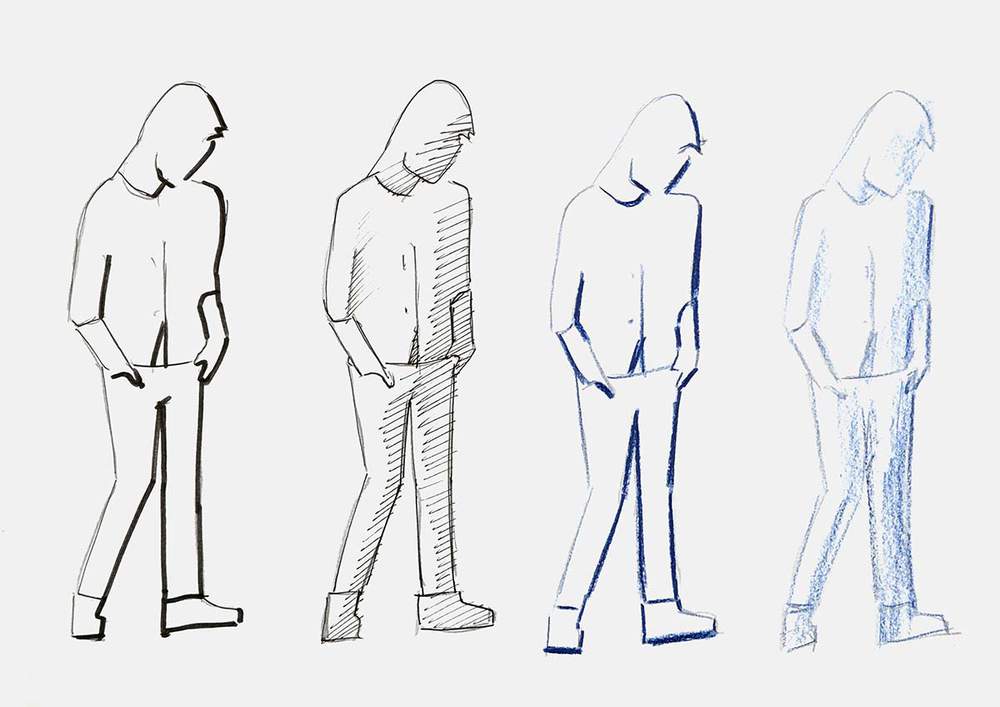
You can also play around with lineweight. Make lines that catch the light lighter, and lines on the bottom of your subject darker. For example, I added some really dark and thicker edges on these human studies. This can add more depth to your drawings without even adding shading.
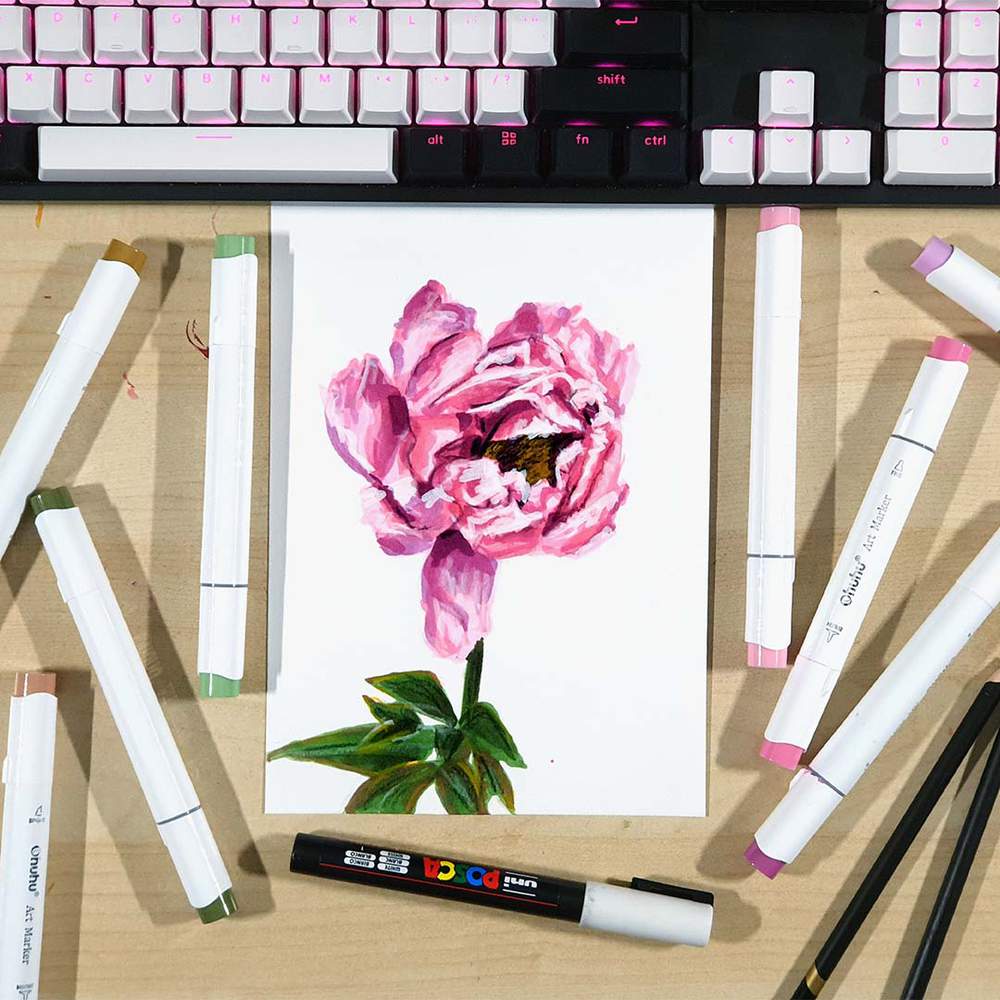
You could also experiment with different drawing supplies, like colored pencils and alcohol markers, see how those work, and how you can use them in your drawings. Personally, I love using these art supplies over black and white pencil drawings. That's why I use them in all my step-by-step drawing guides.
6. Tools Matter Less Than You Think
The best tools to use for beginners who want to get better at drawing are just the tools you already have.
You don't need fancy pencils. You don't need the most textured paper. You don't need blending stumps or electric erasers.
Just a regular HB pencil and printer paper is more than enough.
However, if you want to make practicing more fun, you can buy a good set of graphite pencils like these ones, some alcohol markers that make your drawings pop, or these colored pencils that I love to work with. You'll also need paper that works well with these supplies.
But be careful. Now you also need to learn how to use these drawing supplies.
You don't need to wait for perfect supplies to start. If you want to get better, just use a pencil and some printer paper first.
7. Learn From Your Mistakes
When trying to get better at drawing, you'll need to learn how to spot mistakes in your art before you can even fix them.
When drawing, ask yourself these questions:
- Are the proportions off?
- Is the perspective accurate, or does it look wonky?
- And when you added shading, is the lighting consistently coming from 1 angle?
If something seems off, you learn from it and fix it. However, knowing something's off and knowing how to fix it are two different things.
When I started out with drawing, I could see that something was off about the proportions, but I couldn't always pinpoint what exactly was wrong.
To get better at pinpointing mistakes, you can compare your drawing to the reference or the object in real life. But what works best for me is to hold my drawing in front of a mirror. When you're drawing something, it's easy to lose track of your accuracy as you get used to how it looks. By holding it in front of a mirror (which mirrors your drawing), you suddenly get to look at it with fresh eyes. This makes it so much easier for me to figure out precisely what's wrong.
You can also take a photo and flip it if you don't have a mirror nearby.
After a while, you start to build a collection in your head of mistakes you made and what you needed to do to fix them. This is how you get better fast.
8. Getting Better Takes Time
Getting good at drawing takes time. It can take months or years to get where you want to be. But if you practice a lot effectively, it could also be weeks.
Most people give up before they get there, because "it's too hard", or they think they don't have "the talent". Getting good at drawing does not take talent; it takes a lot of time and practice.
I didn't get where I am now because I am talented (even though most people say that I am talented). I got here because I never stopped drawing and always tried to improve. I had to suck first, before I got good.
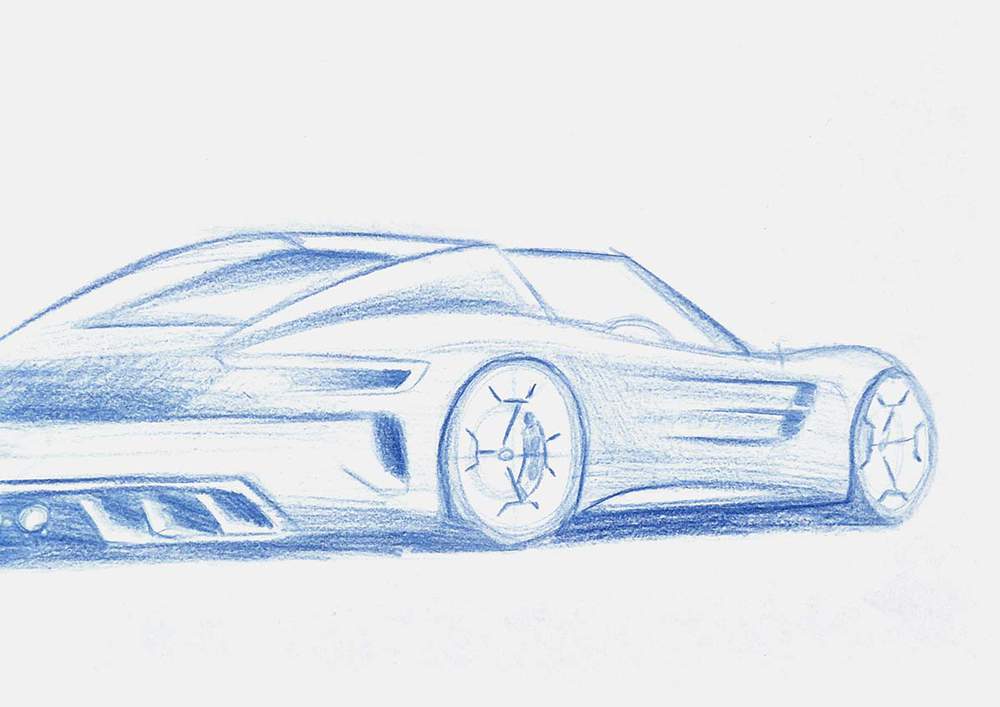
This is one of the first drawings I did when I decided I wanted to get better. As you can see, the proportions are off, the car doesn't even fit on the paper, and I didn't dare to shade it dark enough.
But I had to be this bad to become as good as I am now. Without that experience, I wouldn't be able to make this drawing:

Don't get discouraged by how far you still have to go to become good. Use it as fuel to get better. And never stop. You will get there.

I love bringing cars to life with alcohol markers and colored pencils.
Whether you're just starting out or looking to improve your skills, I'm here to help!
Click here to learn more about me.


Add a comment
Comments
Wat een mooie website, je uitleg is goed te begrijpen. Ik ben nu ongeveer een half jaar bezig en ik wou dat ik eerder had ontdekt, het is zo rustgevend. Maar ik heb nog een lange weg te gaan, als ik dat met jouw werk vergelijk.