8 Sketching Techniques for Accurate Proportions
Drawing accurate proportions is one of the most difficult things when it comes to creating realistic art, especially when you're just starting out.
When I started drawing cars the proportions were way off, so I started to look for sketching methods and tools that would make it easier to get them right.
Here are all the sketching techniques to achieve accurate proportions that I learned since then from watching 100s of YouTube videos, from art class, from studying Industrial Design for a while, and from research.
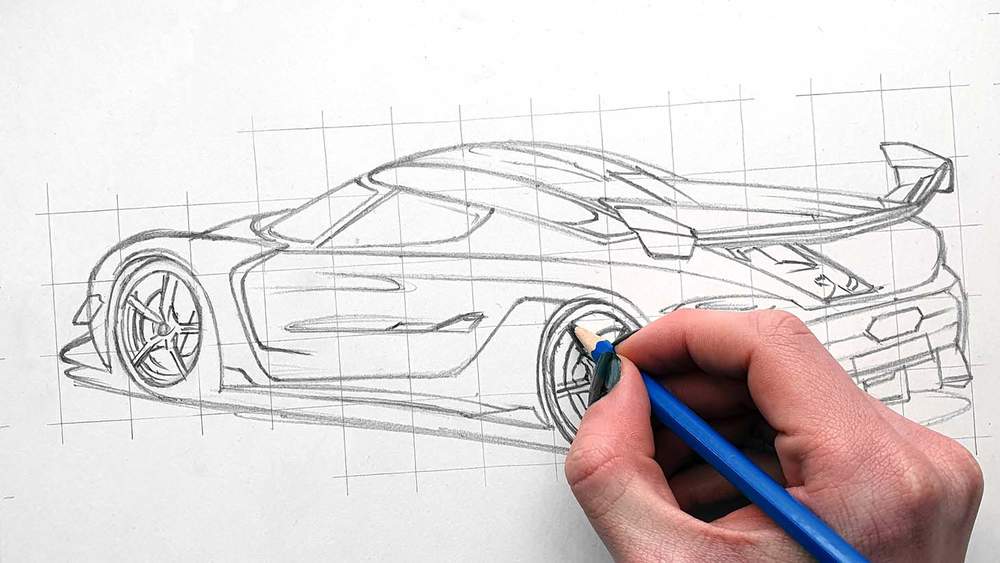
1. Square Grid Method
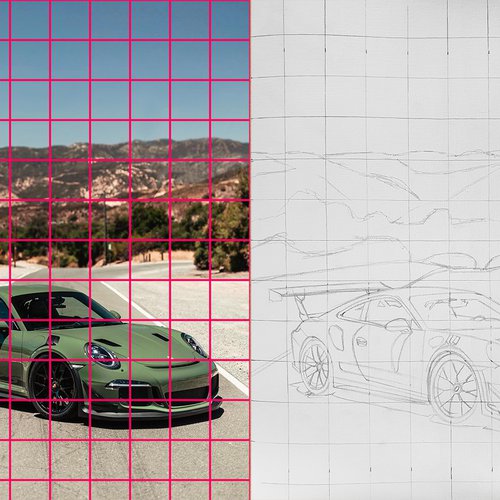
The first technique I learned was the gird method. This technique consists of drawing a grid of all squares onto your reference photo. You then replicate that grid on your piece of paper.
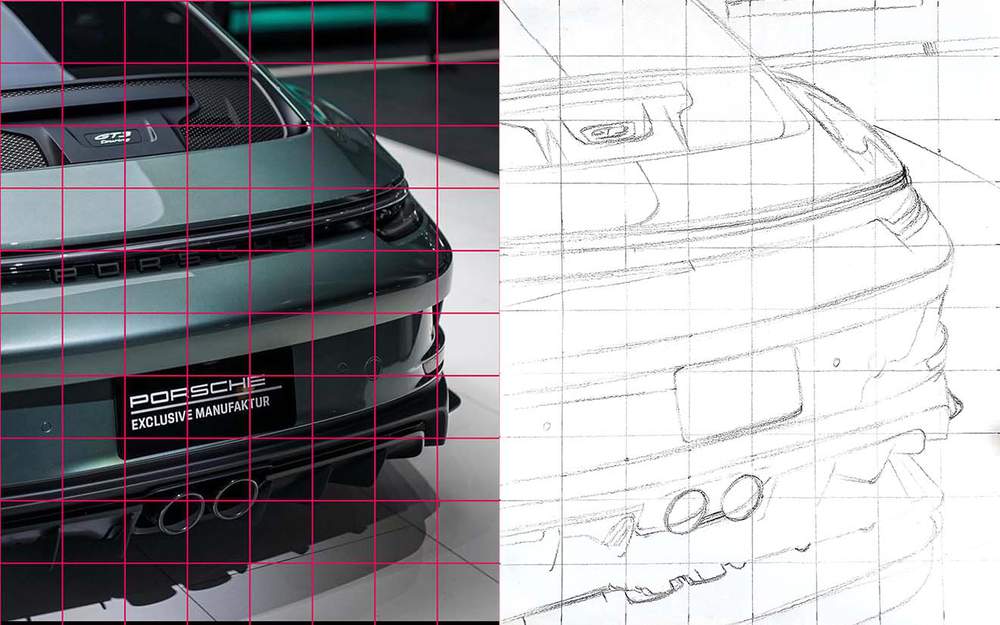
By doing this you divide complicated photos or subjects into more comprehensible squares, so you only need to focus on getting one square right at a time. A grid is also great for seeing where the lines of your drawing subject intersect with the grid lines, making it easier to sketch them correctly.
If what you're drawing is very complex you can increase the number of squares to make it easier to sketch accurately and if it's less complex you don't need as many squares which will make it less overwhelming.
This technique can be used for any subject. I use it all the time when I'm drawing cars.
If you'd like to know more about this technique you should check out this article I wrote on how to use the grid method.
2. Triangular Grid Method
Another version of the grid method is the triangular grid method, but instead of drawing a grid of squares, you draw 2 diagonal lines between opposing corners and a vertical and a horizontal line right through the middle.
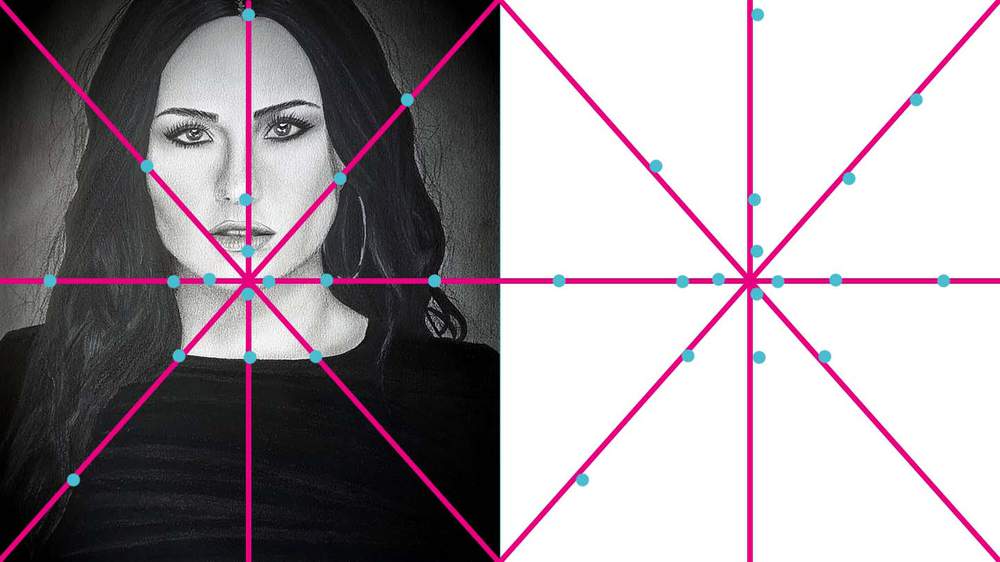
This is the most basic version of this technique, but, just like with the square grid method, you can increase the density of the triangles when you're drawing more complex subjects.

You measure key points of contour lines of the subject that intersect with the grid from the center with a ruler or a compass and then you draw those same points on you're drawing. With those key points, it'll be a lot easier to sketch more precisely.
Just like the square grid method, you can use this technique for any drawing subject you like, but it's especially useful for drawing portraits.
3. Measuring Key Points
If you don't want to sketch a whole grid, you can also just measure the key points. This technique is a bit more tricky, but still quite doable.
To use this method you need a printed version of your reference photo preferably in the same size as your drawing surface. On the printed reference photo you want to mark the most important key points of your drawing subject and measure the coordinates. Then you mark those same spots on your piece of paper. Now it's just a game of connecting the dots.
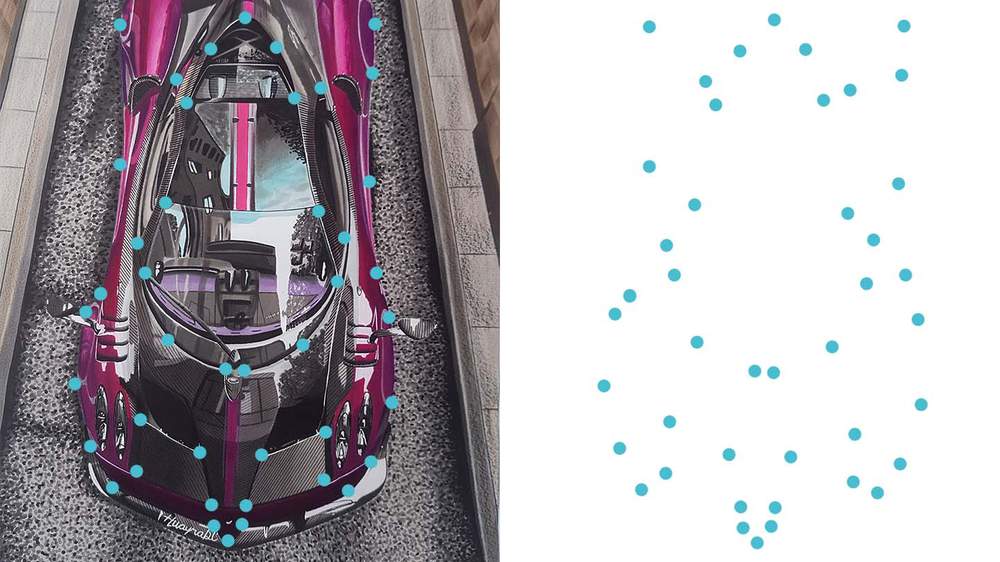
If you can't print your reference photo in the same size as your drawing surface you can make it smaller, as long as it is proportional to your drawing surface. When measuring the key points you'll need to convert the coordinates to fit well on your piece of paper.
You can also use a digital photo, but you need to be careful not to accidentally resize it when you're measuring.
I've used this technique before and it's definitely more difficult than the grid method, but it works really well. You just need to be careful to measure precisely.
Just like the previous 2 techniques, this one works well for all drawing subjects.
4. Sighting
Sighting works really well when you're drawing from real life. To use this technique you use any tool to measure key points and measurements of your drawing subjects. You can use the pencil you're sketching with, a piece of charcoal, a pen, or anything else.
You just hold it in your hand and measure the features of your drawing subject and mark how long they are with your thumb on the tool you're using the measure. Make sure to stretch your arm when measuring and marking your measurements on your drawing surface to ensure your measurements are consistent.
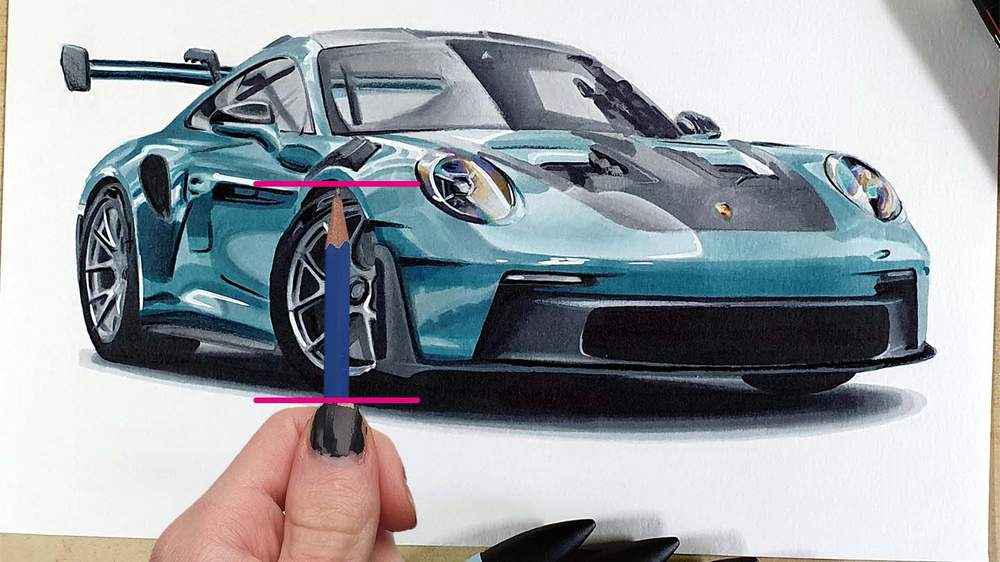
During drawing class at uni we had to use this technique a few times to sketch fellow students. I found it quite difficult, but that's probably because we were drawing people which I had never done before, and because we were using charcoal which I had never used before (and I didn't like using it...). But with a bit of practice, you can definitely get pretty good at it.
This sketching method works really well for drawing anything from life.
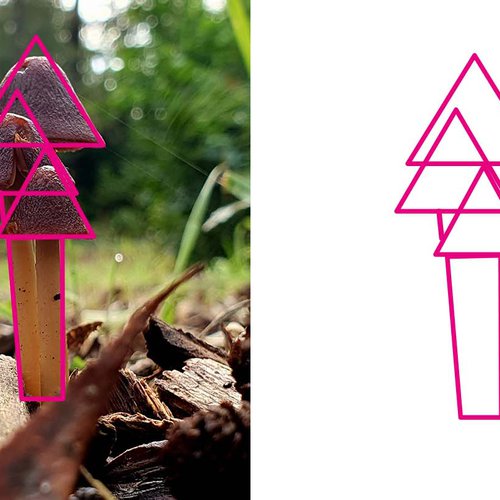
5. Basic Shapes
Dividing your drawing subject into basic shapes can make sketching it a lot easier. When sketching you first look for basic shapes like squares, circles, ovals, etc. in your subject, both in positive and negative space. Then you replicate these shapes on your piece of paper.

By starting with basic shapes it's easier to get the overall proportions right and if you get them wrong it's easier to fix them as you haven't drawn any of the details yet.
When you've sketched all the basic shapes, you can add more and more details until your sketch is done.
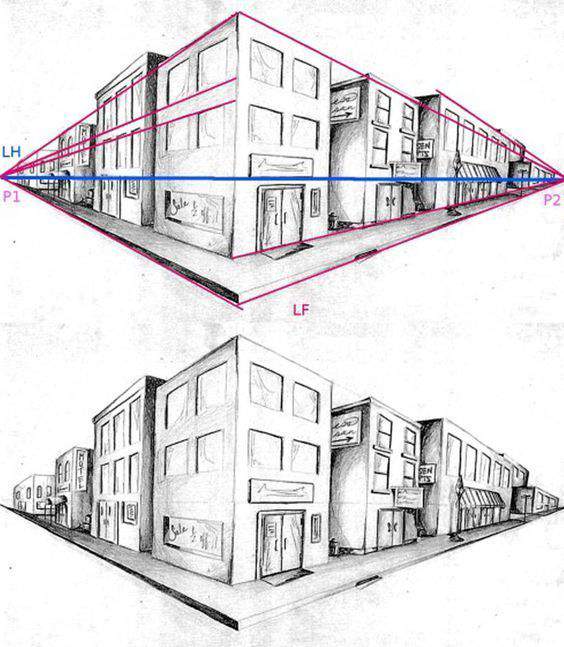
6. Linear Perspective (1,2,3 point pers)
During art class back in 2015 we learned about linear perspective and how to use it. Linear perspective is a method that uses lines and vanishing points where all lines come together. There are multiple types of linear perspective, the most used ones are 1-point, 2-point, and 3-point perspective.
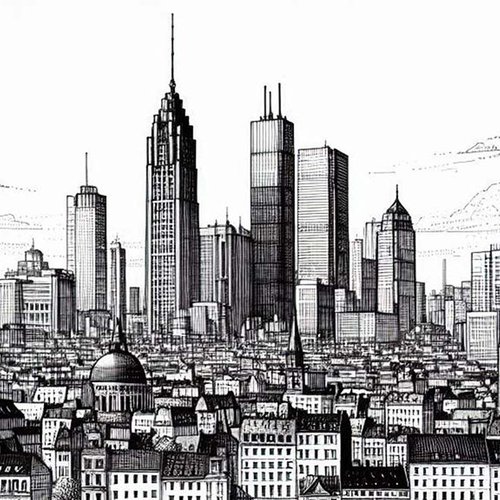
You can use linear perspective for any drawing subject, but it's most used for urban and architectural drawings.
1-Point Perspective
1-point perspective uses 1 vanishing point placed on the horizon and consists of horizontal and vertical lines and lines starting from (or ending in) the vanishing point. This type of linear perspective is mostly used when viewing objects straight on, flat views. An example of this is when you look straight at a wall in your room, but it can also be when you look straight down a street or a train track.

2-Point Perspective
2-point perspective, you guessed it, consists of 2 vanishing points placed on the horizon with a lot of space between them. This type of linear perspective still consists of vertical lines, but all other lines are oblique lines (unless they are right on the horizon line).
2-point perspective occurs when you don't look at something straight on but from an angle, for example when you look at a corner of your room.
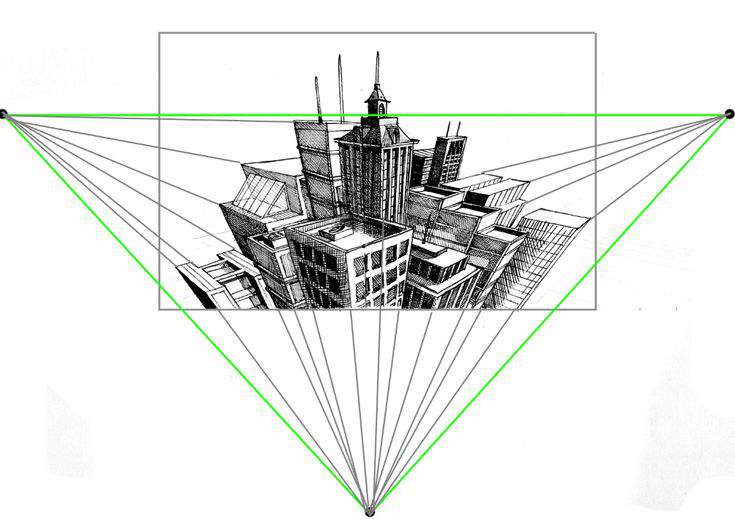
3-Point Perspective
It should be no surprise that 3-point perspective consists of 3-points, 2 on the horizon just like 2-point perspective, and 1 vanishing point below or above the horizon line depending on the focal point.
3-point perspective works almost the same as 2-point perspective, but instead of perfectly vertical lines, all vertical lines come together in the 3rd vanishing point. If you're viewing an object from above (bird's eye view) the 3rd vanishing point is below the horizon and if you're viewing something from below (worm's eye view) it's above the horizon line.
7. Basic Facial Proportions
When drawing portraits there are some general "rules" you can follow to make it easier to get the facial features to look right.
For example, the eyes are usually halfway the height of the face, the bottom of the nose is approximately a quarter of the height of the face from the chin, and the mouth is one-eighth the height of the face above the chin. The edges of the mouth also line up with the center of the eyes and the edges of the nose line up with the inside corner of the eyes.
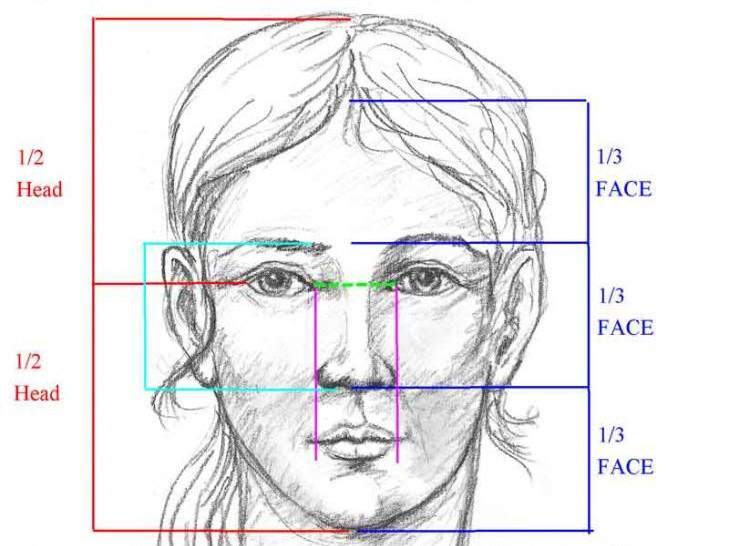
These guidelines are just a loose guide and not a fixed set of rules you need to comply with. When drawing a portrait you still need to look at the face you're drawing to get the facial features correct.
8. Gesture Drawing
Just like there are guidelines for facial features, there are also guidelines for drawing figures. And just like with facial guidelines, figures are all different and have different proportions. These guidelines are just to get the basic proportions right, and together with careful observation, you can create pretty accurate drawings.
Here are some basic guidelines you can follow:
- The height of a person is about 7.5 times the height of the head;
- The leg-to-body ratio is about 1:1;
- The waist-to-height ratio is about 0.5:1;
- The belly button lines up with the elbows which is about 3 heads down from the top of the head;
- The pubic bone is about 4 heads down from the top of the head;
- And the knees are about halfway the legs;
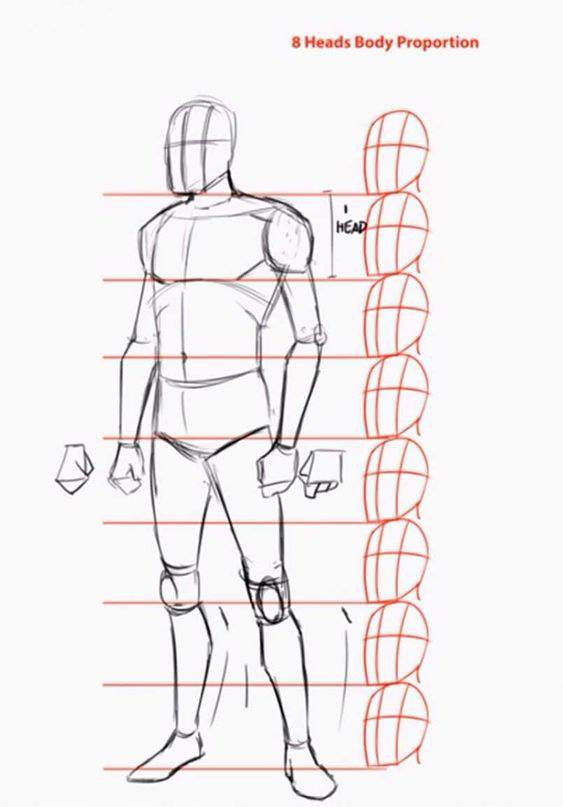
With these measurements, you can easily make figure drawings that look proportionally correct but don't forget to carefully observe the person you're drawing and alter these measurements accordingly.
Tags
Articles You Might Also Like


I love bringing cars to life with alcohol markers and colored pencils.
Whether you're just starting out or looking to improve your skills, I'm here to help!
Click here to learn more about me.


Be the first to comment!
Comments
There are no comments yet.