How to Draw a McLaren P1 - Detailed Step-by-Step Guide
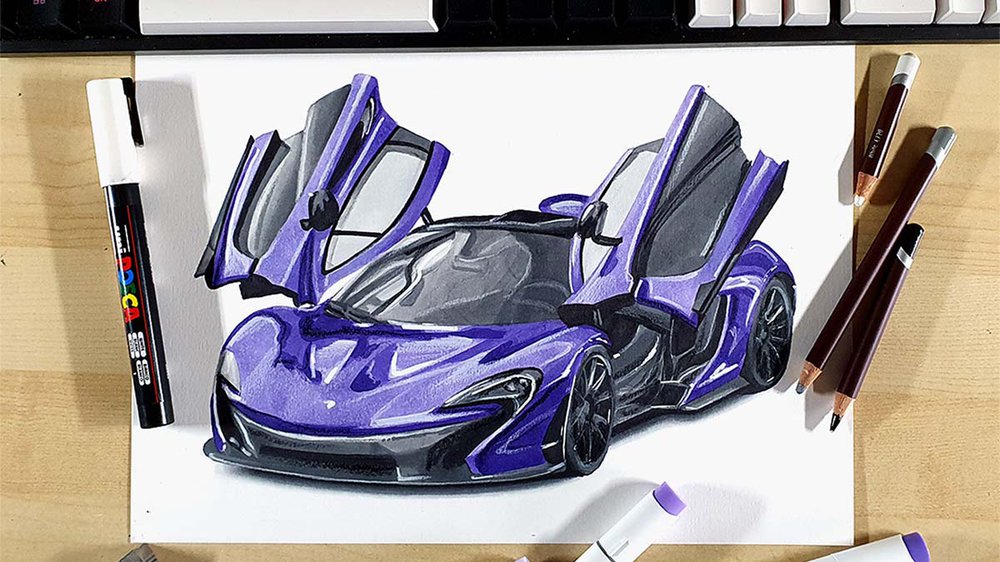
Skill level: Beginner. Time needed: 3 Hours.
In this week's car drawing tutorial, I'll take you through my exact process of drawing this McLaren P1 in this beautiful purple. I'll show you every step and describe what I did in full detail so you can recreate this amazing drawing.
Let's get started!
Disclaimer: In the name of full transparency, please be aware that this blog post contains affiliate links and any purchases made through such links will result in a small commission for me (at no extra cost for you).
How to Draw a McLaren P1?
To make a realistic drawing of a McLaren P1, first gather a few reference photos for the perspective, proportions, lighting, reflections, and color.
After that, create a sketch of the outline of the car using the grid method.
Next, color the car with alcohol markers starting with the black and the grey parts, before moving on to the main body of the P1.
Lastly, add some details with colored pencils and highlights with a Posca paint marker.
Step 1: Look for Reference Photos
The first thing I do when I want to draw a car is to search for reference photos. If you're going to draw anything realistic, I highly recommend using reference photos.
I looked on Instagram and found these 3 that I liked, each for a different aspect of the drawing.
I chose this photo for the perspective as it needs to have the doors up as it is a McLaren, and I generally prefer 3/4 front views.
I chose this photo for the reflections. I really like when a car has some nice reflections and I like a bit of contrast, so that's why I chose this one.
And I used this photo as a rough color reference. I already had a color in mind for the P1, but I still wanted to have a color reference to see how the color reacts with certain reflections and lighting.
Step 2: Choose Your Drawing Materials
Now that we've gathered all reference photos, it's time to decide what drawing supplies we're going to use.
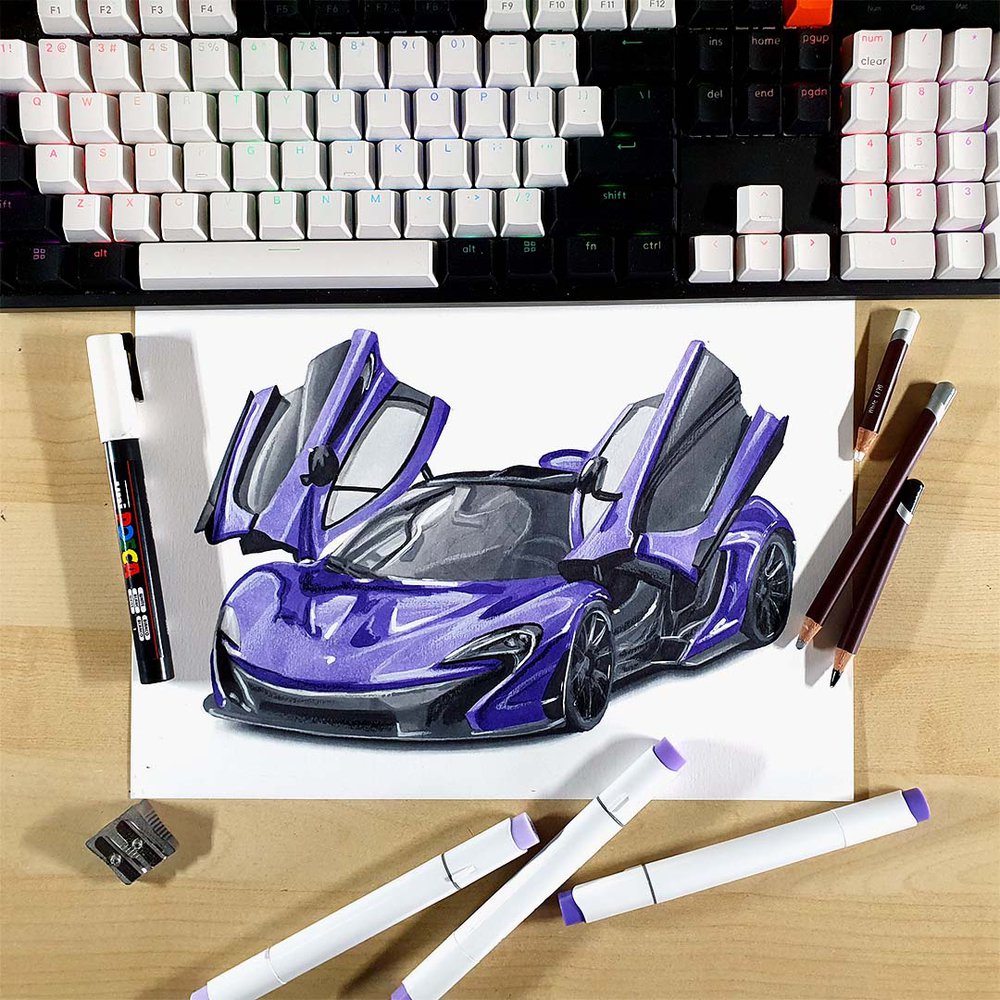
I want to keep this drawing simple, so I chose to mainly use alcohol markers.
I also used Ohuhu Honolulu markers in the colors Neutral Grey 02 (CG020), Neutral Grey 03 (CG030), Neutral Grey 05 (CG050), Neutral Grey 07 (CG070), Black (120), Light Lavender (V250), Lobelia (V270), and Gentian Violet (V320). I also used the colorless blender marker.
For the markers to work well, you need paper that can handle the ink well. For this drawing, as with all other marker drawings, I used the Canson Illustration Manga paper, which is, in my opinion, the best marker paper you can buy.
To add some details on top of the alcohol markers, I used 3 Derwent Coloursoft colored pencils: White, Dove Grey, and Black.
And to add some final highlights, I used a white Posca PC-3M paint marker.
I also used standard materials like a regular HB graphite pencil, a regular eraser, a kneaded eraser, and a ruler.
Step 3: Sketch the Outline of the McLaren P1
Sketching a car like the McLaren P1 can be quite difficult, that's why I like using a sketching technique called the grid method.
By using this method you can sketch a car way more accurately, even if you're not that skilled.
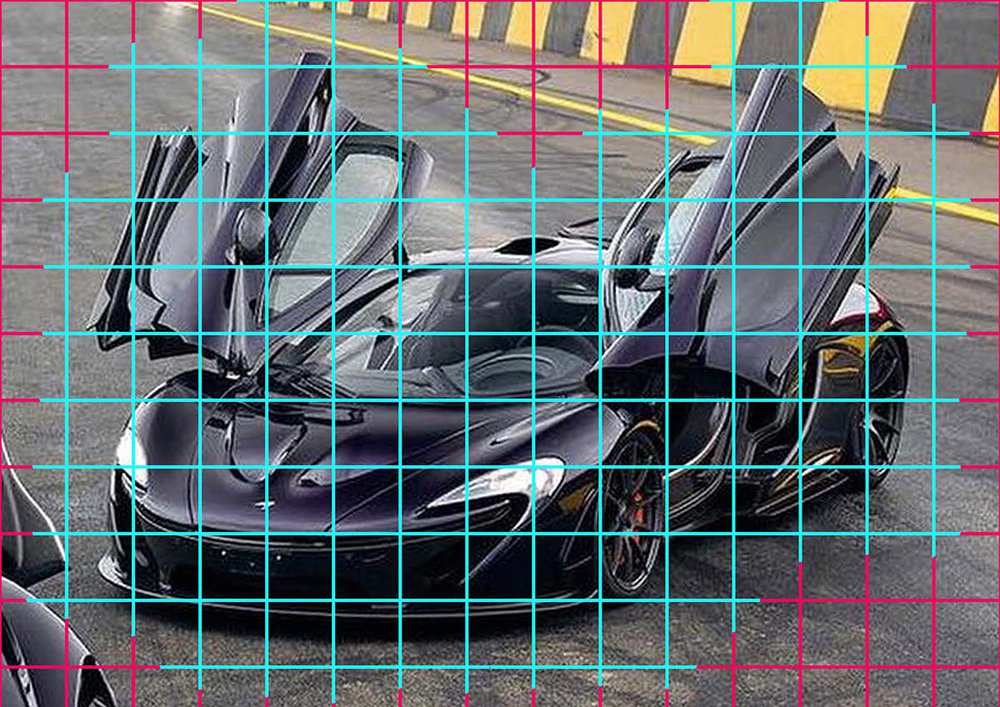
To use the grid method, I first resized the reference photo for the perspective to have the same size as my piece of paper, which is 29.7 by 21 cm (or 3508 by 2480 pixels).
Next, I overlayed a grid on top of the photo and marked the squares that were needed to sketch the P1.
After that, I recreated that same grid on my piece of paper. I only sketched the grid squares that were needed, but you can also just sketch the whole grid.
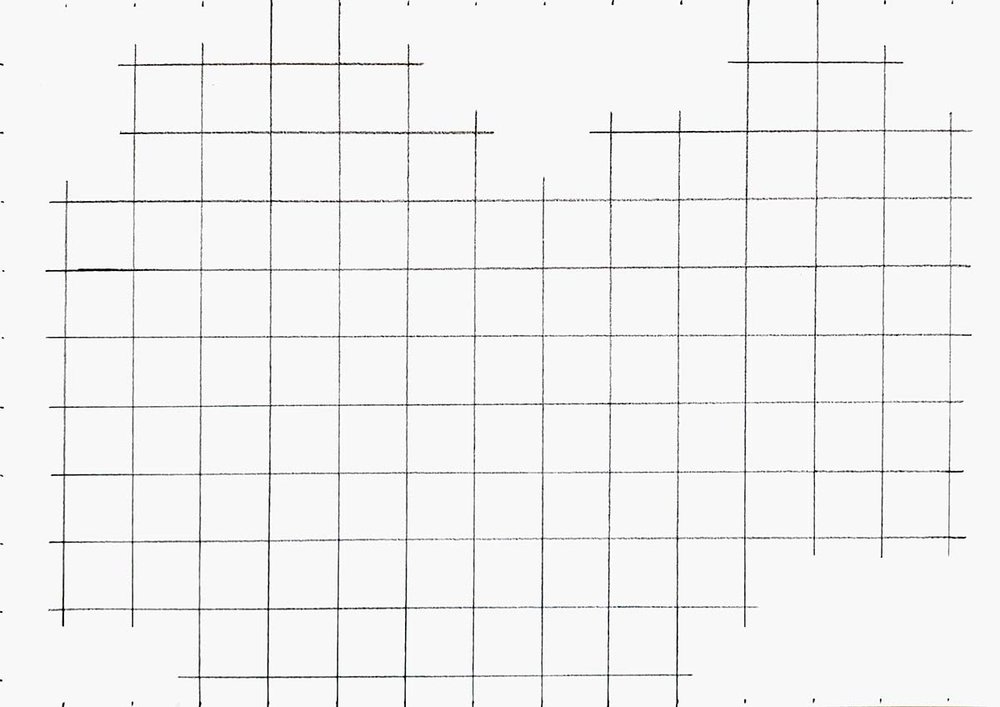
Next, up it's time to start sketching the car. But before we do that, you'll need to lighten the sketch by using a kneaded eraser and rolling it across the paper.
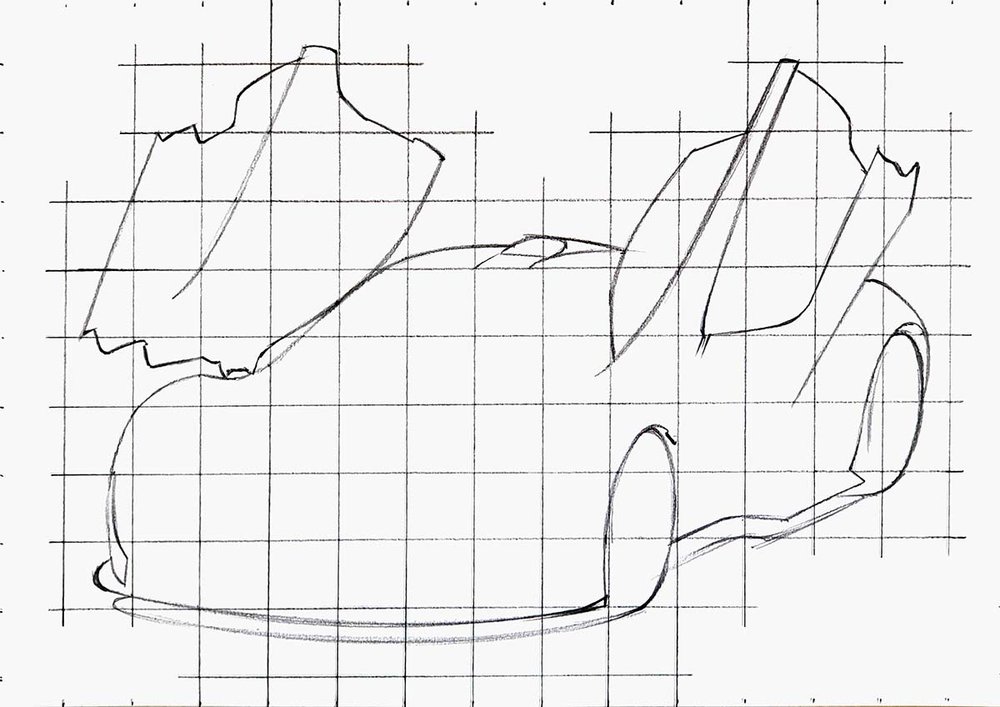
Then, I started sketching. I always start on the left of the car, choose an edge to sketch, and work my way from there up and around the car, deciding the outline into many easy-to-draw lines.
Make sure the proportions of your outline are correct before moving on to the next step. Now is the easiest time to make changes to the outline.
Step 4: Sketch the Details of the McLaren P1
After that, I sketched all the basic shapes and details of the McLaren P1. The shapes of the doors, the front splitter and all the openings, the windshield and the interior, the roof scoop, the headlights, etc.
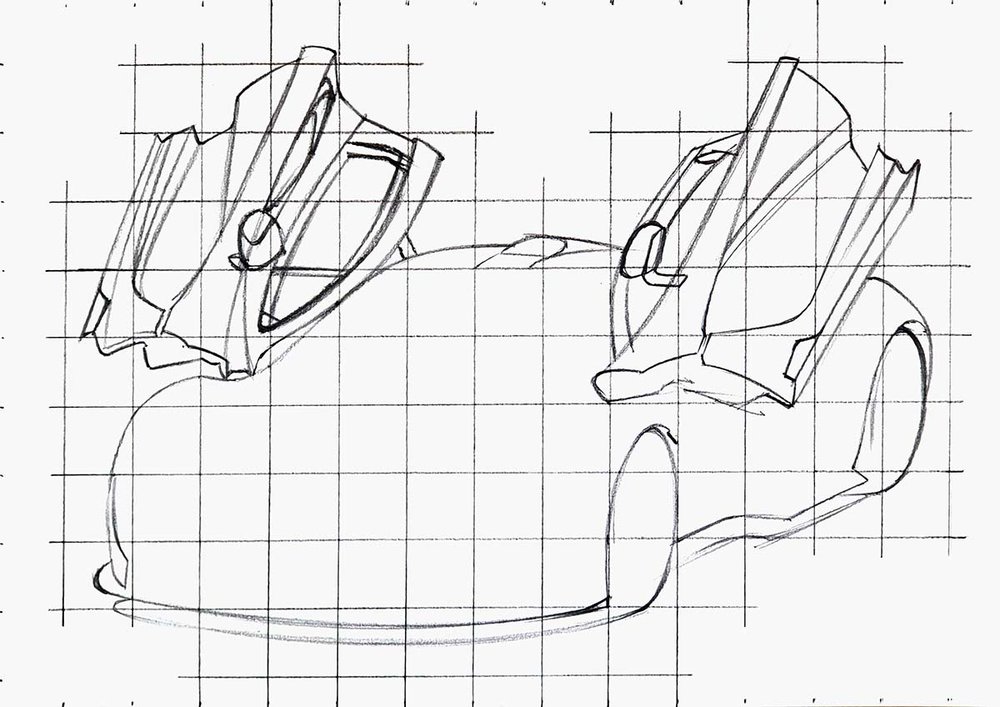
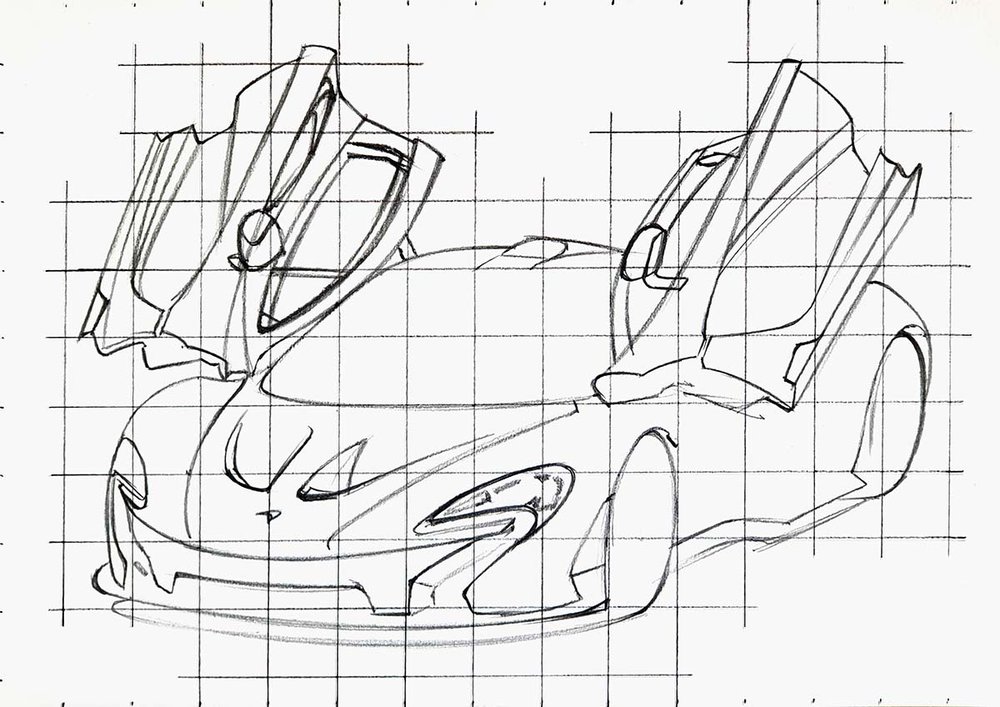
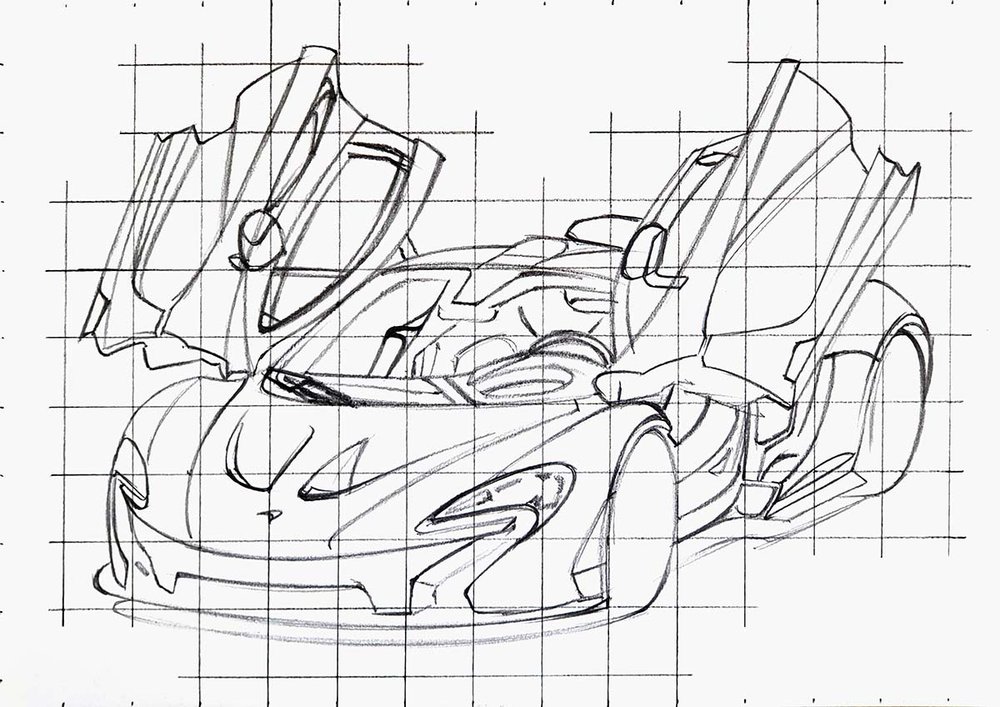
Step 5: Sketch the Wheels of the McLaren P1
Next, I sketched the wheels. I wanted to explain this a little more in-depth as they can be quite tricky to get right.
I started by sketching the outline of the rim inside both wheels. After that, I marked the center and sketched an oval around it and a little bit more to the right.
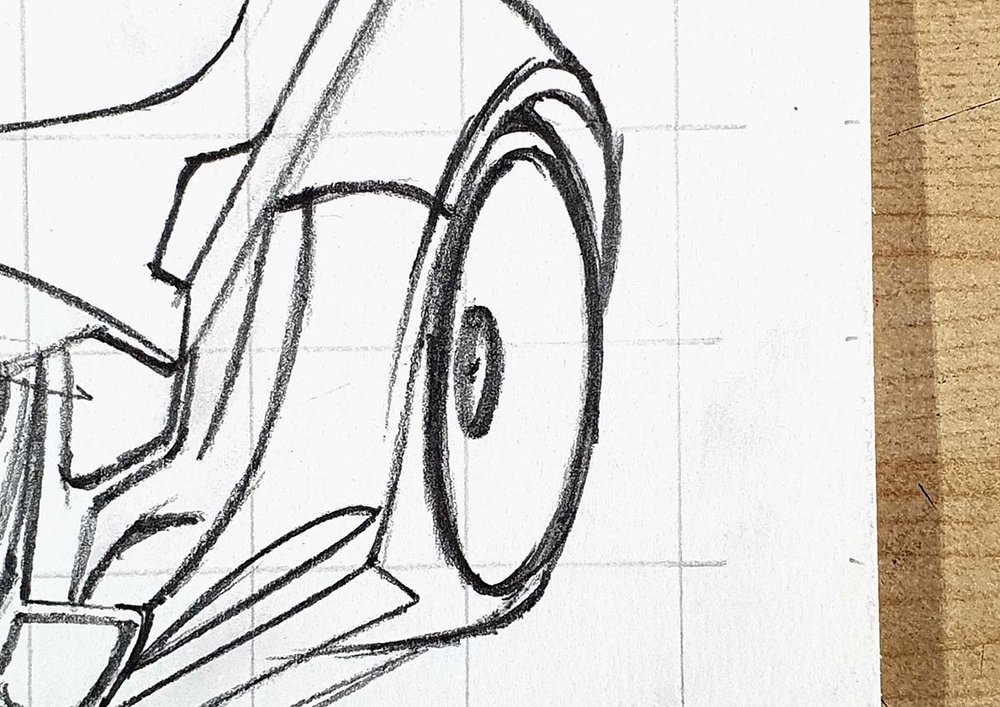
Then, I marked where each spoke connects to the center bit and the outside rim and I sketched all spokes. The top half of the spokes curve upwards and the bottom half curve downwards.
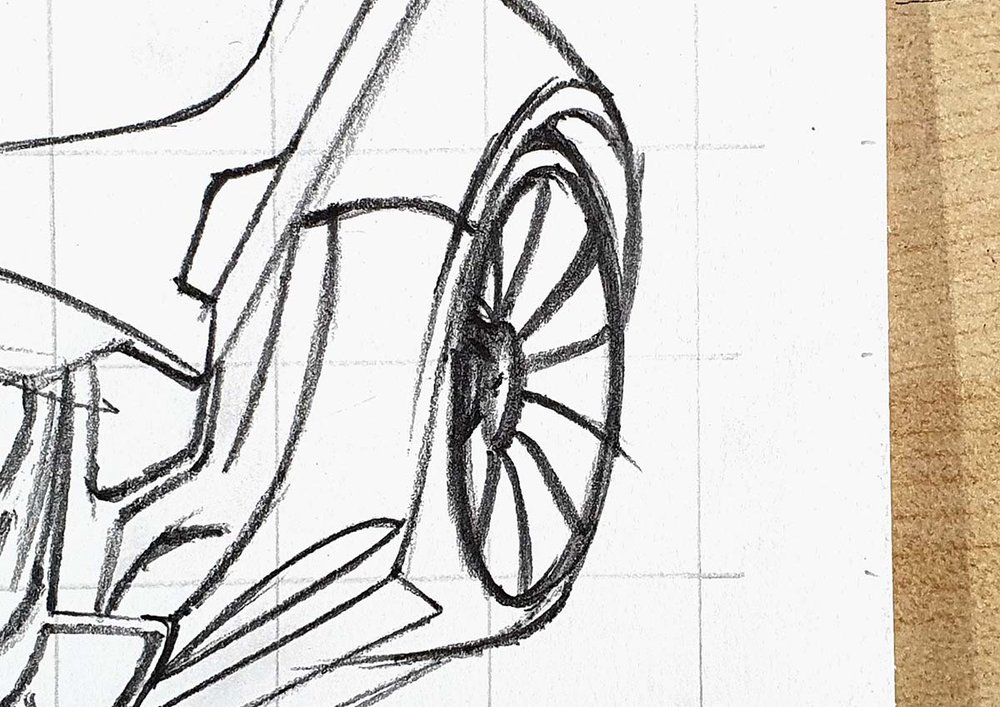
After that, I gave the spokes some dimension by adding a line above and to the left of the top spokes and a line below and to the left for the bottom spokes.
This line is also curved and starts further away from the first spoke line at the center, follows the curvature of the spoke, and ends closer to the line where the spoke attaches to the rim.
I also added an inset rim line just towards the left of the right side of the rim and curved it into the top and the bottom.
And that's the rear wheel all done.
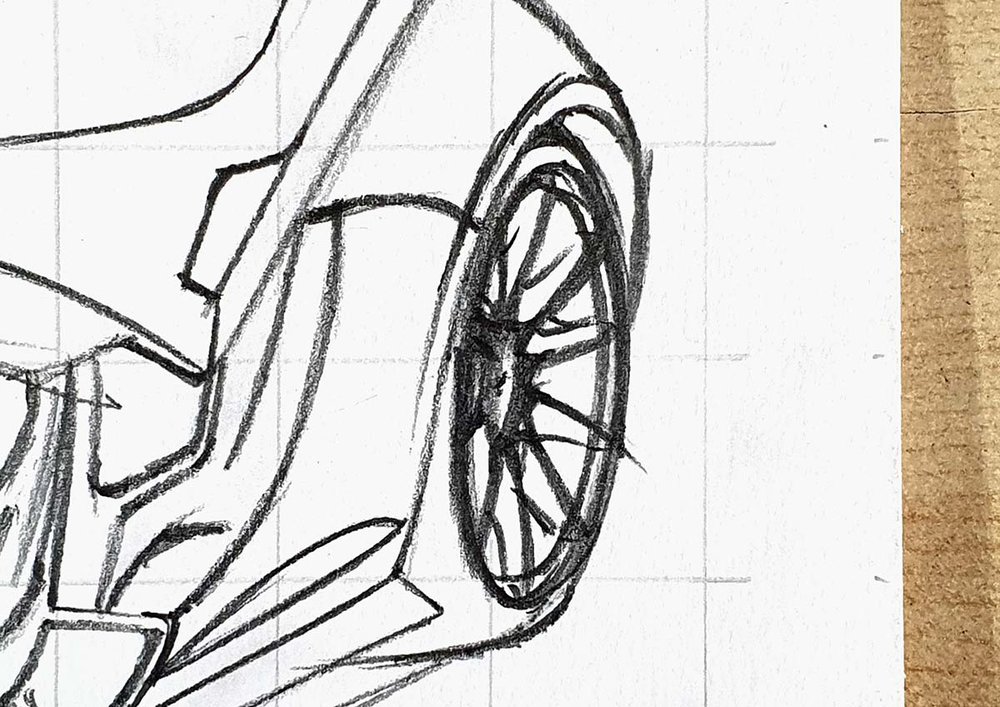
Now, just repeat these steps for the front wheel while carefully looking at the reference photo.

Step 6: Sketch the Reflections onto the McLaren P1
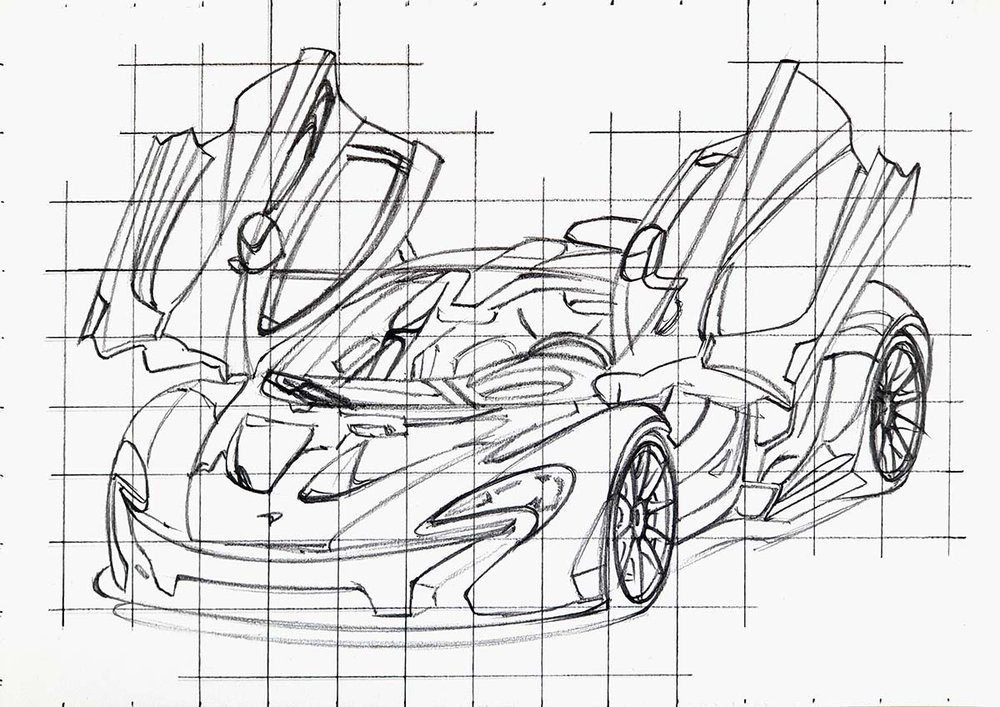
The last step of sketching the McLaren P1 outline is to sketch where the reflections are going to be. There weren't many reflections to sketch, but I still like to do it.
This is just as simple as looking at the reference photo for the reflections and sketching the lines and shapes you see on the car.
It doesn't have to be perfect as reflections can look millions of ways. But make sure they follow the curvature of the body of the car. This makes them look more realistic.
Step 7: Color All Pure Black Parts of the McLaren P1
Now that the sketch is done, it's time to start coloring.
I sometimes find it hard to start coloring. That's why I always start with coloring the easiest bits: all pure black parts.
I look at the reference photo, and where I see black, I color black using the Black (120) Ohuhu marker.

Step 8: Color the Wheels of the McLaren P1
After that, I like to color the wheels. They can look quite daunting, but luckily in this case, they're super easy. As we've already colored most of the wheels black.
I colored both wheels fully with Neutral Grey 07 (CG070). And that's it.

Step 9: Color the Front of the McLaren P1
Next up, I colored the front splitter and the thing above that.
I started by coloring the top edge of this part with Neutral Grey 03 (CG030).

After that, I colored the rest with Neutral Grey 05 (CG050).

And lastly, I used Neutral Grey 07 (CG070) to add the deeper grey tones to this part.
I colored the splitter but left a lighter edge. I also colored the bottom half of the thing above that, and I colored far most of it.

Step 10: Color the Headlights of the McLaren P1
Next, I drew the headlights.
I started by coloring the left headlight with Neutral Grey 02 (CG020).

Then, I used Neutral Grey 03 (CG030) to add some slightly darker grey to the left and the right side of that headlight, and I blended the right part into the lighter grey to the left by coloring over the edge of the 2 shades of grey with Neutral Grey 02 (CG020).

After that, I colored the right headlight. I started by coloring the whole thing with Neutral Grey 03 (CG030).

Then, I used Neutral Grey 05 (CG050) to add some deeper tones and details. I darkened the top swoosh shape and I created some rough details below it.

Lastly, I used Neutral Grey 07 (CG070) to color the darkest parts.

Step 11: Color the Grey Parts of the Doors of the McLaren P1
Next, I colored the grey parts of the doors.
I started by coloring the lightest part of the left door using Neutral Grey 03 (CG030), including the fin on the bottom left, the intake to the top left of the window, the left and top edge of the window, and some parts on the big grey piece on the door.

After that, I used Neutral Grey 05 (CG050) to color the remainder of the door except for the window.
I also darkened the top edge of the window and the bottom half of the fin on the right edge of the door.

Lastly, I used Neutral Grey 07 (CG070) to color the darkest parts. I colored the dark grey part above the window, the right edge of both parts of the bigger grey part of the door, and the top and the left edge of the side skirt.

Next, I colored the right door.
I first colored the lightest bits with Neutral Grey 05 (CG050).

Then, I used Neutral Grey 07 (CG070) to color the rest.

Lastly, I used Black (120) to add some line-shaped reflections on the big grey part of the door, and I colored the bottom part with Neutral Grey 07 (CG070). I also used Neutral Grey 02 (CG020) to color the window.

Step 12: Color the Tub and Side Intake of the McLaren P1
After that, I colored the side intake and the bit of the tub that is visible as the door is open.
I started by coloring everything with Neutral Grey 05 (CG050).

To finish it off, I used Neutral Grey 07 (CG070) to add some dark grey details to the side while leaving some edges lighter grey.

Step 13: Color the Windshield and the Roof of the McLaren P1
Next up, I colored the windshield. I first colored the lightest parts with Neutral Grey 02 (CG020). These are just a few places on the left of the window.

After that, I used Neutral Grey 03 (CG030) to color the second lightest parts, which are again mostly on the left side of the windshield.

Then, I used Neutral Grey 05 (CG050) to color the remainder of the windshield and the roof. I also added some reflections on the left side.

Lastly, I used Neutral Grey 07 (CG070) to add more reflections, mainly on the left and the right side of the window, and I used it to darken the roof.

Step 14: Color the McLaren Logo on the Front of the P1
The last thing on the car to color grey is the McLaren logo on the front.
I used Neutral Grey 03 (CG030) to color it.

Step 15: Color the Shadow Below the McLaren P1
After that, I colored the shadow underneath the P1.
I first colored the whole shadow Neutral Grey 03 (CG030).

Next, I used Neutral Grey 05 (CG050) to color in between the black and the light grey.

Lastly, I blended the different shades of grey to form a smooth gradient.
I first blended the black into the grey by coloring over the edge of the black and grey with Neutral Grey 07 (CG070).
Next, I used Neutral Grey 05 (CG050) to blend the Neutral Grey 07 (CG070) into the Neutral Grey 05 (CG050) by coloring over the edge where the 2 colors meet.
After that, I used Neutral Grey 03 (CG030) to blend the Neutral Grey 05 (CG050) into the Neutral Grey 03 (CG030) by going over the edge of the two greys.
Lastly, I used the colorless blender marker to blend the Neutral Grey 03 (CG030) into the white of the paper by going over the edge of the Neutral Grey 03 (CG030).

Step 16: Color the Main Body of the McLaren P1
Now it's finally time to color the main body of the car.
I started by coloring the whole body with Light Lavender (V250).

After that, I used Lobelia (V270) to add the reflections. I looked at the reference photo for the reflections and colored the parts that were darker.

Lastly, I used Gentian Violet (V320) to add the darkest shadows and reflections. I again looked at the reference photo and searched for the parts that were the darkest and colored those with this color.

Step 17: Add Details to the McLaren P1 Drawing
The McLaren P1 is now fully colored, but it's lacking details. That's where the colored pencils come in handy.
I used the white pencil to add a lot of highlights and light details all over the car: the wheels, the tub, the main body, etc.
I used the grey pencil to mainly add some corrections and medium highlights to the grey parts of the car.
Lastly, I used the black pencil to add some dark details like panel gaps.
Step 18: Add White Highlights to the McLaren P1 Drawing
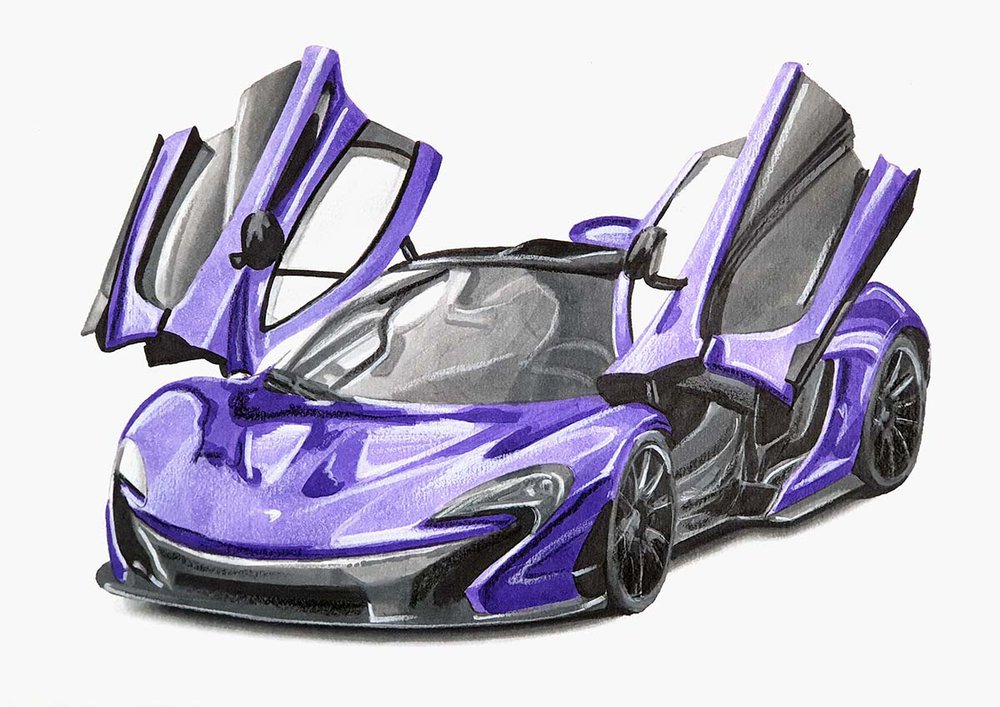
The drawing already looks quite good, but there is one simple thing that can make it look a lot better: pure white highlights.
I looked at the reference photo once more and searched for bright highlights and colored those using the white paint marker to make the drawing come to life.
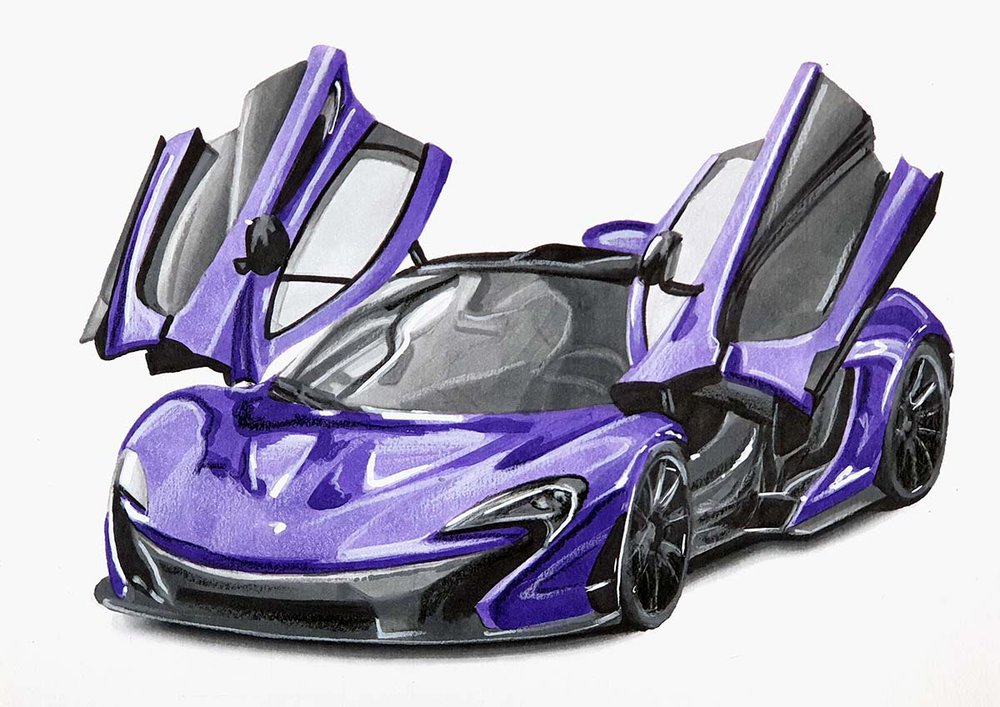
And That's How I Made This McLaren P1
I hope this was helpful to you!
Thank you for taking the time to read (and follow) this tutorial!
Leave a comment with what other cars you want me to make tutorials for!
My go-to alcohol markers for blending, rich color payoff, and amazing value. The brush tips feel super natural to draw with — a must-have for smooth gradients and realistic shading!
- Brush + chisel tips
- Great for beginners & advanced artists
- Budget-friendly alternative to Copics




Be the first to comment!
Comments
There are no comments yet.